11 869 läst ·
76 svar
12k läst
76 svar
Ngenic - Teardown

Kan själv!
· Trelleborg
· 19 624 inlägg
Är du en riktig människa?oakm skrev:
Yes, you can almost certainly read what's already on it.
You won't be able to plug it into your computer like a simple USB drive. Instead, you'll need to power it on and connect to the running operating system (which is likely Linux). The two primary methods for doing this are via a serial console or over the network (SSH).
Method 1: Serial Console (The Most Reliable First Step)
This is the recommended method because it works even if the networking is not configured, and it allows you to see all the boot-up messages, which are incredibly useful for diagnostics.
What You Will Need:
Steps:
- A 5V Power Supply: These boards typically run on 5V DC power. You must check the user manual for the specific carrier board or development kit to confirm the voltage and connector type.
- USB-to-TTL Serial Adapter: A crucial tool for embedded development. Common and inexpensive models are based on chips like FTDI FT232RL or CP2102.
- Jumper Wires: To connect the adapter to the board.
- Software: A terminal emulator program like PuTTY (for Windows) or minicom/screen (on macOS/Linux).
- Find the Serial Port Pins: This is the most critical step. You must consult the user manual for the board to identify the correct pins for the debug UART/serial console. Look for pins labeled TX (Transmit), RX (Receive), and GND (Ground). Connecting to the wrong pins could damage the board.
- Connect the Adapter:
- Connect the GND pin on your adapter to the GND pin on the board.
- Connect the TX pin on your adapter to the RX pin on the board.
- Connect the RX pin on your adapter to the TX pin on the board.(Note: The TX/RX lines are crossed because what one device transmits, the other receives).
- Configure Your Terminal:
- Plug the USB adapter into your computer and open your terminal program.
- Find the correct COM port (on Windows) or device file (e.g., /dev/ttyUSB0 on Linux) for your adapter.
- Set the connection parameters. A very common setting for these boards is:
- Baud Rate: 115200
- Data Bits: 8
- Parity: None
- Stop Bits: 1
- Flow Control: None
- Power On and Watch:
- Open the connection in your terminal program.
- Apply power to the MYIR board.
- If successful, you will see text scroll by in your terminal. This is the bootloader (likely U-Boot) followed by the Linux kernel booting up.
- At the end of the process, you will likely be presented with a login prompt.
Method 2: Network Connection (SSH)
If the pre-installed software is configured to connect to a network automatically, this can be simpler.
What You Will Need:
Steps:
- A 5V Power Supply
- An Ethernet Cable
- A Network Router/Switch
- Connect the Hardware: Plug the Ethernet cable from the board into your router.
- Power On the Board: Let it boot up completely (give it a minute or two).
- Find the Board's IP Address:
- The easiest way is to log in to your router's administration page and look at the list of connected DHCP clients. Look for a new device, possibly with a hostname like "myir" or "imx6ull".
- Alternatively, you can use a network scanning tool on your computer or phone (like nmap on PC or the "Fing" app on mobile) to scan your local network for new devices.
- Connect with SSH:
- Open a command prompt or terminal on your computer.
- Use the SSH command to connect. You will need the username and IP address. Common default usernames are root or admin.
- Example: ssh [email protected] (replace with the correct IP).
- It will likely ask for a password. Common defaults are root, admin, or sometimes it's left blank. Again, the manual is the best source for this.
What to Do Once You're In
Once you have a command-line prompt, you can explore the system with standard Linux commands:
By exploring the filesystem and running processes, you can reverse-engineer how the original gateway software was built and what it does.
- ls -la: List files and directories in the current location.
- cd /: Change to the root directory.
- cat /etc/os-release: See what Linux distribution is installed.
- ps aux: See all the processes that are currently running. This is a great way to find the main "gateway" application.
- top or htop: See real-time system resource usage (CPU, RAM).
- dmesg: Read the kernel's message buffer, useful for seeing hardware detection info.
Om ja, har du läst reglerna som du borde sett när du reggade dig?
Kan själv!
· Trelleborg
· 19 624 inlägg
Kan själv!
· Trelleborg
· 19 624 inlägg
Kan själv!
· Trelleborg
· 19 624 inlägg
Programmering sker nog via kortkantskontakten ja.Gareth skrev:
Jag använder Discord, men har sedan trådens start kommit till insikt att jag inte kommer lägga ner någon nämnvärd tid på detta tyvärr.Etnoy skrev:
Om de inte kör cert pinning kan detta bli jätteenkelt, vi får väl hoppas
")
Eller snarare, kör de inte cert pinning är det nästan ett säkerhetshål som drabbar alla användare...
Kan själv!
· Trelleborg
· 19 624 inlägg
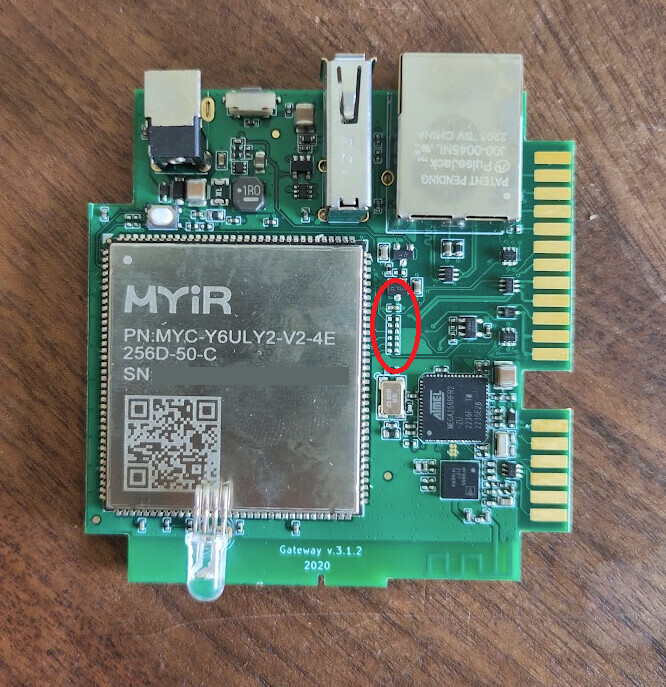
Jag skulle inte lita på det, kan vara för att konfigurera CPU.
Har inte hunnit lägga så mycket tid på det, får inte riktigt grepp vad de anslutna pinnarna är.
Schema finns här:
https://www.myirtech.com/download/NXP/myb-y6ulx_sch.pdf
Kan själv!
· Trelleborg
· 19 624 inlägg

Min input här, är att som det skrivits om. Försöka först och främst DNS styra Gatewayen till hack. Skicka lite kod som ger access. Läsa av.
Fungerar inte det så UART/JTAG. Att pausa en boot behöver man hitta rätt pin att jorda under boot.
Fungerar inte det så UART/JTAG. Att pausa en boot behöver man hitta rätt pin att jorda under boot.