Hej!
Jag flyttade nyligen till Sverige från Nederländerna så min svenska är inte tillräckligt bra ännu. Jag kommer att fortsätta på engelska, hoppas det är ok. Du kan svara på svenska, eftersom läsningen går bra.
We are renovating the living room and removed wallpaper from plasterboards to paint everything.
The previous owners used different kind of wallpapers in different areas. Really glad that 75% of the wallpapers came off without any issues or any damage to the plasterboards behind it, except some left over glue which can be removed easily.
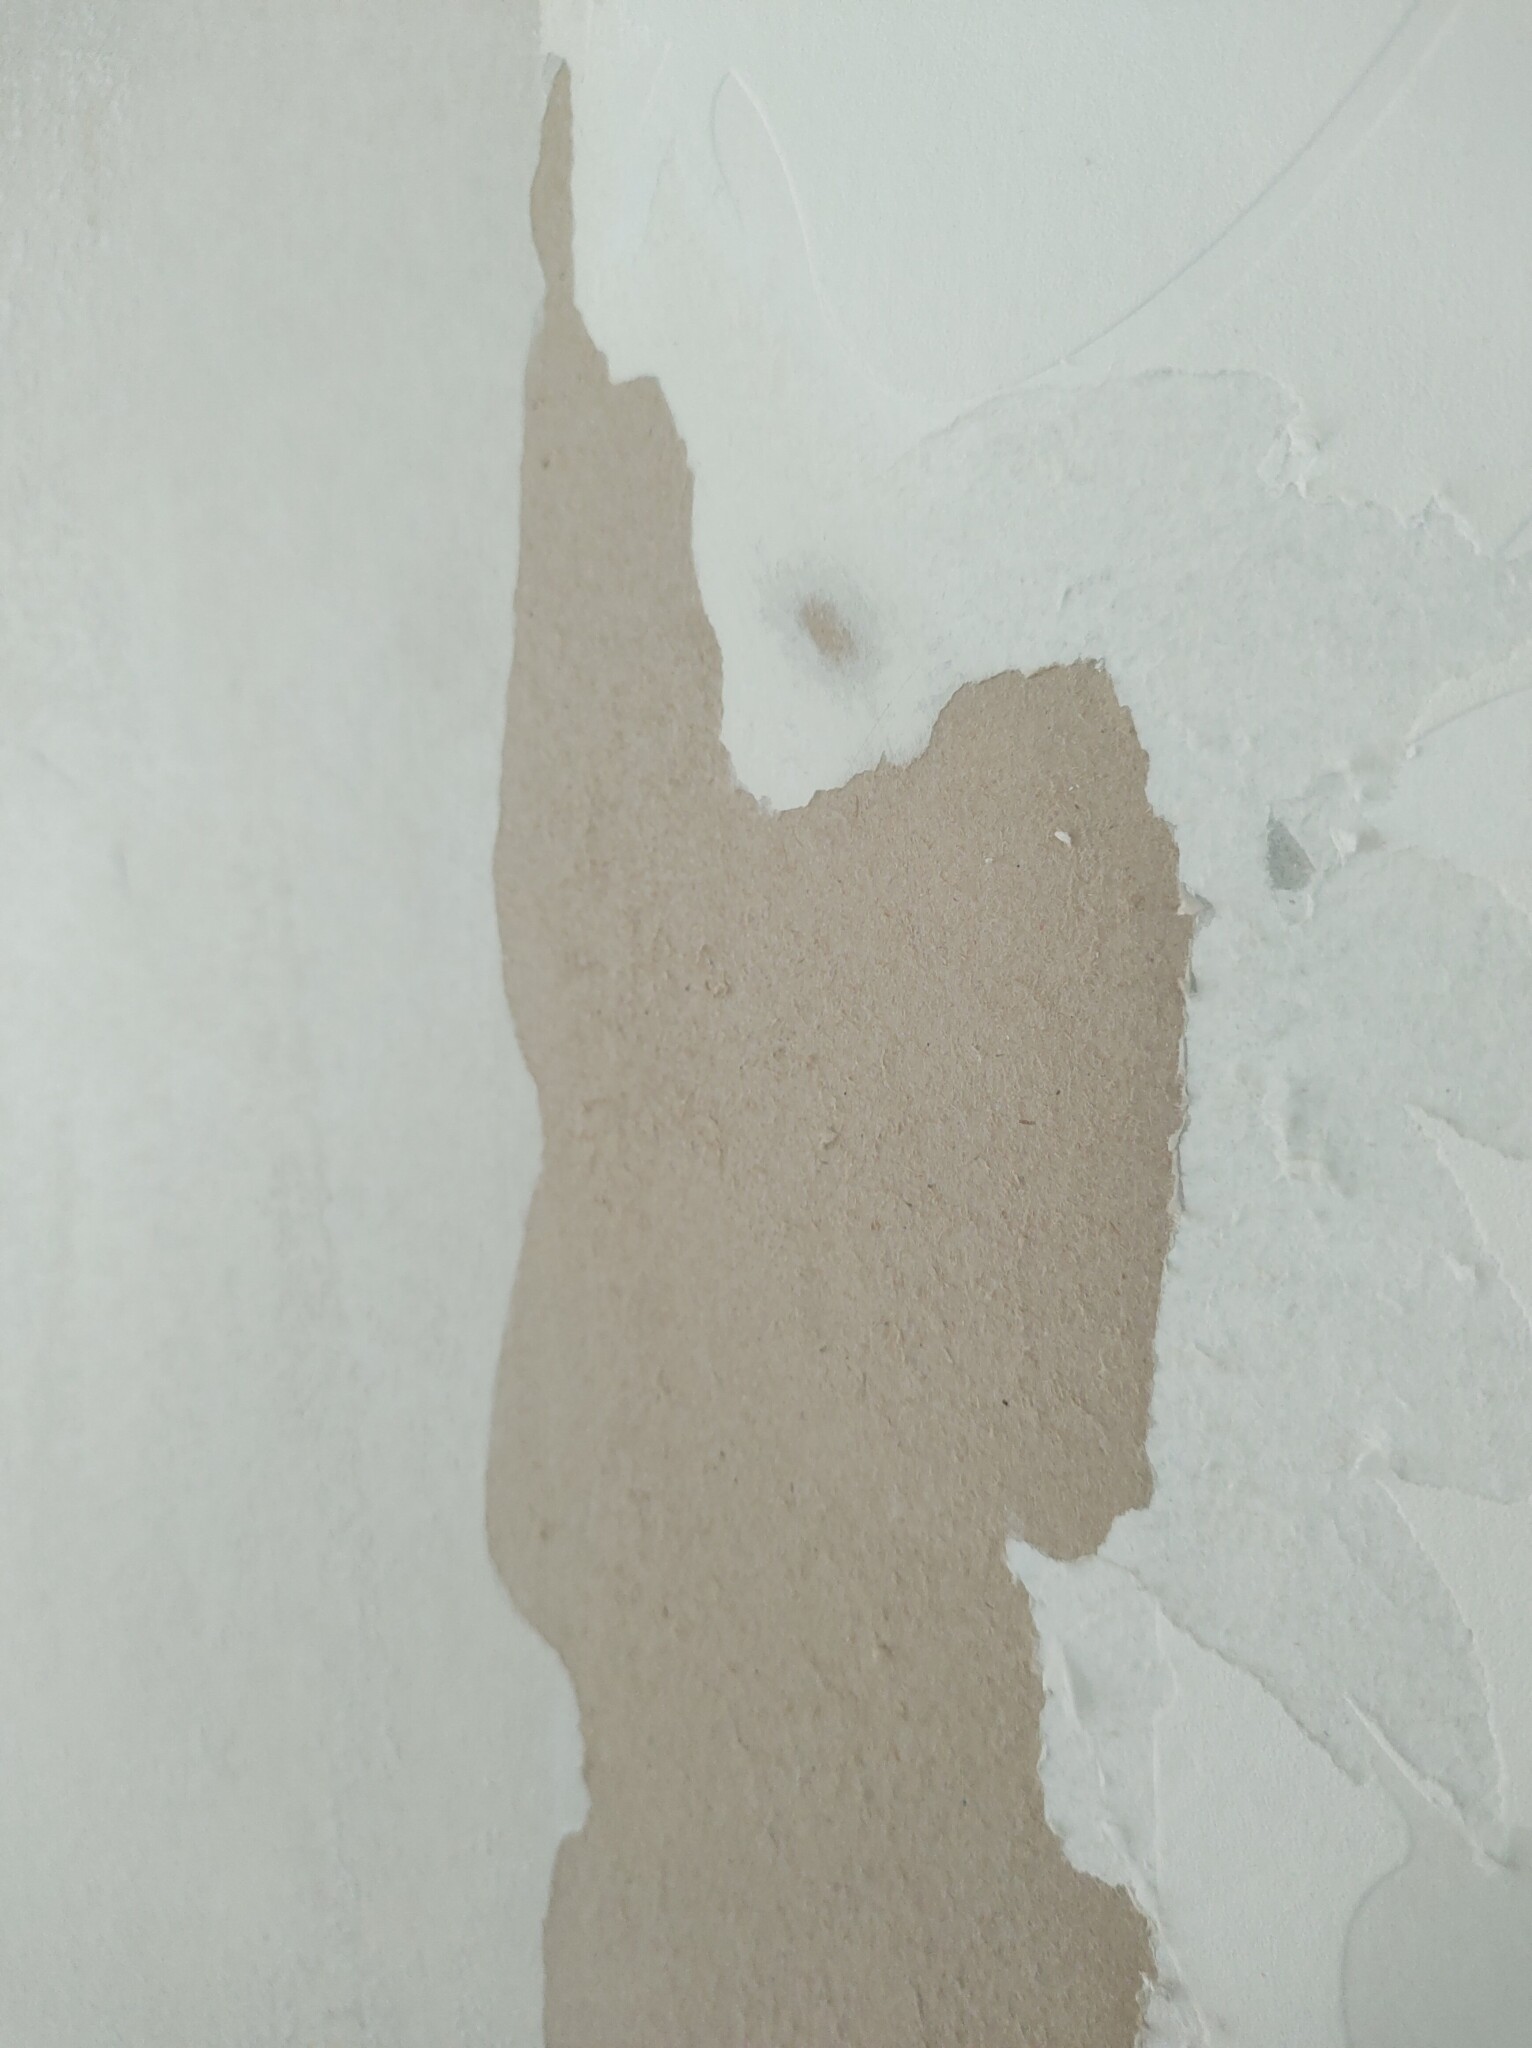
There is a different kind of wallpaper in the kitchen and we just started removing this, but it also takes away the face paper (the upper 1mm of the plasterboard). See picture (left is plasterboard with the face paper still on it, in the middle its gone after removing the wallpaper and to the right it is the problem wallpaper which doesn't come off properly.
I have a few questions about about how proceed
1) Any tips on how to remove the rest of the wallpaper without damaging the plasterboard?
2) How to repair the damaged area? It is not deep, just really not even 1mm.
3) What primer to use on the plasterboard before painting? Is it ok to just use Beckers Primer and then Beckers Living?
Tack så mycket och så ledsen för att jag inte skriver på svenska. Jag pluggar!
Jag flyttade nyligen till Sverige från Nederländerna så min svenska är inte tillräckligt bra ännu. Jag kommer att fortsätta på engelska, hoppas det är ok. Du kan svara på svenska, eftersom läsningen går bra.
We are renovating the living room and removed wallpaper from plasterboards to paint everything.
The previous owners used different kind of wallpapers in different areas. Really glad that 75% of the wallpapers came off without any issues or any damage to the plasterboards behind it, except some left over glue which can be removed easily.
There is a different kind of wallpaper in the kitchen and we just started removing this, but it also takes away the face paper (the upper 1mm of the plasterboard). See picture (left is plasterboard with the face paper still on it, in the middle its gone after removing the wallpaper and to the right it is the problem wallpaper which doesn't come off properly.
I have a few questions about about how proceed
1) Any tips on how to remove the rest of the wallpaper without damaging the plasterboard?
2) How to repair the damaged area? It is not deep, just really not even 1mm.
3) What primer to use on the plasterboard before painting? Is it ok to just use Beckers Primer and then Beckers Living?
Tack så mycket och så ledsen för att jag inte skriver på svenska. Jag pluggar!
The term you are looking for is "bredspackling" if you are looking to smooth out larger areas. Takes a bit of skill, but you should be able to get a hang of it. The tools and materials are not super expensive and in my experience the cheap stuff works good enough. This guy demonstrates it well.
Most likely no, you will not be able to remove the rest without damaging the plaster since the damage is caused (most likely) by the wallpaper being put up with a stronger glue.
Some tips: Seal off the room you are doing this in because after the paste dries you will sand it down and possibly even out again with a new layer that requires more sanding.
Protip: use a proper mask (P3 class) when sanding because it is a very fine mineral dust that wrecks your lungs. Also do not use your regular vacuum cleaner when cleaning up after sanding! The dust is incredibly fine and will pass through the filter and damage the motor.
The best investment I made as a homeowner was a high quality vacuum with HEPA filter and filter bags. I have the Kärcher WD6, the only drawback is it is sort of big and clunky when you just want it out for a smaller job.
Lycka till!
Thank you for the quick reply.torparavgrund skrev:
The term you are looking for is "bredspackling" if you are looking to smooth out larger areas. Takes a bit of skill, but you should be able to get a hang of it. The tools and materials are not super expensive and in my experience the cheap stuff works good enough. This guy demonstrates it well. [media]
Most likely no, you will not be able to remove the rest without damaging the plaster since the damage is caused (most likely) by the wallpaper being put up with a stronger glue.
Some tips: Seal off the room you are doing this in because after the paste dries you will sand it down and possibly even out again with a new layer that requires more sanding.
Protip: use a proper mask (P3 class) when sanding because it is a very fine mineral dust that wrecks your lungs. Also do not use your regular vacuum cleaner when cleaning up after sanding! The dust is incredibly fine and will pass through the filter and damage the motor.
The best investment I made as a homeowner was a high quality vacuum with HEPA filter and filter bags. I have the Kärcher WD6, the only drawback is it is sort of big and clunky when you just want it out for a smaller job.
Lycka till!
Do I need to seal the damaged area with anything? I am reading so many different "stories" about it. Like using a shellac based primer to avoid any bubbles forming under the mud.
Any tips on which "spackel" to use?
I got a nice WD too, so no problem there. Love those things.
Also want to add you can add new layer of plasterboard on top instead. Use renoveringsgips, it is a 6mm board that is quite hard. However this would mean removing all the trim, crown moulding and baseboard and readjusting them to length, so very much depending on the circumstances if that is actually less work. It would also almost definitely cost more, especially if you accidentally break any trim while removing it. https://www.byggmax.se/gipsskiva-ytskiva-p07008
Hm, no did not think about that, but will consider it. The annoying part is that the rest of the area is perfectly fine. If we put up "renoveringsgips" we will have to do the whole living room, which will probably end up costing more both in time and money.S sturnus skrev:
Annoying part is that it is an open floor plan. So the whole kitchen and living room of approximately 50m2 is connected. Going to be a pain either way ....
You can do only selected walls, you don't have to do the whole living room. Even if all the walls require it, I think you will do it faster with renovation boards. Filling large surfaces to make them look good requires experience, and not a little. Besides, you don't have to dismantle the strips. They are 12-15 mm thick, the board is 6 mm, so if you accept it, the strips will protrude less from the face of the wall.E Evenstar skrev:Hm, no did not think about that, but will consider it. The annoying part is that the rest of the area is perfectly fine. If we put up "renoveringsgips" we will have to do the whole living room, which will probably end up costing more both in time and money.
Annoying part is that it is an open floor plan. So the whole kitchen and living room of approximately 50m2 is connected. Going to be a pain either way ....
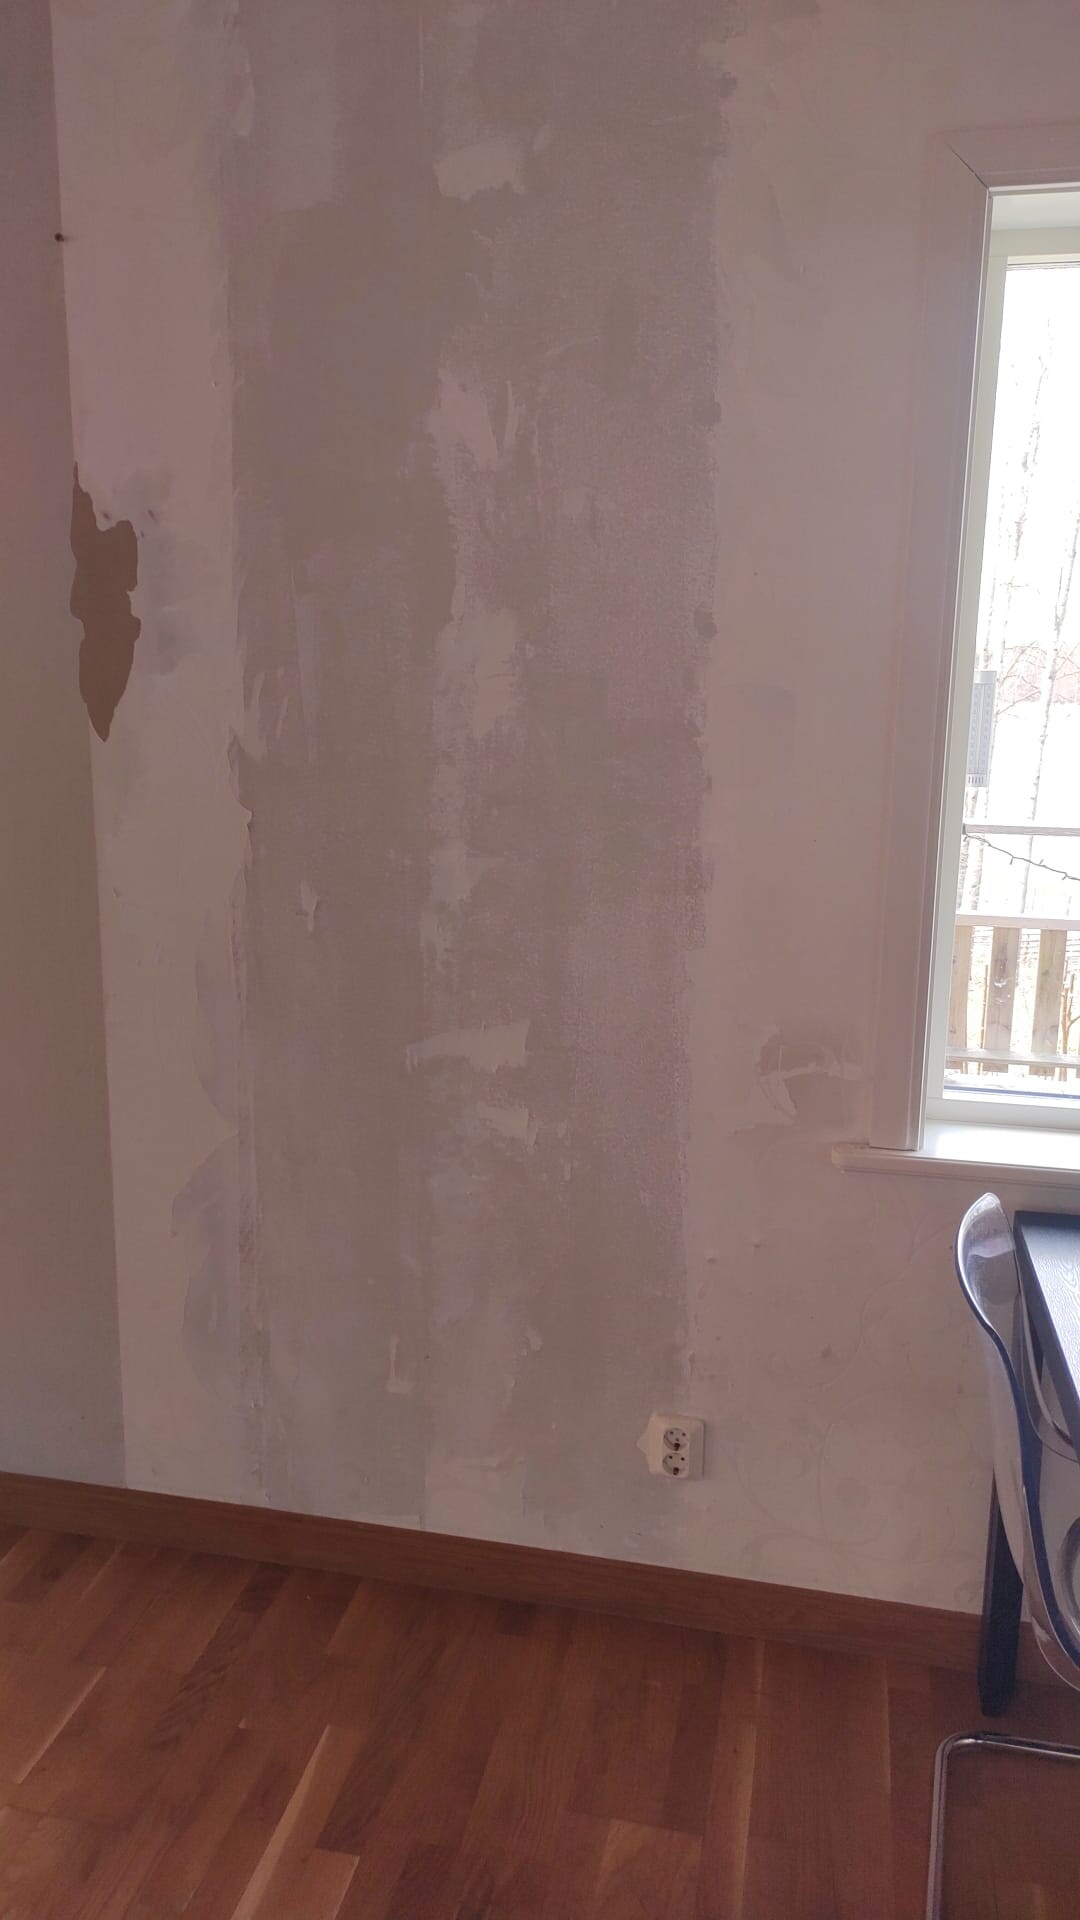
I just proceded, a bit more carefully with the removal of the wallpaper. It looks liked it is glued really well near the studs, but the rest seems fine and came off pretty clean mostly.
So I hopefully can get away by just repairing this spot only.
Do I need any kind of sealer to avoid bubbles under the "mud" because the outer protective layer of the plasterboard is gone?
And, for the parts that are not damaged. Can I just scrap of the glue residue carefully, make it 100% dustr free and then use something like Beckers Primer or do I need something special before the primer?
Tack så mycket för hjälpen och glad påsk alla
Quick update, also for other that might run into same issues.
This is what I did:
1) Remove wallpaper
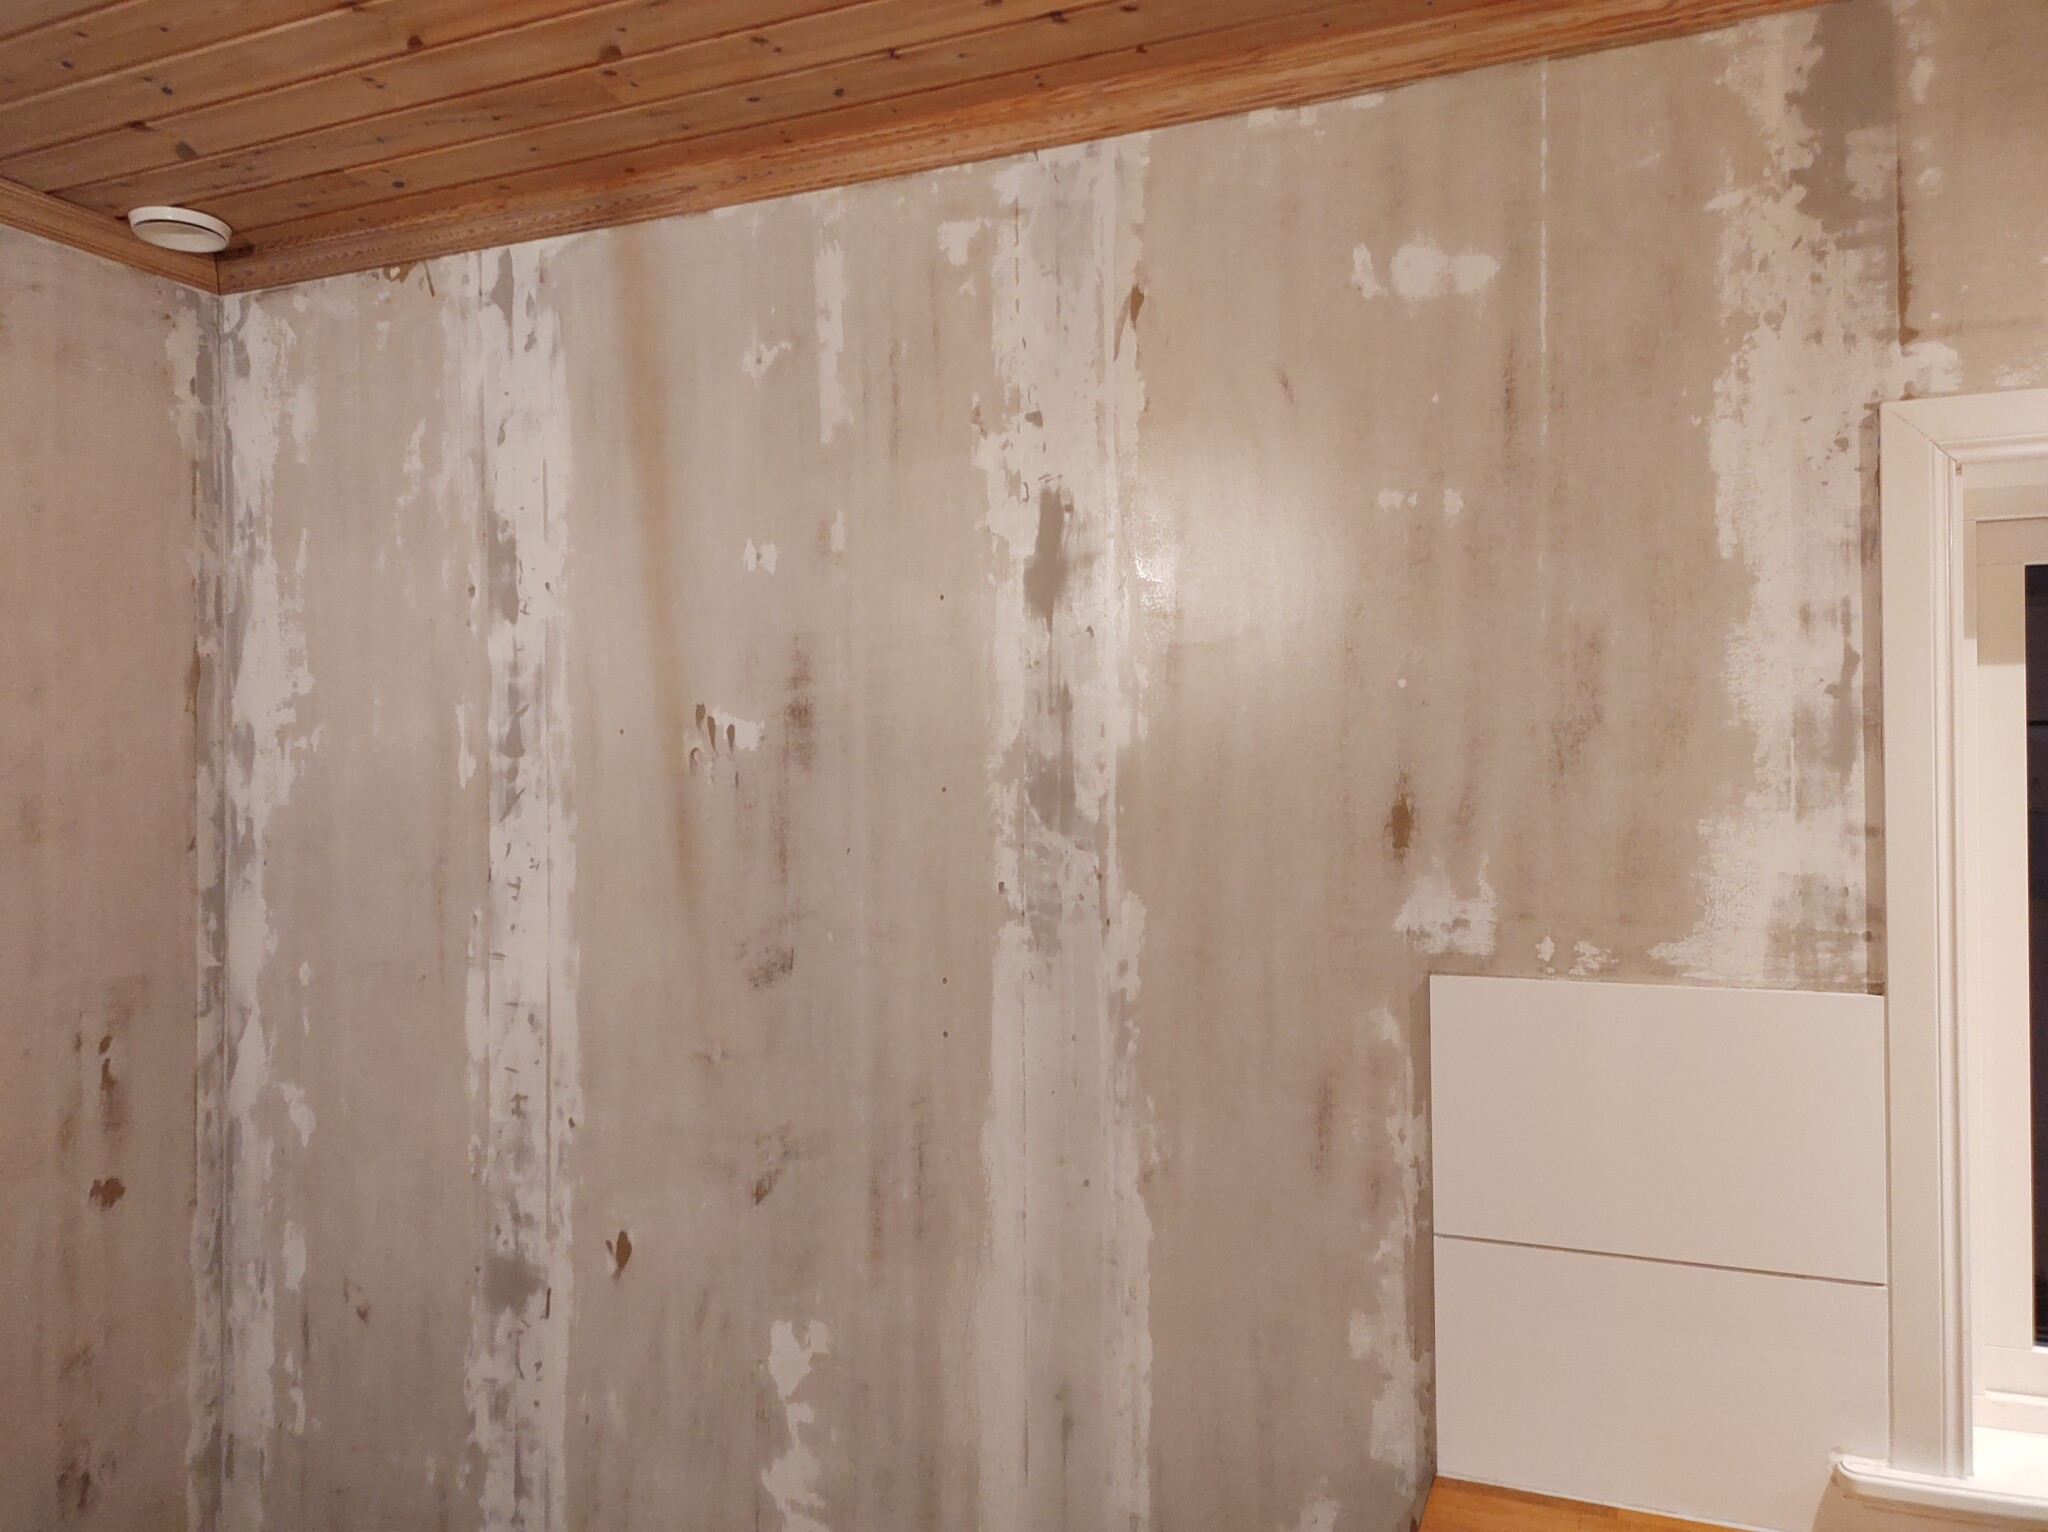
2) Use Zinsser Gardz on all walls, damaged or undamaged. I sealed it all with Zinsser Gardz.
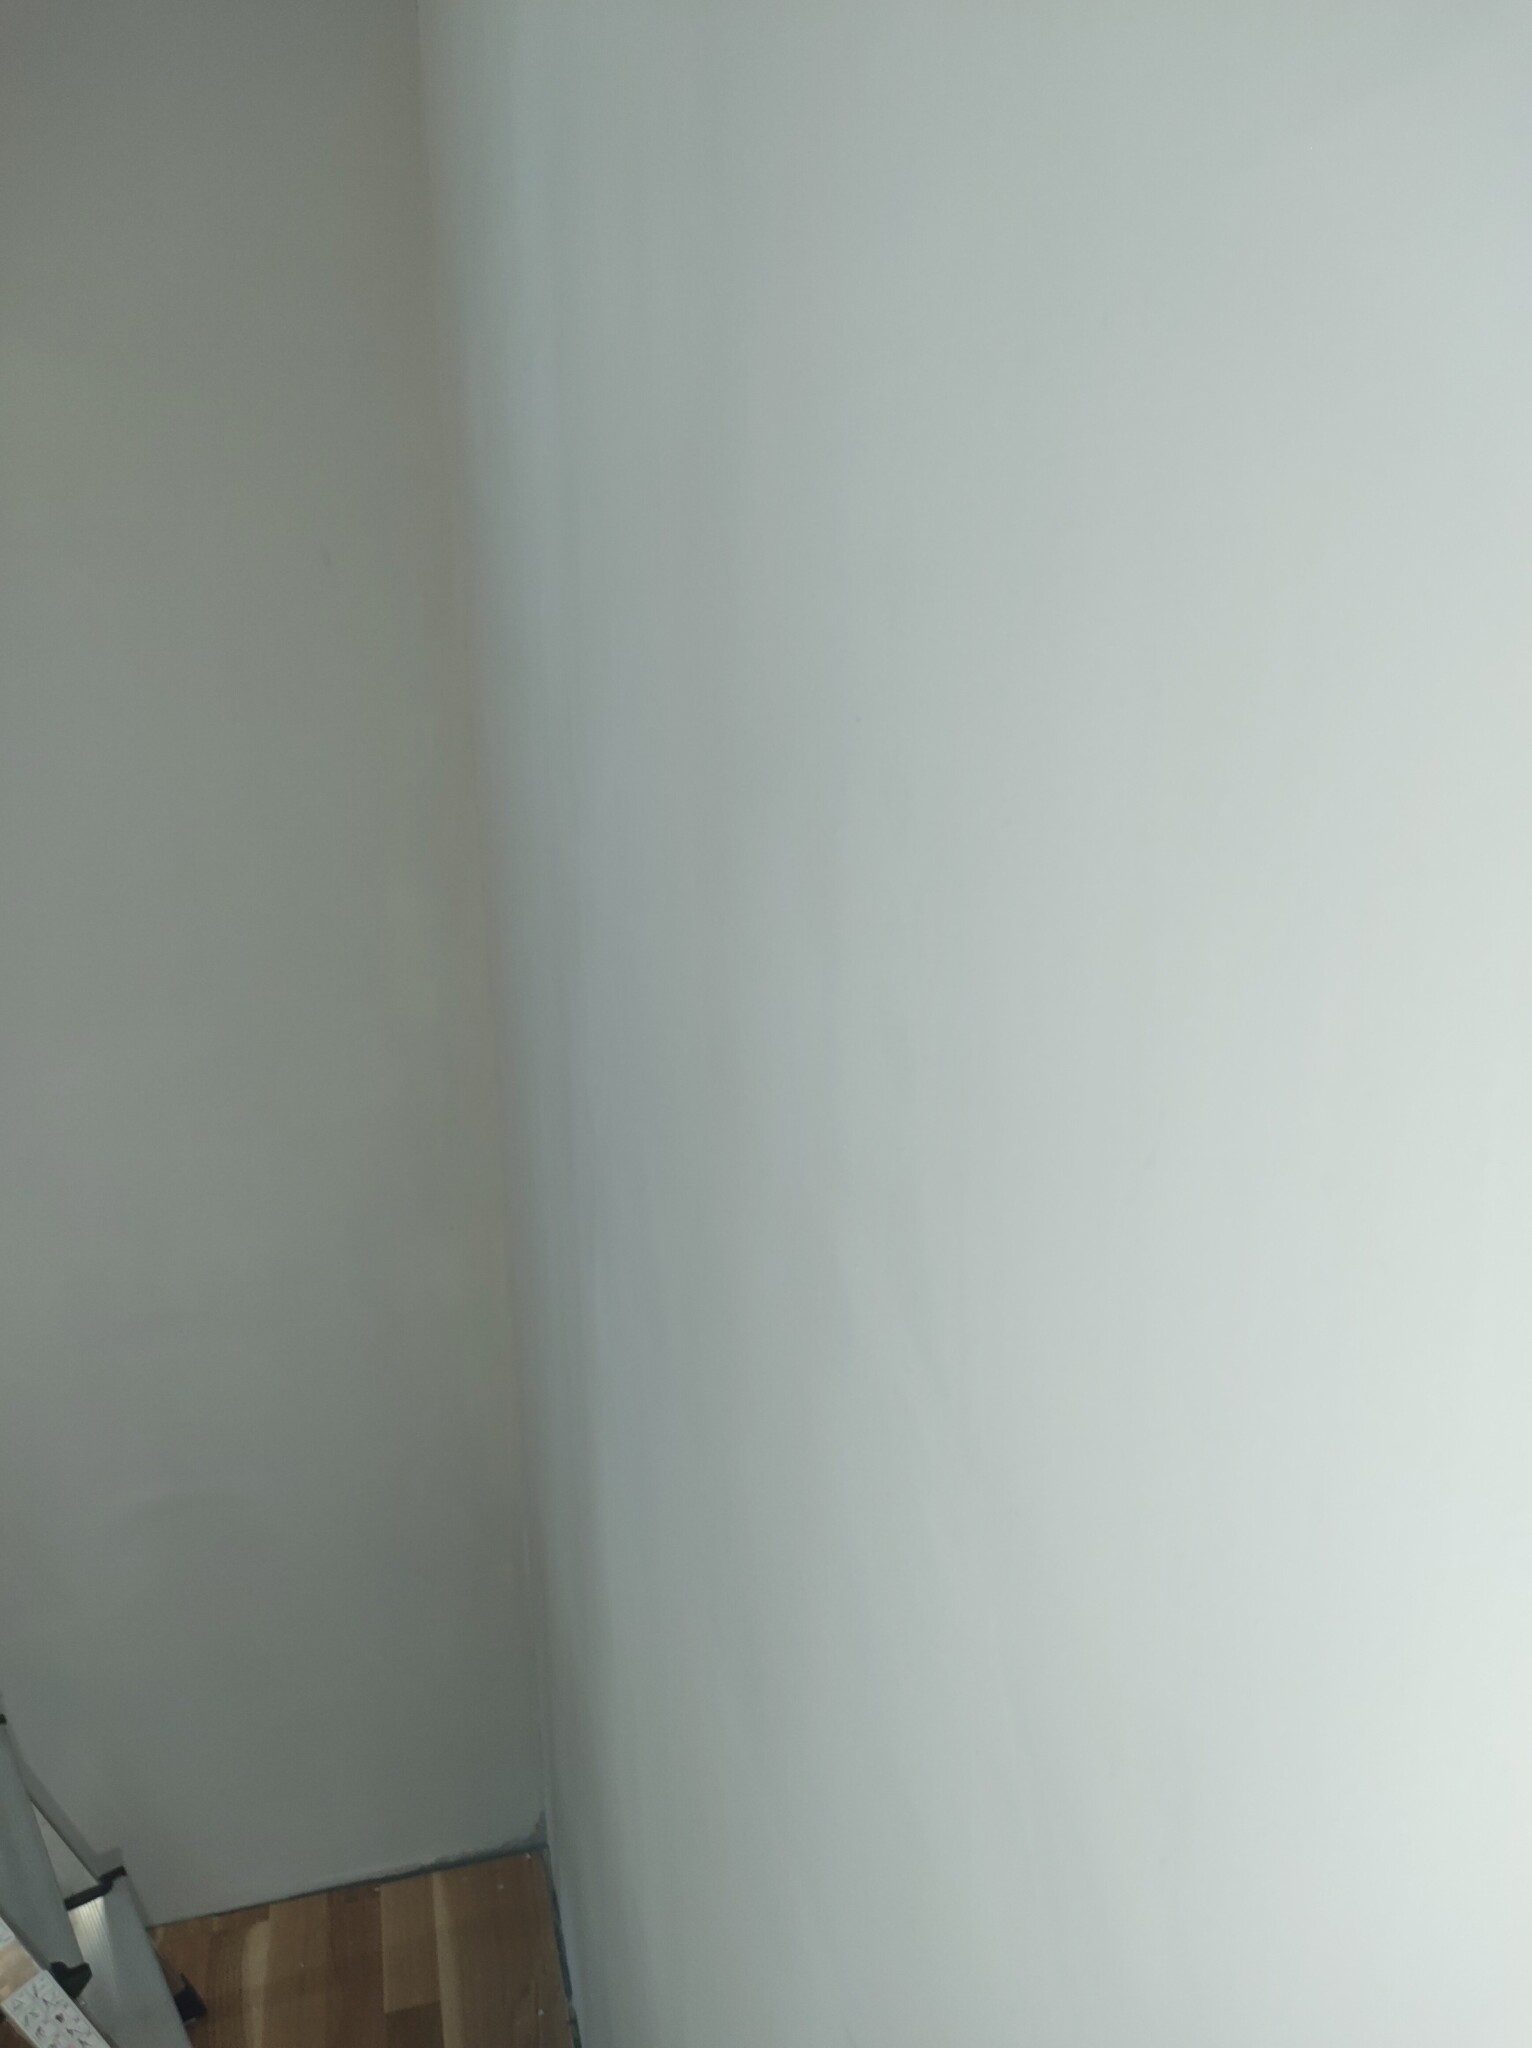
3) Skim coated with Jotun Rullsparkel, three layers.
4) Manual sanding with Mirka Abranet (thanks to tips here on Byggahus).
Result is a pretty smoot wall! Thank you")
Picture 1: After removing wallpaper and using Zinsser Gardz
Picture 2: After skim coating and sanding
Thank you all for the help!
This is what I did:
1) Remove wallpaper
2) Use Zinsser Gardz on all walls, damaged or undamaged. I sealed it all with Zinsser Gardz.
3) Skim coated with Jotun Rullsparkel, three layers.
4) Manual sanding with Mirka Abranet (thanks to tips here on Byggahus).
Result is a pretty smoot wall! Thank you
Picture 1: After removing wallpaper and using Zinsser Gardz
Picture 2: After skim coating and sanding
Thank you all for the help!
Klicka här för att svara