Hi,
This is for our international members") . Since I fitted a true riving knife to my Wadkin AGS10 saw there has been some interest both locally in sweden and from woodworkers abroad. So, since I already made this instruction in pm for a member at the ukworkshop forum it's mainly a matter of copy pasting.
. Since I fitted a true riving knife to my Wadkin AGS10 saw there has been some interest both locally in sweden and from woodworkers abroad. So, since I already made this instruction in pm for a member at the ukworkshop forum it's mainly a matter of copy pasting.
I did quite extensive research on the true riving knife concept before I started modyfying my saw. In my world the definition of a true riving knife is a one that follows the movement of the blade and keep the distance to the blade constant at all blade heights. Also the top of the knife should stay parallell to the top of the saw during the movement.
The two concepts I found on the net are the ones in the links below.
concept1 http://www.sawmillcreek.org/showthread.php?133210-Delta-34-350-12-14-quot-riving-knife-retrofit&
and concept2 http://thewoodenscrew.blogspot.se/2011/10/well-its-finally-done.html
Due to several reasons the solution that fit the AGS10 bets was the one in the second link.
So, what we are after is this mechanism and I will do my best do describe the work process
FYI, all my parts (except for the guide pins) are made from aluminium, if you have possibility to machine steel that would give you a better construction, you could make the parts thinner and avoid some work. You could probably more or less copy the bearing solution in concept2 link.
Complete 3D of the imortant parts can be found here https://drive.google.com/drive/u/0/folders/0B0TTat3l4tx-cDFFOGptclREbkU
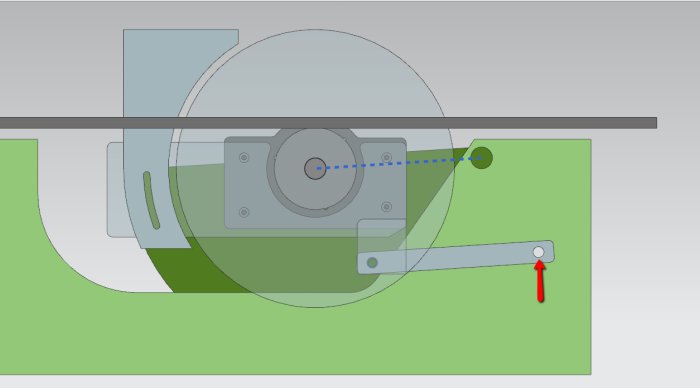
To start with, the principle is a parallelogram with a rotating axial bearing in the center of the arbour, refer to picture below. So, the principle is that the riving knife plate rotates around blade axis center, and the bar screwed to the chassi makes sure the top of the knife stays parallel to the saw top. The length of the bar matches the distance between the pin around which the swing arm rotates and the blade (blue dot line).
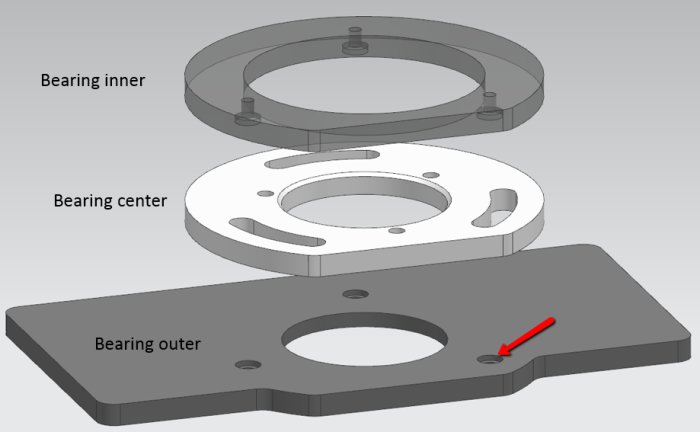
Below pic is the heart of the function, the axial bearing. These 3 parts needs to be very accurately machined. In the slots there are guide pins (seen in pic 3). The center bearing is screwed onto the front of the arbour housing (threaded directly into it, I think I used M4. Then nuts on backside to counterlock the screws). Inner and outer bearing rotates around the center bearing.
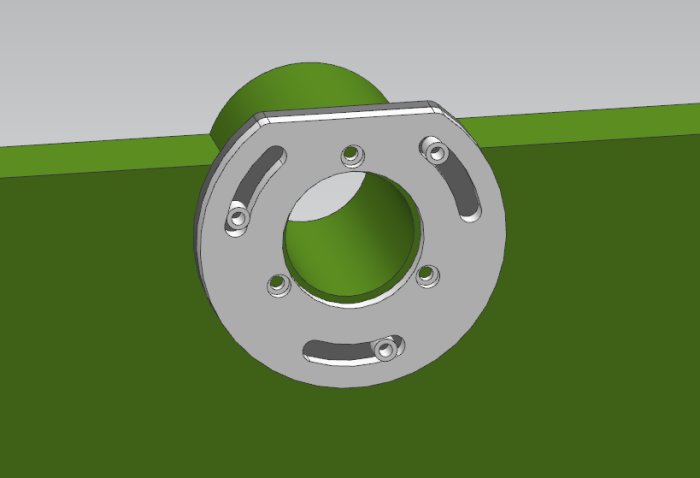
Center bearing is as said, screwed onto front of arbour (you need inner bearing to be in place when you finally assemble it). Top flat surface on center bearing should be parallel to flat surface on swing arm.To make the knife parallel to the blade, front arbour house surface needs to be parallel to the blade. I used a file to get the surface parallel and checked it with the arbour flange (?, the big steel thing right behind the blade). Centerbearing should preferable be concentric to hole in arbour housing.

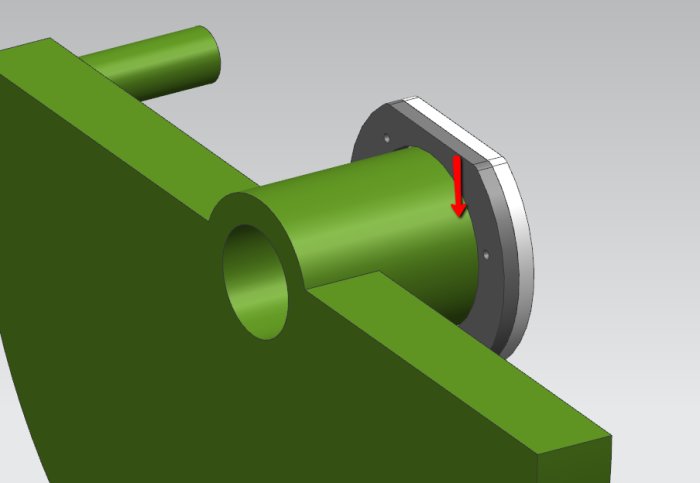
Guide pins shown, I made these on my metal lathe, in POM plastic for low friction. These should be a few hundred of mm longer than nominal distance between bearing parts to allow movement. Pins are flat sunk in both inner and outer bearing for guidance.
To fit the inner bearing some material needs to be removed from arbour housing. The housing is not concentric. I used a file for this as well.
Heart of mechanism in place and now you here https://www.byggahus.se/forum/threa...och-maskiner-idag.250889/page-19#post-2338695. You see I have some brown sheets between the parts, that is taped on low friction material (I think PTFE) to avoid aluminium against aluminium rubbing.
Following pics is what is needed in terms of modifications to give the bearing room. You need to remove some material from the saw to make room for the bearing in the lower position. I used an angle grinder with colour removal disc.
Entire top needs to be shifted slightly to the right (no machining work and this is very small move, dont remember but I loosened the bolts and slightly moved the top).
I made a recess in my zero clearance insert to make room for the bearing in the top position. (not much needs to be removed).
This is the tricky one and the main reason for why you should try to use thinner plates in the bearing construction. Arbour flange needs some axial clearance to the outer bearing plate. That means pushing the arbour towards the blade side. But, pushing it out long enough means the arbour bearing closest to the blade ends up half way outside the housing. So, I removed approx. 5mm from the distance cylinder that sits between the bearings, material was removed from blade side. Then I added approx. 5mm thick turned distance cylinder between bearing nearest blade and the arbour flange. This moves the entire ball bearing and distance cylinder towards the non blade side so both bearings fits inside housing.
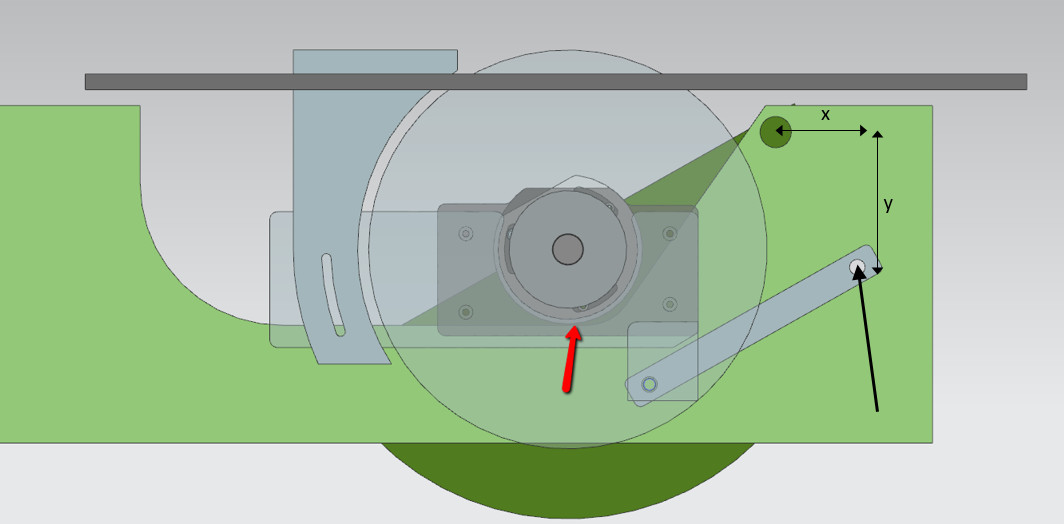
This hole (black arrow) needs to be at the correct position in both x and y, in relation to the swingarm pin center. Take the dimension from 3D file.

Rest is easy, the big plate the riving knife sits on doesnt need to be very accurate (but the hole position for the bar needs to be connected at the right position). The connection bar (or rather the hole positions) needs to match distance between swing arm rotation point and blade center axis. Follow the 3d for C-C dimension between the holes.
Riving knife sits on its own plate, 2 turned cylinders for guiding and bolt between them. I use dewalt knife and blade guard, they are extremely cheap (around 10£ for both knife and guard).

Hope you understood most of it, I used my own words for a few parts I don't know the name of. Swing arm and arbour housing is the same part I just called them by different name if I referred to what's close to the arbour vs the entire part.
This is a major modification and you need to tear down the entire saw, but its doable
This is for our international members
. Since I fitted a true riving knife to my Wadkin AGS10 saw there has been some interest both locally in sweden and from woodworkers abroad. So, since I already made this instruction in pm for a member at the ukworkshop forum it's mainly a matter of copy pasting.I did quite extensive research on the true riving knife concept before I started modyfying my saw. In my world the definition of a true riving knife is a one that follows the movement of the blade and keep the distance to the blade constant at all blade heights. Also the top of the knife should stay parallell to the top of the saw during the movement.
The two concepts I found on the net are the ones in the links below.
concept1 http://www.sawmillcreek.org/showthread.php?133210-Delta-34-350-12-14-quot-riving-knife-retrofit&
and concept2 http://thewoodenscrew.blogspot.se/2011/10/well-its-finally-done.html
Due to several reasons the solution that fit the AGS10 bets was the one in the second link.
So, what we are after is this mechanism and I will do my best do describe the work process
FYI, all my parts (except for the guide pins) are made from aluminium, if you have possibility to machine steel that would give you a better construction, you could make the parts thinner and avoid some work. You could probably more or less copy the bearing solution in concept2 link.
Complete 3D of the imortant parts can be found here https://drive.google.com/drive/u/0/folders/0B0TTat3l4tx-cDFFOGptclREbkU
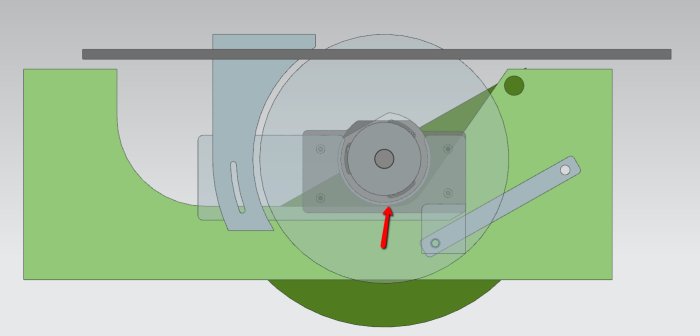
To start with, the principle is a parallelogram with a rotating axial bearing in the center of the arbour, refer to picture below. So, the principle is that the riving knife plate rotates around blade axis center, and the bar screwed to the chassi makes sure the top of the knife stays parallel to the saw top. The length of the bar matches the distance between the pin around which the swing arm rotates and the blade (blue dot line).

Inloggade ser högupplösta bilder
Logga in
Skapa konto
Gratis och tar endast 30 sekunder
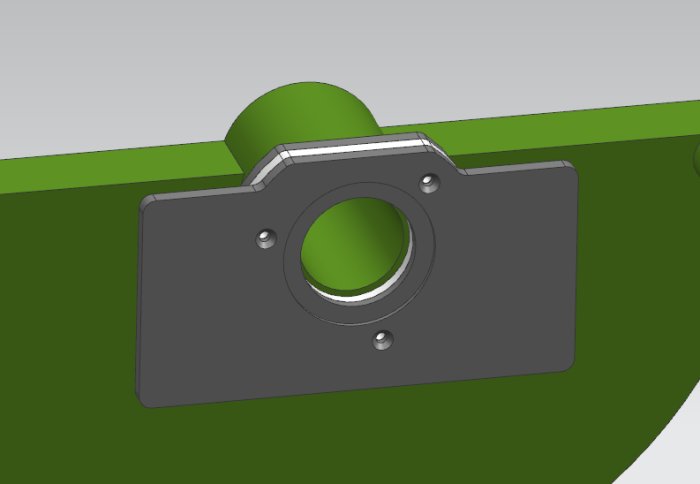
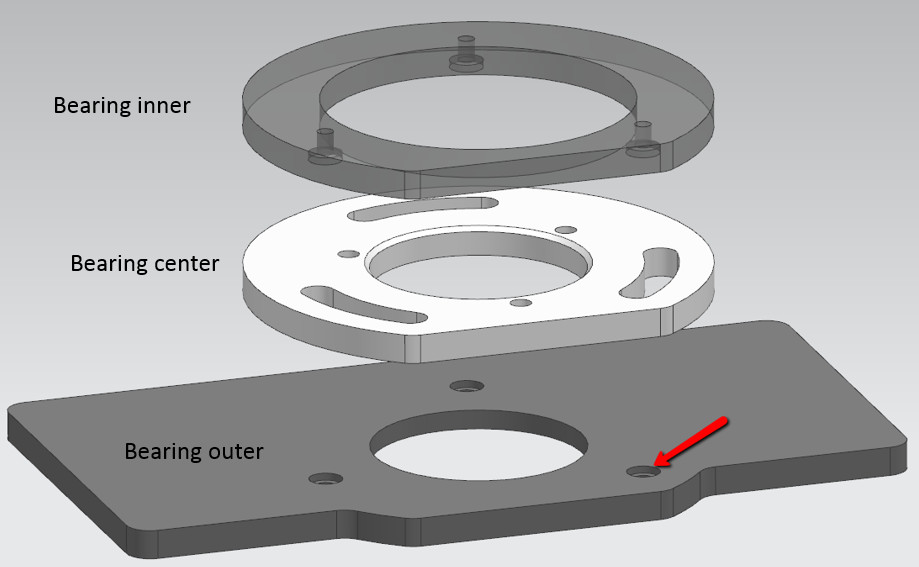
Below pic is the heart of the function, the axial bearing. These 3 parts needs to be very accurately machined. In the slots there are guide pins (seen in pic 3). The center bearing is screwed onto the front of the arbour housing (threaded directly into it, I think I used M4. Then nuts on backside to counterlock the screws). Inner and outer bearing rotates around the center bearing.
Inloggade ser högupplösta bilder
Logga in
Skapa konto
Gratis och tar endast 30 sekunder
Center bearing is as said, screwed onto front of arbour (you need inner bearing to be in place when you finally assemble it). Top flat surface on center bearing should be parallel to flat surface on swing arm.To make the knife parallel to the blade, front arbour house surface needs to be parallel to the blade. I used a file to get the surface parallel and checked it with the arbour flange (?, the big steel thing right behind the blade). Centerbearing should preferable be concentric to hole in arbour housing.
Inloggade ser högupplösta bilder
Logga in
Skapa konto
Gratis och tar endast 30 sekunder
Guide pins shown, I made these on my metal lathe, in POM plastic for low friction. These should be a few hundred of mm longer than nominal distance between bearing parts to allow movement. Pins are flat sunk in both inner and outer bearing for guidance.
Inloggade ser högupplösta bilder
Logga in
Skapa konto
Gratis och tar endast 30 sekunder
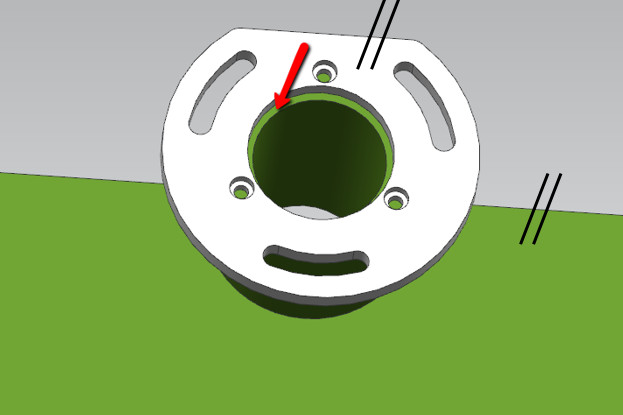
To fit the inner bearing some material needs to be removed from arbour housing. The housing is not concentric. I used a file for this as well.

Inloggade ser högupplösta bilder
Logga in
Skapa konto
Gratis och tar endast 30 sekunder
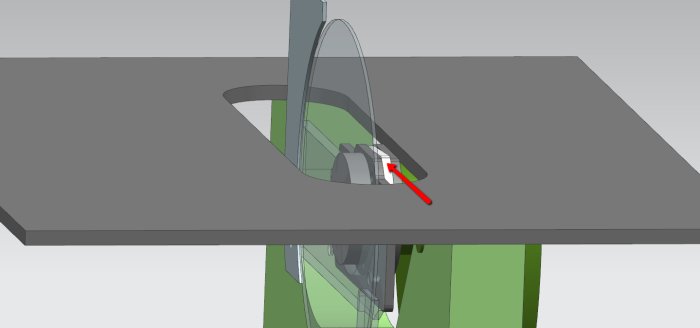
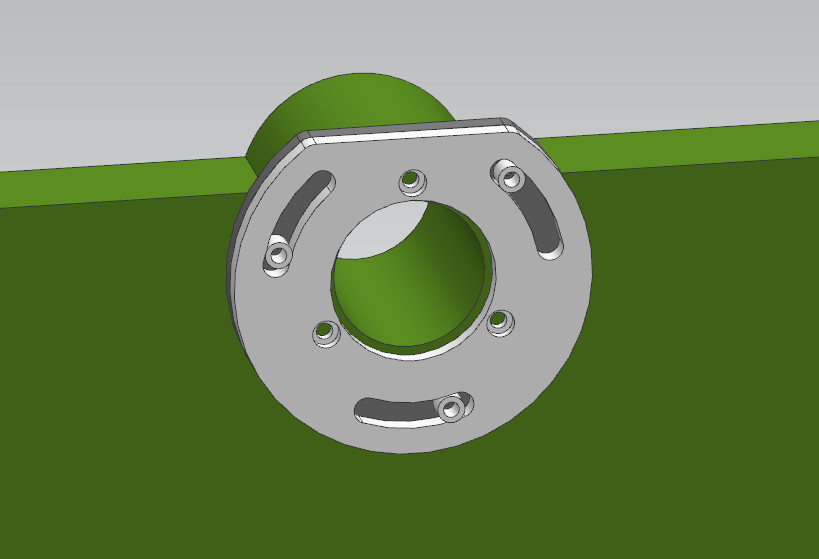
Heart of mechanism in place and now you here https://www.byggahus.se/forum/threa...och-maskiner-idag.250889/page-19#post-2338695. You see I have some brown sheets between the parts, that is taped on low friction material (I think PTFE) to avoid aluminium against aluminium rubbing.

Inloggade ser högupplösta bilder
Logga in
Skapa konto
Gratis och tar endast 30 sekunder
Following pics is what is needed in terms of modifications to give the bearing room. You need to remove some material from the saw to make room for the bearing in the lower position. I used an angle grinder with colour removal disc.

Inloggade ser högupplösta bilder
Logga in
Skapa konto
Gratis och tar endast 30 sekunder
Entire top needs to be shifted slightly to the right (no machining work and this is very small move, dont remember but I loosened the bolts and slightly moved the top).

Inloggade ser högupplösta bilder
Logga in
Skapa konto
Gratis och tar endast 30 sekunder
I made a recess in my zero clearance insert to make room for the bearing in the top position. (not much needs to be removed).

Inloggade ser högupplösta bilder
Logga in
Skapa konto
Gratis och tar endast 30 sekunder
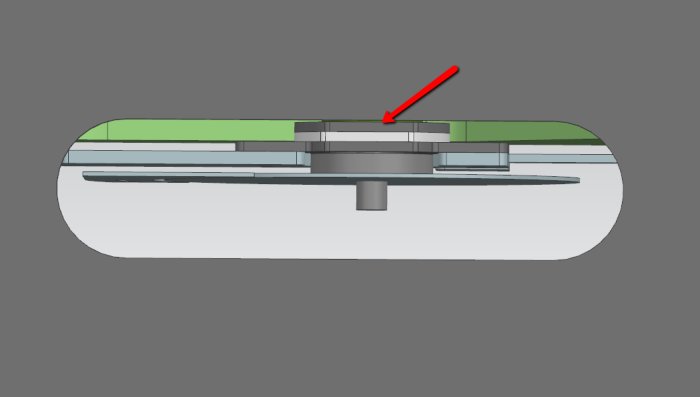
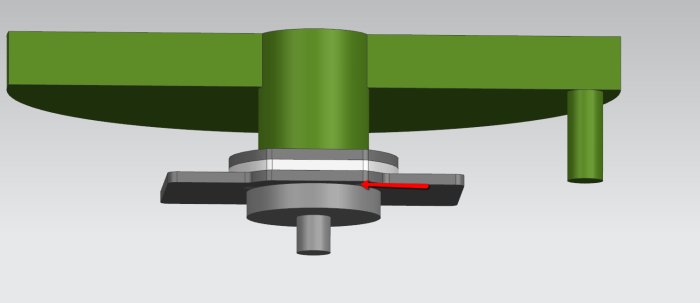
This is the tricky one and the main reason for why you should try to use thinner plates in the bearing construction. Arbour flange needs some axial clearance to the outer bearing plate. That means pushing the arbour towards the blade side. But, pushing it out long enough means the arbour bearing closest to the blade ends up half way outside the housing. So, I removed approx. 5mm from the distance cylinder that sits between the bearings, material was removed from blade side. Then I added approx. 5mm thick turned distance cylinder between bearing nearest blade and the arbour flange. This moves the entire ball bearing and distance cylinder towards the non blade side so both bearings fits inside housing.

This hole (black arrow) needs to be at the correct position in both x and y, in relation to the swingarm pin center. Take the dimension from 3D file.
Inloggade ser högupplösta bilder
Logga in
Skapa konto
Gratis och tar endast 30 sekunder
Rest is easy, the big plate the riving knife sits on doesnt need to be very accurate (but the hole position for the bar needs to be connected at the right position). The connection bar (or rather the hole positions) needs to match distance between swing arm rotation point and blade center axis. Follow the 3d for C-C dimension between the holes.
Riving knife sits on its own plate, 2 turned cylinders for guiding and bolt between them. I use dewalt knife and blade guard, they are extremely cheap (around 10£ for both knife and guard).

Inloggade ser högupplösta bilder
Logga in
Skapa konto
Gratis och tar endast 30 sekunder
Hope you understood most of it, I used my own words for a few parts I don't know the name of. Swing arm and arbour housing is the same part I just called them by different name if I referred to what's close to the arbour vs the entire part.
This is a major modification and you need to tear down the entire saw, but its doable
Redigerat:
Hi, very interesting post, I’m from South Africa and recently bought a 1975 10AGS. Do you perhaps have designs for a riving knife, importing from the UK is extremely expensive. Regards Stefan
You mean only the actual knife and not the mechanism? I purchased two Dewalt dw745 knifes, one is cut in height to be able to make grooves. The Dewalt knife is around 10-15$ including blade guard. But; My interface is made to fit the dewalt knife, most likely the Dewalt knife won't fit the original Wadkin Interface.S StefanBrandt skrev:
Hi, I’m interested in making the conversion unit and have asked a friend to see if he can make it for me. Good to know that it’s for a Dewalt riving knife. I’ve been searching for plans for the wadkin 10ags riving knife, bit no luck yet. As I mentioned, £88+ and import duties is too expensive.
There seem to be some confusion here. There are two types of ags10, the older one with fixed riving knife (as mine was) and the newer one with a following riving knife.
There is no Wadkin kit that converts the older type to a modern following knife. If there was, £88 would be a bargain compared to my cnc'd parts and time to make the conversion.
...and of you have the newer type of ags10 with a following knife, the conversion makes no sense and will not be possible either.
Redigerat:
No confusion - I also have the old version like you with the static/fixed riving knife mounting, but it didn’t have the riving knife when I bought it, so I need to buy one. Whilst searching for riving knifes I found your post and like the conversion you did. Irrespective if I do or don’t do the conversion I still need a riving knife and am searching if someone have done designs for the riving knife which I can give to a local laser cutting company to make for me.
If the saw is from 1975 I am almost certain all AGS had a true riving knife installed from the factory by then.
It seems that your only problem is that you are missing the actual riving knife, not the mechanism which it sits in and makes it go up and down with the height of the sawblade.
Creating a riving knife that fits your mechanisms should be trivial compared to @Ola C creation from scratch.
EDIT: Wrote this before I saw your post above.
V vectrex skrev:If the saw is from 1975 I am almost certain all AGS had a true riving knife installed from the factory by then.
It seems that your only problem is that you are missing the actual riving knife, not the mechanism which it sits in and makes it go up and down with the height of the sawblade.
Creating a riving knife that fits your mechanisms should be trivial compared to @Ola C creation from scratch.
EDIT: Wrote this before I saw your post above.
yes, primary need is a riving knife, secondary is the innovative conversion @Ola did. The conversion is very convenient and I think will ensure that like most riving knifes don’t end up in a box and thrown away . I’ve heard a few horror stories of accidents due to not using a riving knife and am not using the saw until I have one fitted.V vectrex skrev:If the saw is from 1975 I am almost certain all AGS had a true riving knife installed from the factory by then.
It seems that your only problem is that you are missing the actual riving knife, not the mechanism which it sits in and makes it go up and down with the height of the sawblade.
Creating a riving knife that fits your mechanisms should be trivial compared to @Ola C creation from scratch.
EDIT: Wrote this before I saw your post above.
oh, and I’m pretty sure that my guys will remove it when I’m not around because they will get annoyed with adjusting it every time they work with different thickness wood...S StefanBrandt skrev:yes, primary need is a riving knife, secondary is the innovative conversion @Ola did. The conversion is very convenient and I think will ensure that like most riving knifes don’t end up in a box and thrown away . I’ve heard a few horror stories of accidents due to not using a riving knife and am not using the saw until I have one fitted.
Klicka här för att svara