533 294 läst ·
640 svar
533k läst
640 svar
Egen glidgjutning godkänd!
Hi.Adrian M skrev:
Hello everyone,
Sorry can't make use of Swedish, and not sure if will get any replies, as the thread is not in English, but will give it a try.
Spotted this thread, trying to find a solution for our old house's brick chimney, where for getting the chimney inspection green light (approved), we have been suggested to use a metallic insulated flue line, inside one of the chimney's channels which has the dimensions of 140 mm x 190 mm. In my view, that would reduce the chimney's potential (would not call it diameter as it's not round), hence I am interested in a few things:
1. given this thread is started years ago, is the slip casting ( Glidgjjutning) a practice among specialized companies who do this?
2. If I am to do this myself, I want to reduce the mess as much as possible, so question is: before using the self-prepared ceramic concrete, I could have seen some people clean the chimney then wet it. I guess that's to improve brick stickiness. Should I expect that water to be absorbed by the bricks or do I need to seal, as well as possible, the indoor hole(s) where the stove is currently connected to the chimney?
3. Have seen and learned a lot of techniques in self building the pillow which acts as dragger of the mortar and be pulled from bottom up. My question is: do I need to make it as close as possible as the chimney's inner dimensions or those centimeters mentioned throughout the thread, would allow mortar of a certain viscosity to remain stick to the walls of the chimney? Also, I understand the use of the sponges, yet could someone confirm that the use of the hard canvas is to protect the sponge from being ripped off due to the friction to the chimney's walls?
4. When you say you had to pull the dragger several times bottom up, to end up with a consistent mortar layer on brick chimney's walls, does it mean that you have pulled it all the way to the top, then reinserted it back to the bottom and pulled it again?
I must say that I am encouraged by the fact our chimney is really straight, with regular shape, and I have seen it worked for others who have been challenged even more by the S shapes of their chimneys.
Thanks a lot in advance for your potential responses. It will serve as guidance for me.
Adrian
Any specialized 'glidgjutar-company' I haven't seen. Bricklayers use to do it.
I guess you wet it also because you don't want the mortar to cure far too fast, hence becoming brittle.
If your dragger is too small, all mortar will end up at the bottom. Make it perfect
")
Regarding #4, I think the idea is to start the procedure once again from the bottom.
Thanks for the quick answer. Got my lesson today, when I got the visit of the first "expert" who estimated the materials and work at around 16k SEK before rotavdrag, regardless of the method used. While his "preferred" method was using a flexible flume liner.
I have nothing to lose on trying the method described in this thread, at least to attempt manufacturing a cushion and test it through the chimney channel.
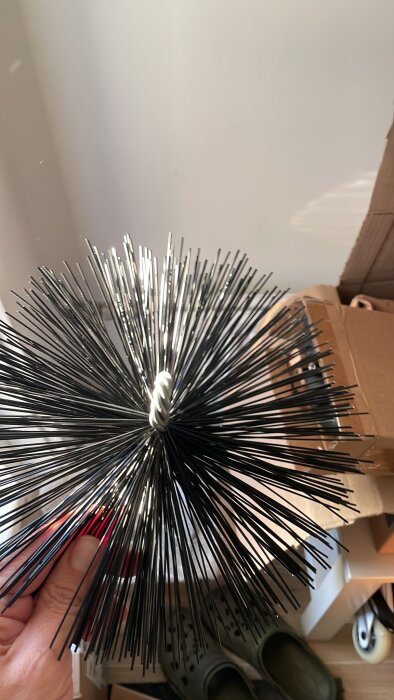
Only things to figure out: what to use in order to spring water evenly through the chimney walls and what works best to clean up the inner walls of the chimney. Probably something like this chimney sweepers brush, would do the job. Some people here recommended https://www.jula.se/catalog/bygg-oc...h-oppna-spisar/sotarverktyg/sotarsats-199018/
Hope it will work.
Thanks,
Adrian
I have nothing to lose on trying the method described in this thread, at least to attempt manufacturing a cushion and test it through the chimney channel.
Only things to figure out: what to use in order to spring water evenly through the chimney walls and what works best to clean up the inner walls of the chimney. Probably something like this chimney sweepers brush, would do the job. Some people here recommended https://www.jula.se/catalog/bygg-oc...h-oppna-spisar/sotarverktyg/sotarsats-199018/
Hope it will work.
Thanks,
Adrian
Please also see https://ventilation.se/sv/categories/glidgjutning
They tend to suggest the flexible liner because it's generally easier to install in most cases, and won't cause any leaks. Drawbacks are smaller cross section and chimney will run cooler as they use to insulate between bricks and liner with vermiculite.
They tend to suggest the flexible liner because it's generally easier to install in most cases, and won't cause any leaks. Drawbacks are smaller cross section and chimney will run cooler as they use to insulate between bricks and liner with vermiculite.
That's exactly where my worries come: the use of vermiculite is questionable and I am surprised it is widely used in Sweden. At least, I came across articles like https://www.health.state.mn.us/communities/environment/asbestos/homeowner/insulation.html where there are concerns raised. But don't want to hijack the topic, so will focus on this thread.
The link you have shared is great and it saves my time on manufacturing a cushion myself.
Thanks again, Fluxor!
Adrian
The link you have shared is great and it saves my time on manufacturing a cushion myself.
Thanks again, Fluxor!
Adrian
I thought of using my garden hose with a straight nozzle set to wide spray pattern starting at the bottom slowly pulling it up while spraying. Doesn't need to be even, just wet enough I would say.
Hej again,
Have a few more questions, maybe some are obvious:
1. How good the chimney walls need to be brushed in order for mortar to adhere to the surface and apart from the chimney sweeper brush (Sotarsats) is there any other effective way to clean it?
2. Attaching a picture with my setup and I am trying to reduce the messa and avoid breaking any walls to minimum, therefore my question: the duct is straight, 140 x 190 mm and at the bottom there is a visiting little door, where I intend to introduce the cushion and pull it up to the top, as such, do you see any problem with the upper right jointure to the stove when lifting the cushion with the trolley? How did you guys ensure mortar won't block that horizontal channel? Do I need to disassemble the stove and put some paper on the round tube that connects it to the chimney to avoid the mortar getting inside the tube?
Thanks,
Adrian

UPDATE:
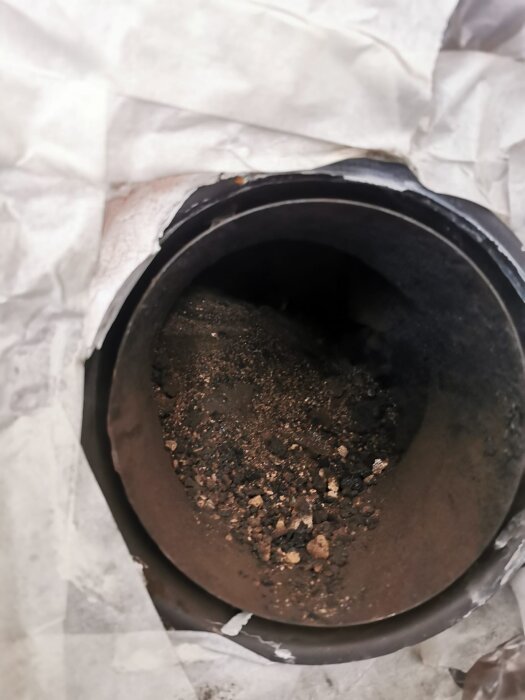
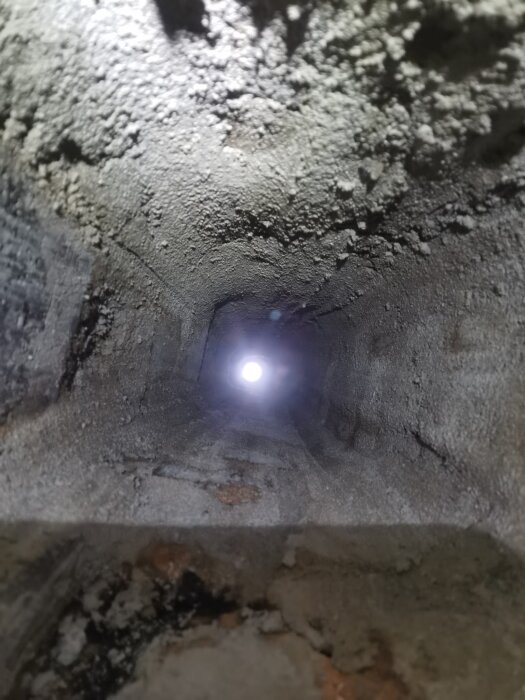
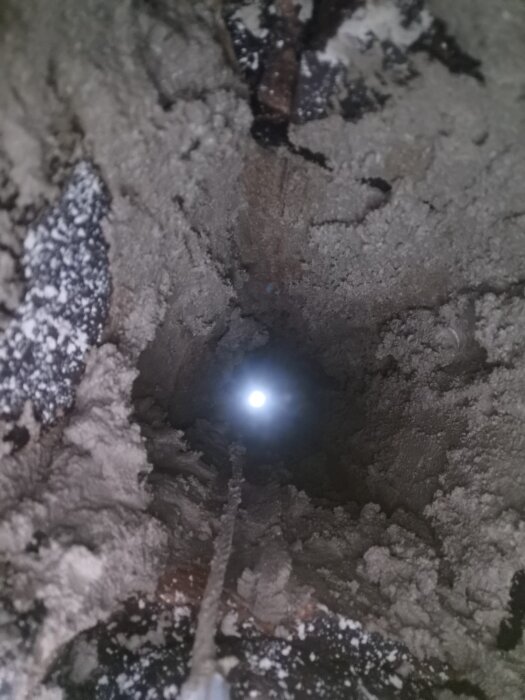
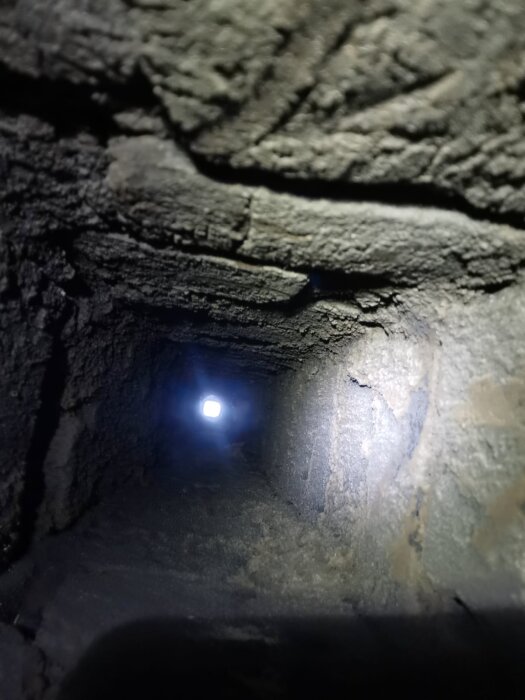
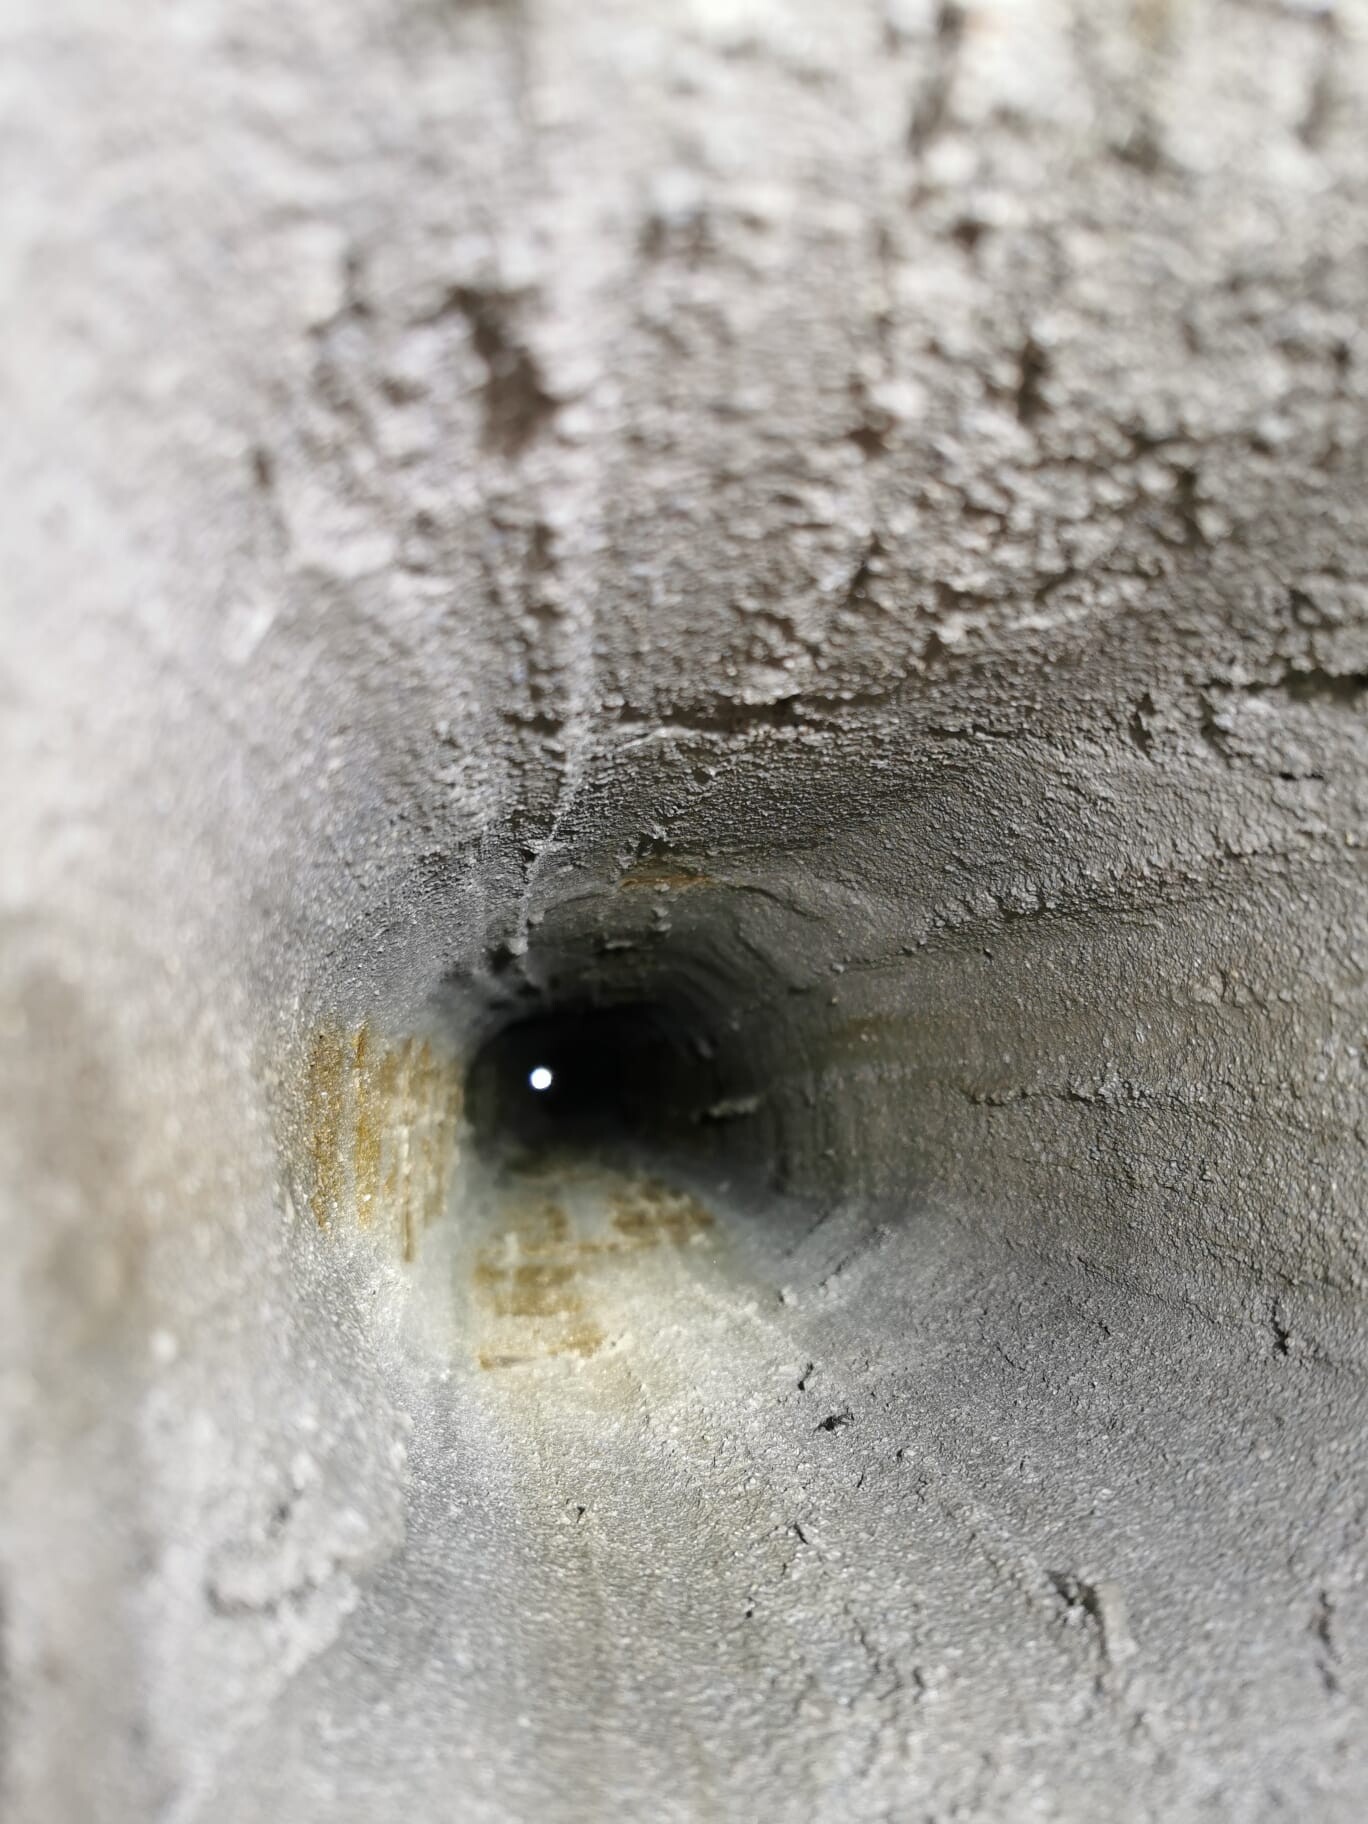
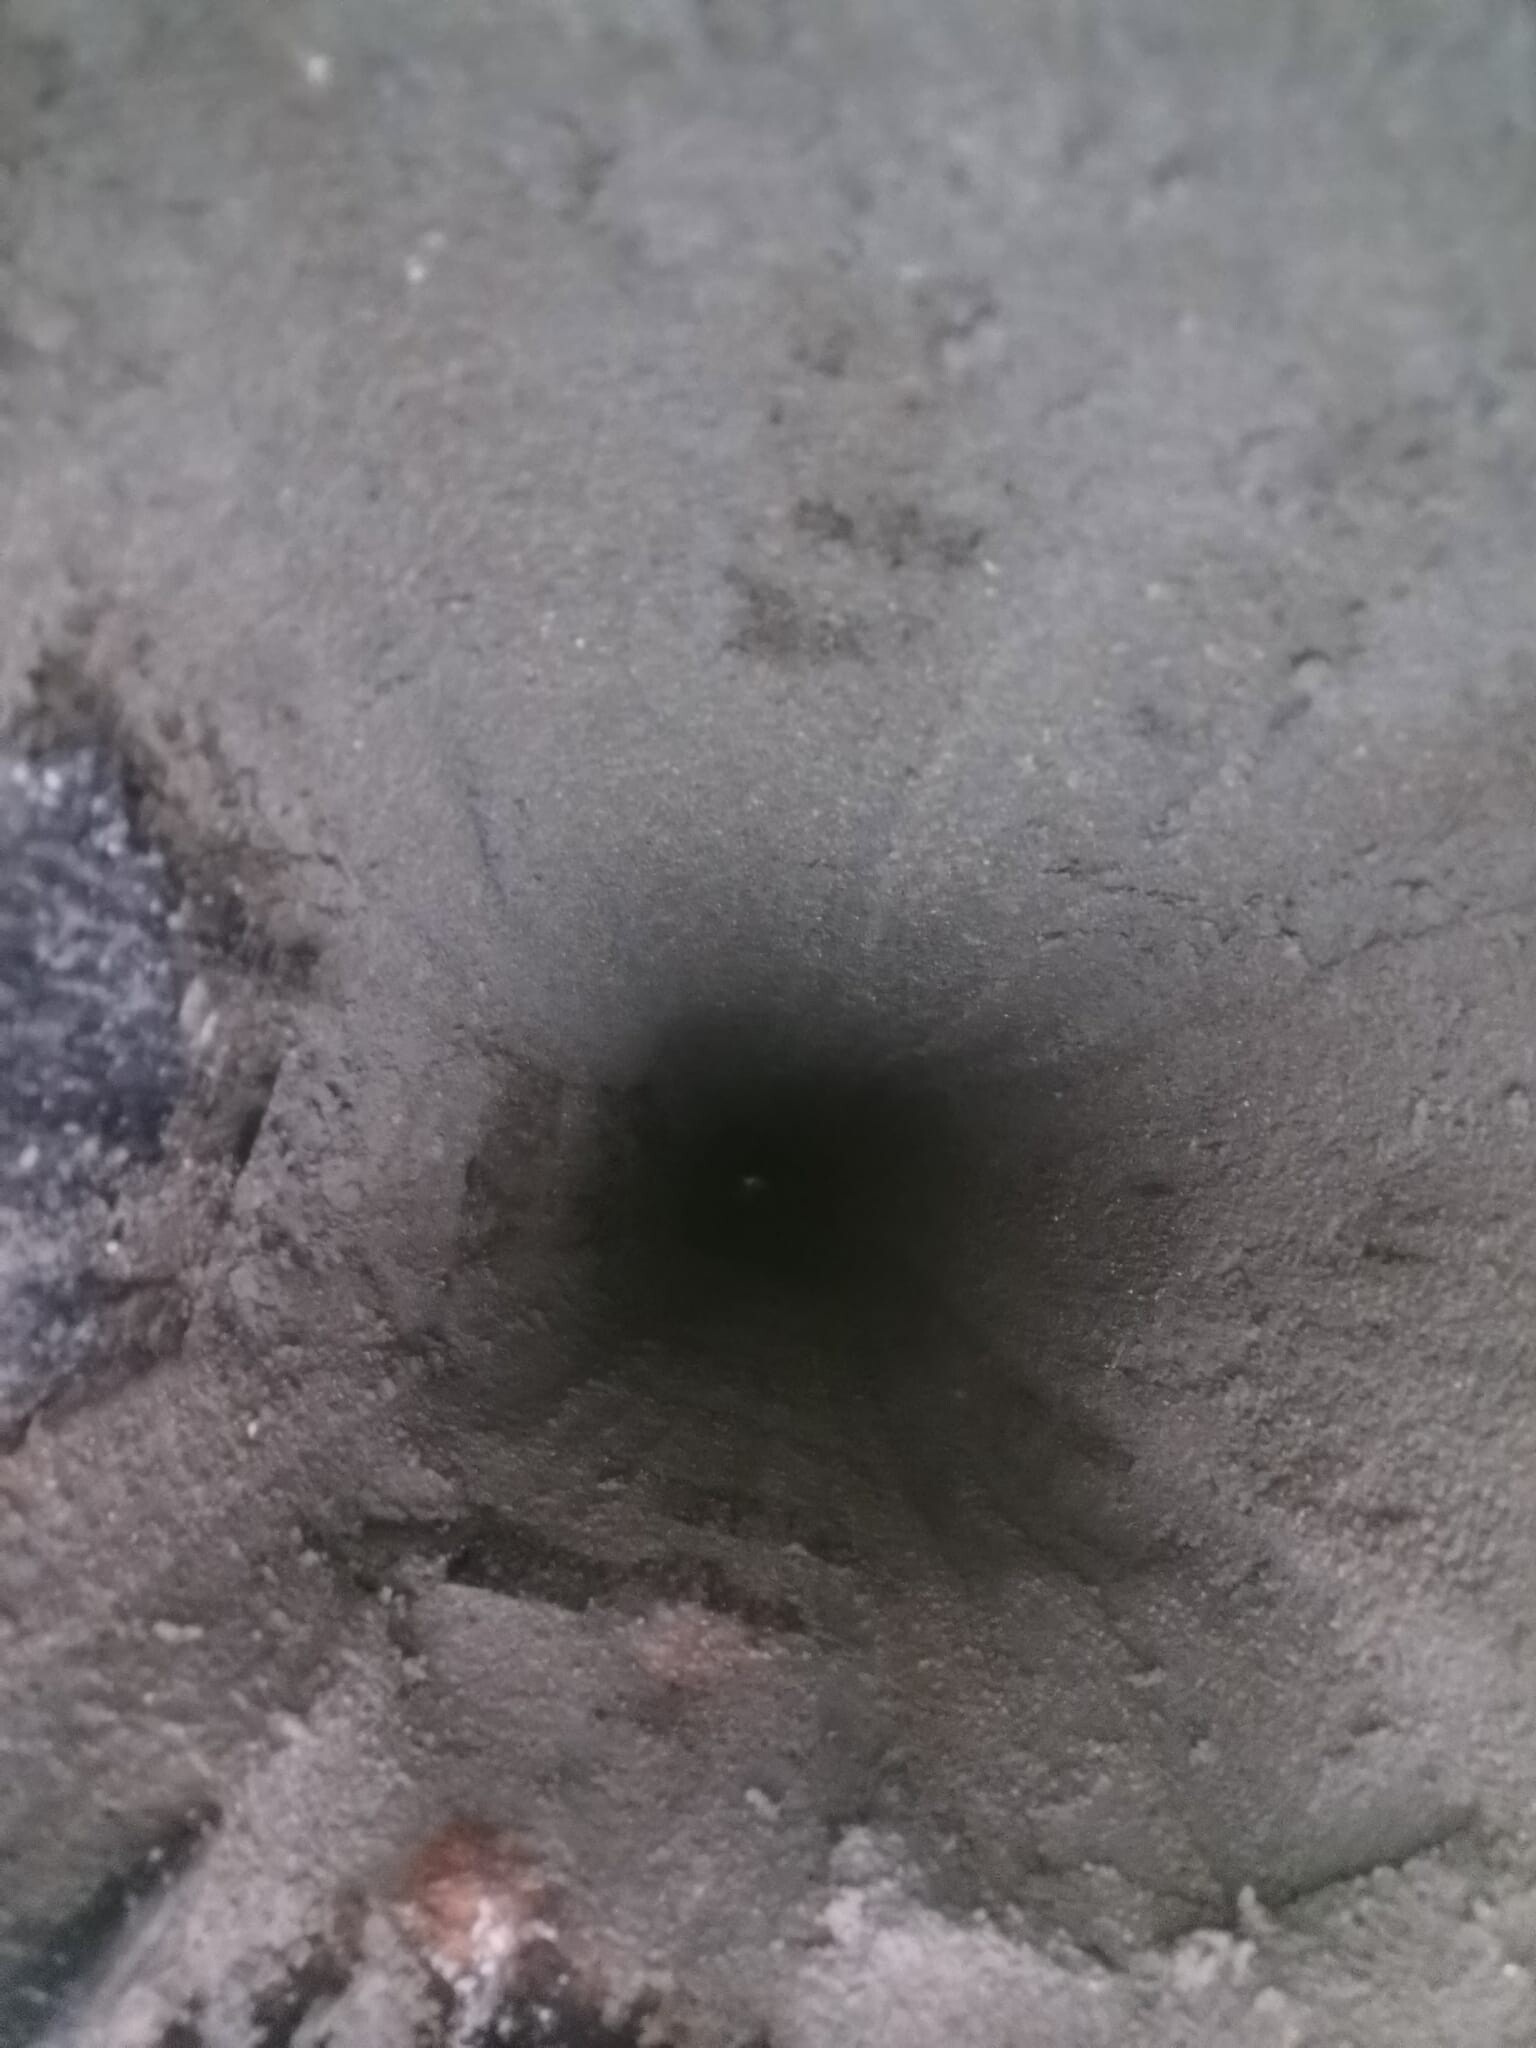
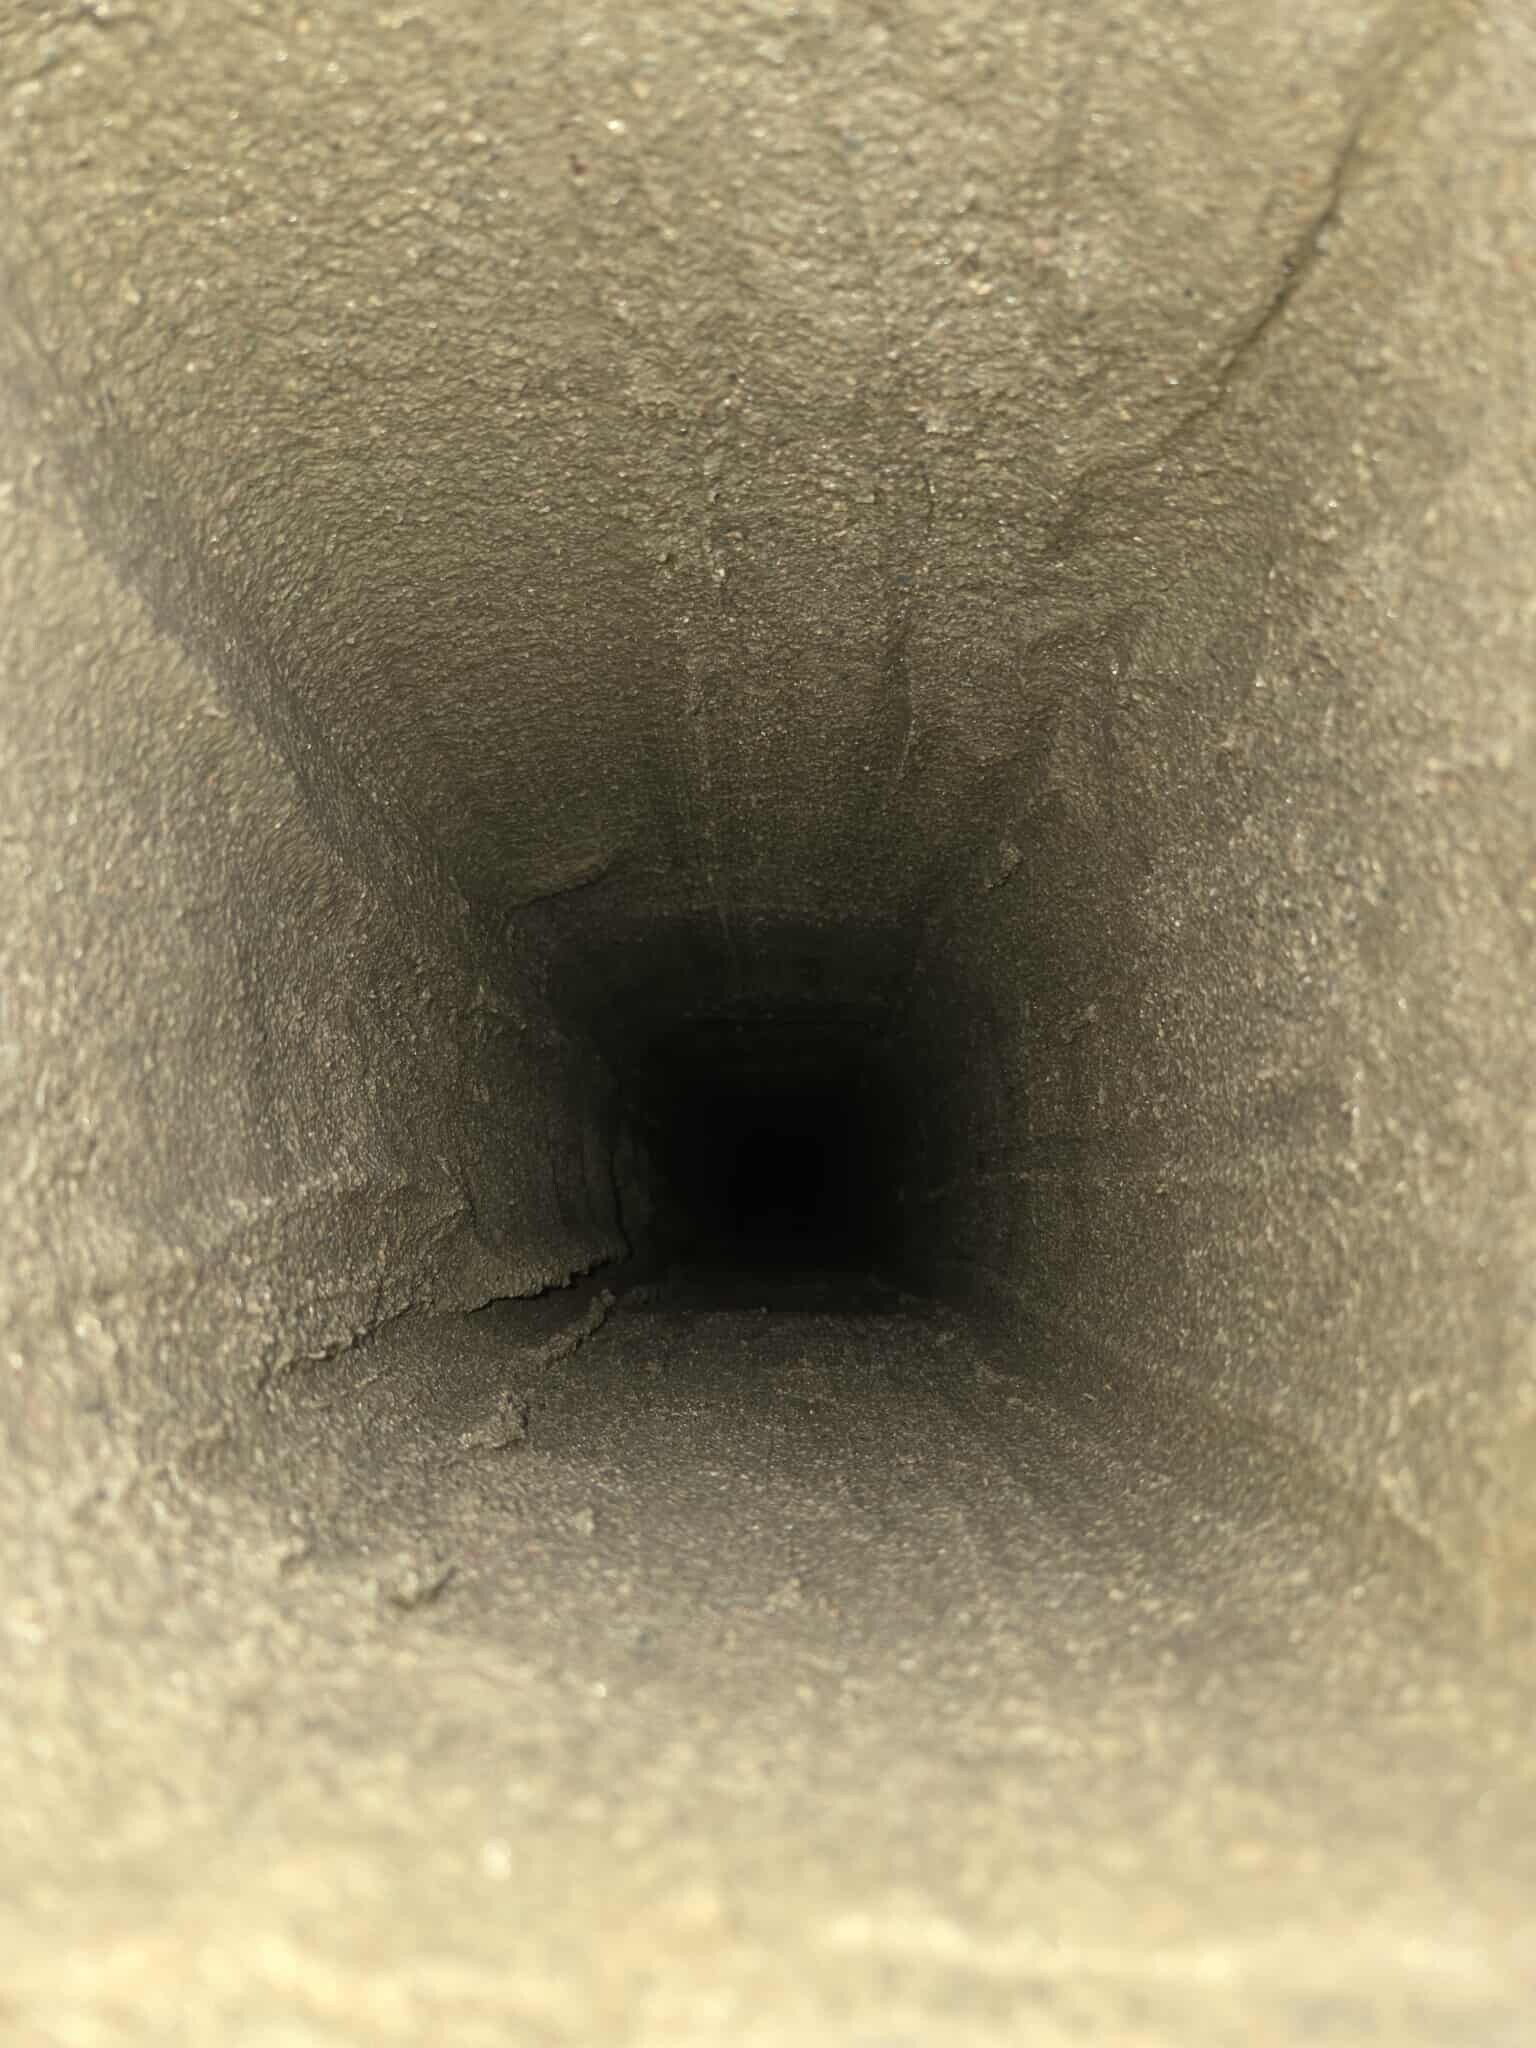
Please scrap the second question as I have just realized the channel where the visiting door exists, is a different one than the one which serves the stove. I have had a look from the hole in the wall where the stove is connected and assessed the duct, it looks straight and dirty, hence the question about cleaning it properly remains.
As for my plan to attempt the cleaning, I shall try from the round hole where the stove is connected, of which inner diameter is 130 mm, hence if I follow recommendations from this thread, will need to build a plate 2 cms smaller on all sides than the chimney's duct inner wall, so that ends up with 120 x 170 mm the hard plate, plus the foam and the hard canvas on top. once inside, will be pulled by the trolley and should work. Probably a bit challenging when will need to repeat the procedure and the cushion will be full of mortar.
Attaching a picture taken bottom up, with duct's current status.
Thanks,
Adrian

D dinky57 skrev:
UPDATE 2: Preparing for slip casting this weekend.UPDATE:
Please scrap the second question as I have just realized the channel where the visiting door exists, is a different one than the one which serves the stove. I have had a look from the hole in the wall where the stove is connected and assessed the duct, it looks straight and dirty, hence the question about cleaning it properly remains.
As for my plan to attempt the cleaning, I shall try from the round hole where the stove is connected, of which inner diameter is 130 mm, hence if I follow recommendations from this thread, will need to build a plate 2 cms smaller on all sides than the chimney's duct inner wall, so that ends up with 120 x 170 mm the hard plate, plus the foam and the hard canvas on top. once inside, will be pulled by the trolley and should work. Probably a bit challenging when will need to repeat the procedure and the cushion will be full of mortar.
Attaching a picture taken bottom up, with duct's current status.
Thanks,
Adrian
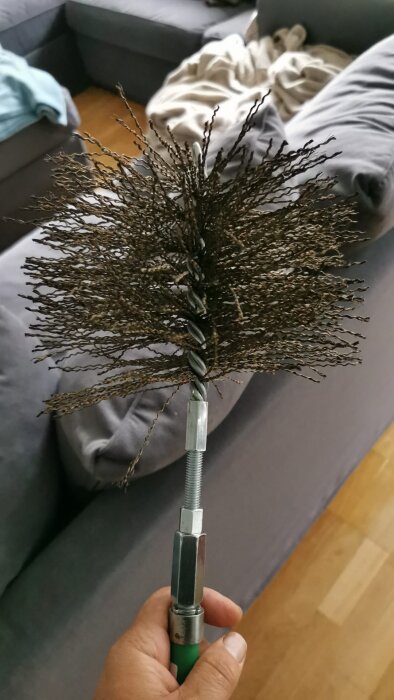
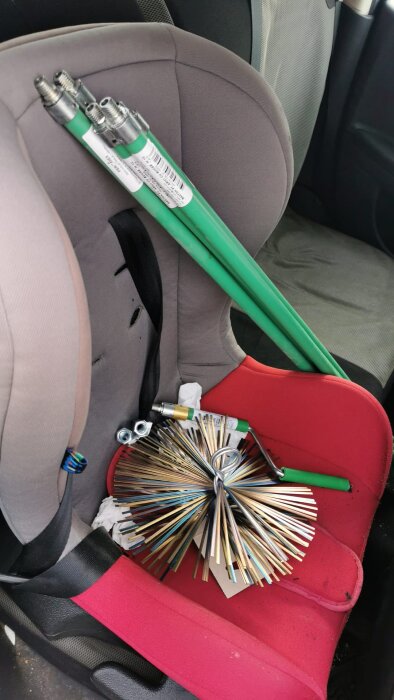
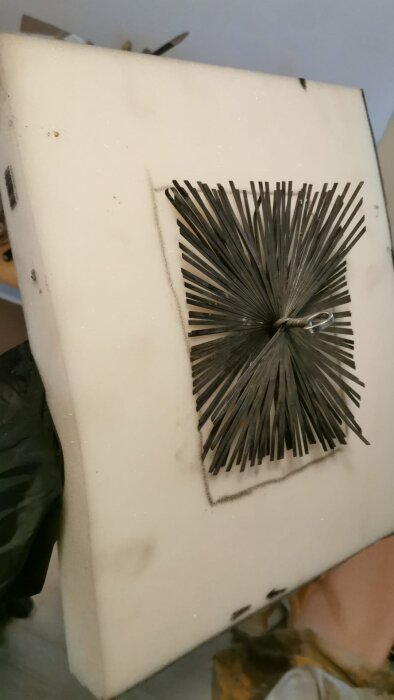
Investments so far: different shapes brushes (see pictures), including what you call krejs (I guess), as well as telescopic rods for the cleaning part.
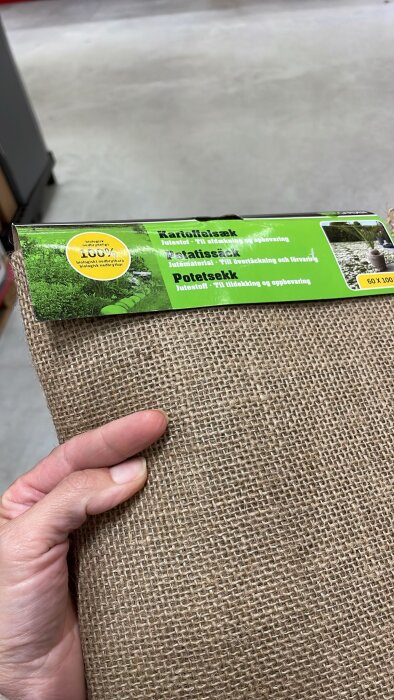
Bought mattress foam (1000 mm x 2000 mm) the size I found, but of course planning to cut smaller pieces, will cover it in sack canvas (see pictures) for the first drags and for the final ones will use a piece of bathroom sealing foil (Mapei Tätstiktsfolie för värum) I have got left since renovating the bathroom.
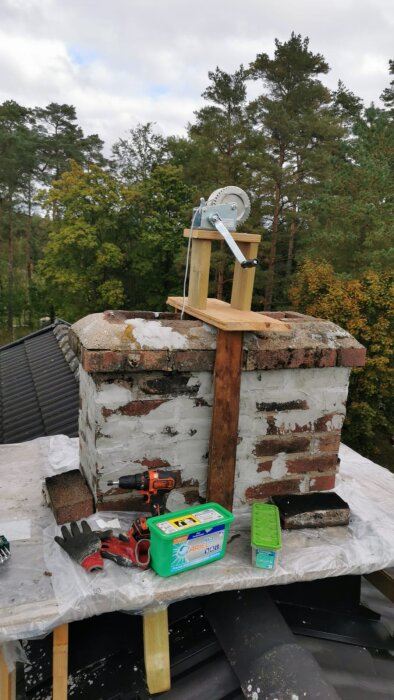
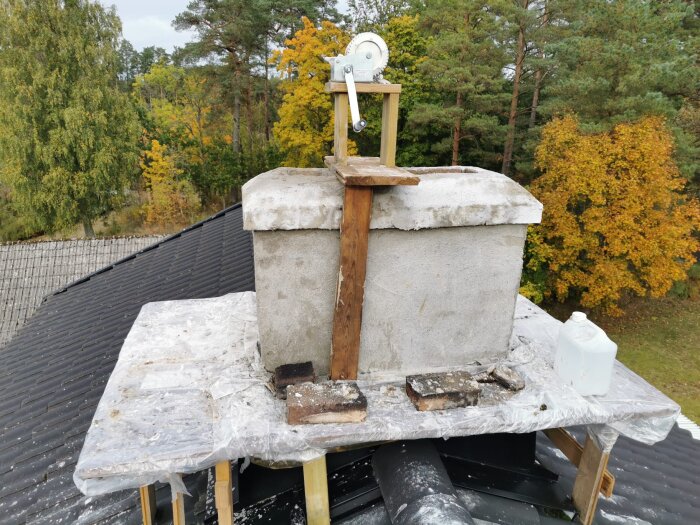
Ordered a hand winch and an endoscopic camera from Amazon (there is one with front and side camera, both lightened).
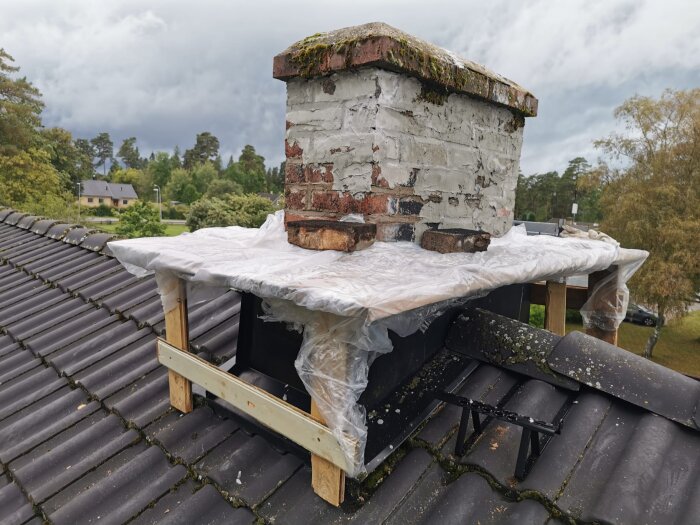
So far managed to build the scaffold, the winch support and after adjusting the 200 mm square krejs to something closer to my chimney's duct dimensions (1400 x 1900 mm), cleaned a few times with the rods and krejs, as well as the brush, resulting in a few buckets of soot and old lime mortar (also in the picture.
I am pondering if I have to build the cushion from a hard plate, 4 cm smaller than the duct or should I use the circle covered by the foam and the sack canvas and the sealing foil to try the first drags, as I have no intention of making holes in the wall, but squeeze inside the duct through the stove connection pipe (130 mm inner diameter).
Next, after cleaning properly (as I have noticed soot, especially on the lower part of the duct) would be to wet it properly and need to figure out if that would require a long hose, like others did, or simply wetting the foam and having it dragged bottom up.
Hope to come back with new pictures and good news next week.
Thanks,
Adrian
-
 Inloggade ser högupplösta bilderLogga inSkapa kontoGratis och tar endast 30 sekunder
 -
 Inloggade ser högupplösta bilderLogga inSkapa kontoGratis och tar endast 30 sekunder
 -
 Inloggade ser högupplösta bilderLogga inSkapa kontoGratis och tar endast 30 sekunder
 -
 Inloggade ser högupplösta bilderLogga inSkapa kontoGratis och tar endast 30 sekunder
 -
 Inloggade ser högupplösta bilderLogga inSkapa kontoGratis och tar endast 30 sekunder
 -
 Inloggade ser högupplösta bilderLogga inSkapa kontoGratis och tar endast 30 sekunder
 -
 Inloggade ser högupplösta bilderLogga inSkapa kontoGratis och tar endast 30 sekunder
 -
 Inloggade ser högupplösta bilderLogga inSkapa kontoGratis och tar endast 30 sekunder
 -
 Inloggade ser högupplösta bilderLogga inSkapa kontoGratis och tar endast 30 sekunder


UPDATE 3:UPDATE:
Please scrap the second question as I have just realized the channel where the visiting door exists, is a different one than the one which serves the stove. I have had a look from the hole in the wall where the stove is connected and assessed the duct, it looks straight and dirty, hence the question about cleaning it properly remains.
As for my plan to attempt the cleaning, I shall try from the round hole where the stove is connected, of which inner diameter is 130 mm, hence if I follow recommendations from this thread, will need to build a plate 2 cms smaller on all sides than the chimney's duct inner wall, so that ends up with 120 x 170 mm the hard plate, plus the foam and the hard canvas on top. once inside, will be pulled by the trolley and should work. Probably a bit challenging when will need to repeat the procedure and the cushion will be full of mortar.
Attaching a picture taken bottom up, with duct's current status.
Thanks,
Adrian
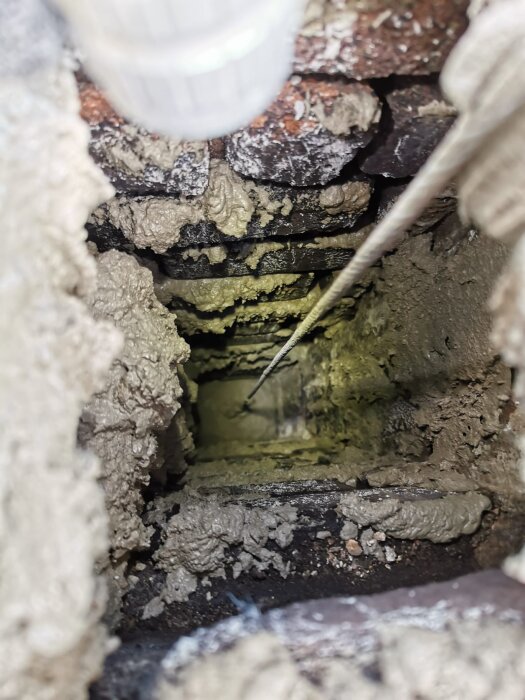
Saturday on a rainy weather, have been cleaning as good as possible the chimney, using the two brushes I have purchased. After the cleaning, it came the washing part, using the water pressure machine, connected with a hose for pipes cleaning (that I have purchased specifically for this job).
I have made sure I washed well for the entire length of the chimney's duct and collected the water at the bottom of the chimney.
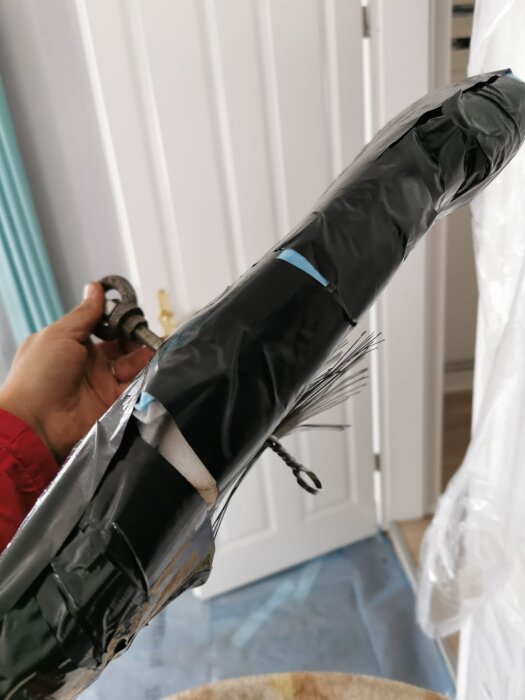
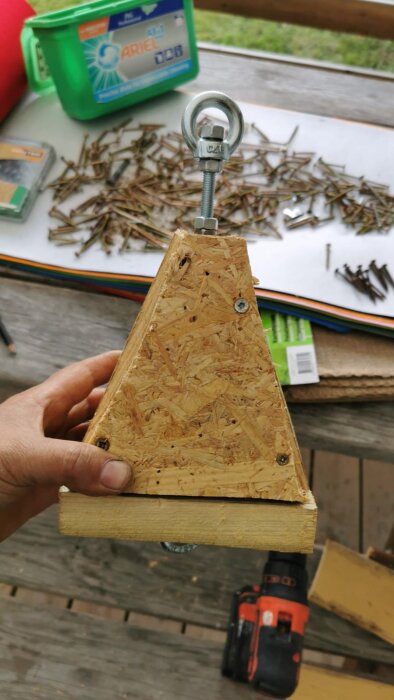
Additionally, I have prepared a first cushion, out of wood, which proved too big to be squeezed inside the stove (see pictures), so I changed the strategy and made a cushion adjusting one of the square brushes, added the 5 cm foam on top of it and covered it with two sheets of canvas and strong tape across for easy sliding (picture also added).
Sunday: After purchasing the mortar (c-bruk and tiles adhesive), mixed the mortar with water and proportioned it 60 - 40 % (c-bruk - tiles adhesive) and we have (together with a bricklayer) started to pour from top, after squeezing the cushion to the tube where the stove connects to the chimney.
Initially it was too loose and we had to make it a bit more sticky. Obviously during first drag, we have poured more mortar than needed and consequently big chunks started to fall at the bottom. As part of my job, I had to collect the mortar from the bottom and bring it back to the roof on buckets to be re-added. We did this 3-4 times without adding much more mortar, other than the one which fell off from chimney's duct.
Eventually, we had one final pull up, using a new foam piece, with only wet canvas on top (no strong tape), for smoothing the work.
Attaching some pictures to illustrate each phase of the work and the inside and outside final status.
Still have though a few questions, which will help me understand more work will be required:
1. judging after latest pics, after final pulls, there are areas where the mortar seems to be spread in very thin layer over the bricks, however all the space between the bricks seem to be well covered now. Should I expect to be challenged by the chimney sweeper, when they will come again for assessing the results? I could have seen from others' pictures, the mortar layer on top of the bricks looked really thick (probably due to successive pulls, after the mortar from previous runs dried).
In this case, did anyone try subsequent pulls, after the initial mortar dried on chimney's duct? I would appreciate a response, before reaching out again to the chimney sweeper company for assessing the new status.
2. My understanding is that Zingo and others, made a hole close to the bottom of the chimney for inserting the cushion before pulling it up. Also, understanding the process was cyclic after some years, does it mean that subsequent times they had to create a new hole for the same purpose?
Asking because my aim was NOT to break the walls and create as less mess as possible.
Thanks,
Adrian
PS: pics were added as the work progressed (unsure though if they are uploaded exactly the same as I have intended to, in order to show the progress and final status)
-
 Inloggade ser högupplösta bilderLogga inSkapa kontoGratis och tar endast 30 sekunder
 -
 Inloggade ser högupplösta bilderLogga inSkapa kontoGratis och tar endast 30 sekunder
 -
 Inloggade ser högupplösta bilderLogga inSkapa kontoGratis och tar endast 30 sekunder
 -
 Inloggade ser högupplösta bilderLogga inSkapa kontoGratis och tar endast 30 sekunder
 -
 Inloggade ser högupplösta bilderLogga inSkapa kontoGratis och tar endast 30 sekunder
 -
 Inloggade ser högupplösta bilderLogga inSkapa kontoGratis och tar endast 30 sekunder
 -
 Inloggade ser högupplösta bilderLogga inSkapa kontoGratis och tar endast 30 sekunder
 -
 Inloggade ser högupplösta bilderLogga inSkapa kontoGratis och tar endast 30 sekunder
 -
 Inloggade ser högupplösta bilderLogga inSkapa kontoGratis och tar endast 30 sekunder
 -
 Inloggade ser högupplösta bilderLogga inSkapa kontoGratis och tar endast 30 sekunder
 -
 Inloggade ser högupplösta bilderLogga inSkapa kontoGratis och tar endast 30 sekunder
 -
 Inloggade ser högupplösta bilderLogga inSkapa kontoGratis och tar endast 30 sekunder


Hej!
Smiter in med ett inlägg från min glidgjutning som utfördes relativt likt Zingos instruktioner, skillnaden var att jag bultade fast en ögla i centrum på skivan istället för öglor i varje hörn.
"Torrdrog" först och fick justera kudden en gång.
Sedan körde vi på med bruk två vändor efter varandra.
Och tillsist så körde vi utan bruk för att jämna ut enligt bilden.
Pipan var 17x17, vi gjorde en platta av två tunna plywood skivor på 11x11 med 5cm tjockt skumgummi från en trasig mt5 sadel. Den klipptes till ca 18x20 med en bit brandfilt över.
Gick väldigt smidigt då vi var 3st som utförde jobbet. För oss var det lämpligt att ha en som höll emot med linan under skivan från sotluckan så att den inte började kalva i böjen.

Jätte Järna ska försöka självCinolin skrev:
hejChrilleC Chrille K skrev:Detta var en mycket läsvärd tråd. Hoppas den följs upp av fler. Jag har precis murat upp min skorsten med tegel från kallvinden. Det var svårt och tidskrävande men helt klart genomförbart för den normalt händige. Att bära upp ett ton sten på stege var inte det jobbiga eftersom det tog sin tid att lägga varje enskild sten (mellan 30-60 min för ett skift som består av ca 13 stenar). Då grannen betalat 38 000 kr för samma jobb var det riktigt skönt att bära upp stenen, trots att ryggen blev lite urlakad efter en vecka. Jag kan nog ge tips och lärdomar om önskemål finnes. Eftersom skorstenen är från 1800-talet och troligtvis är murad med lerbruk eller liknande (med vanlig gråstensinblandning) så är jag osäker om tätheten längre ner i murstocken. Ska nu kontakta sotaren för att försöka få tag i rökpatron och röktesta själv innan besiktning. Om jag upptäcker läckor så känns steget till glidgjutning nu mycket enkelt. Tack för detta tips.
Undrar när du murade skorstenen vad för bruk Hasse du
Tänker glidgjuta själv
I helgen så ska vi Glidgjuta då det enligt prognos ska vara +grader. Men vi har problem med att hitta ett bra bruk att använda och det enda "värmebeständiga" bruket vi hittat är det på bilden, någon som testat det?

När skorstenen uppfördes för 100 år sedan fanns inte bruket du skärmskottade, och den har väl fungerat i många år?E Edisag skrev:
Medlem
· Stockholms län
· 639 inlägg
Lite sent nu kanske men hittade denna:E Edisag skrev:
https://www.kamintillbehor.se/eldfast-murbruk/eldfast-murbruk-faerdigt
Bauhaus har också:
https://www.bauhaus.se/eldfast-bruk...4581664968129355&utm_content=Alla%20produkter
Mvh