2,821 views ·
12 replies
3k views
12 replies
Reinforcement battens - correctly executed
Hi,
I urgently need help.
Due to poor coordination between the plumber and the carpenter at the renovation company, I suspect the floor joists in the bathroom being renovated are not optimal. Previously, there was a wet room mat. Now it will be tiled.
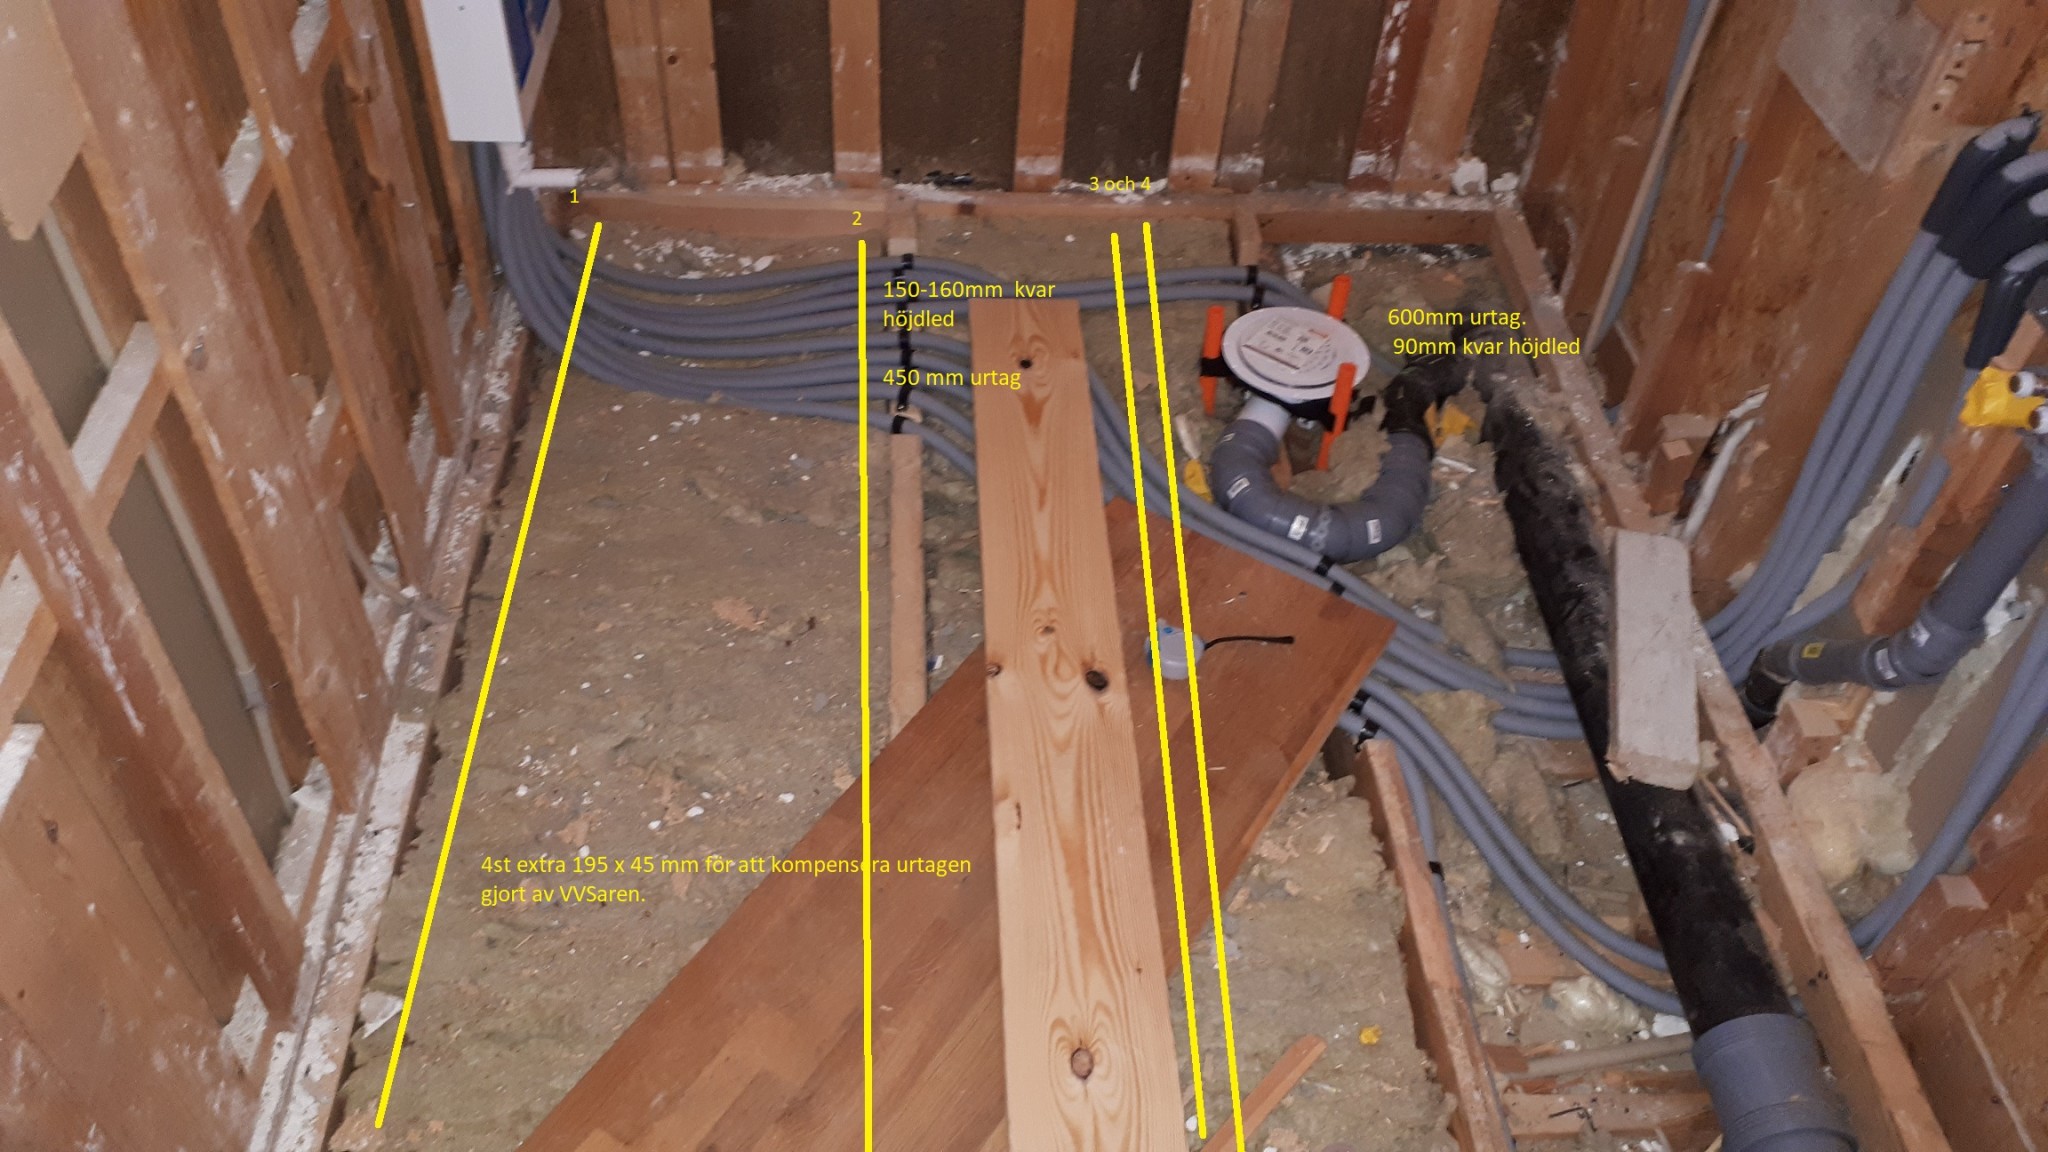
One of the images describes the cutouts made by the plumber. The joist under the floor drain is no longer reliable as it's 90-100mm left and has cracks around the cutouts.
To reinforce the floor, 4 extra joists have been added. They are about 170-180mm high to fit in. The yellow lines show their placement. The spacing between the joists is about 450-550mm, though the double joist by the drain is about 650-700mm to the wall. In these new joists, there are also cutouts:
Joist no. 2 according to the image text, joists 3 & 4 have two cutouts: 60mm deep / 50mm long and 60mm deep / 400-450mm long.
Are these reinforcements sufficient to support a bathroom floor?
After reading the Wood Guide, I understand that perhaps holes should have been drilled in the middle of the joists to run all pipes in the compartment closest to the manifold cupboard. What do you think?
Conditions:
Dimensions approximately 2.7 x 1.7 m. Floor heating plus slope means that around 250-300kg self-leveling compound will be used. No bathtub.
I urgently need help.
Due to poor coordination between the plumber and the carpenter at the renovation company, I suspect the floor joists in the bathroom being renovated are not optimal. Previously, there was a wet room mat. Now it will be tiled.
One of the images describes the cutouts made by the plumber. The joist under the floor drain is no longer reliable as it's 90-100mm left and has cracks around the cutouts.
To reinforce the floor, 4 extra joists have been added. They are about 170-180mm high to fit in. The yellow lines show their placement. The spacing between the joists is about 450-550mm, though the double joist by the drain is about 650-700mm to the wall. In these new joists, there are also cutouts:
Joist no. 2 according to the image text, joists 3 & 4 have two cutouts: 60mm deep / 50mm long and 60mm deep / 400-450mm long.
Are these reinforcements sufficient to support a bathroom floor?
After reading the Wood Guide, I understand that perhaps holes should have been drilled in the middle of the joists to run all pipes in the compartment closest to the manifold cupboard. What do you think?
Conditions:
Dimensions approximately 2.7 x 1.7 m. Floor heating plus slope means that around 250-300kg self-leveling compound will be used. No bathtub.
Tomture61
Self-builder
· Född i Luleå
· 6 266 posts
Tomture61
Self-builder
- Född i Luleå
- 6,266 posts
cc 30 is suitable if you plan to use klinker on the floor with, for example, floor chipboard.
But you also plan to use self-leveling compound!
You should avoid notching out bearing joists at the top/bottom, drilling holes in the middle is what you should do. You significantly weaken the joist.
But you also plan to use self-leveling compound!
You should avoid notching out bearing joists at the top/bottom, drilling holes in the middle is what you should do. You significantly weaken the joist.
Hello,
thank you for the reply. I was hoping for more concrete answers to the question; is this technically sound construction-wise given the added studs?
I am fully aware that it weakens the framework, but is the weakening significant enough that it is a "no go" without further measures?
thank you for the reply. I was hoping for more concrete answers to the question; is this technically sound construction-wise given the added studs?
I am fully aware that it weakens the framework, but is the weakening significant enough that it is a "no go" without further measures?
Feels a bit borderline, but if they cast a reinforced slab with underfloor heating, it might work?
I’m currently working on a bathroom myself here at home, and it’s CC30 with crossbars every 100cm and a cast slab on top of that.
As an amateur, you don't dare to take any shortcuts.
I’m currently working on a bathroom myself here at home, and it’s CC30 with crossbars every 100cm and a cast slab on top of that.
As an amateur, you don't dare to take any shortcuts.
It is precisely the words "maybe it works" that are gnawing.
However, the company does not have the sense like you to therefore apply the precautionary principle...
Does anyone think this is technically sound?
Will have an inspector look at the pictures for an initial statement. But also hoping for support from the forum...
However, the company does not have the sense like you to therefore apply the precautionary principle...
Does anyone think this is technically sound?
Will have an inspector look at the pictures for an initial statement. But also hoping for support from the forum...
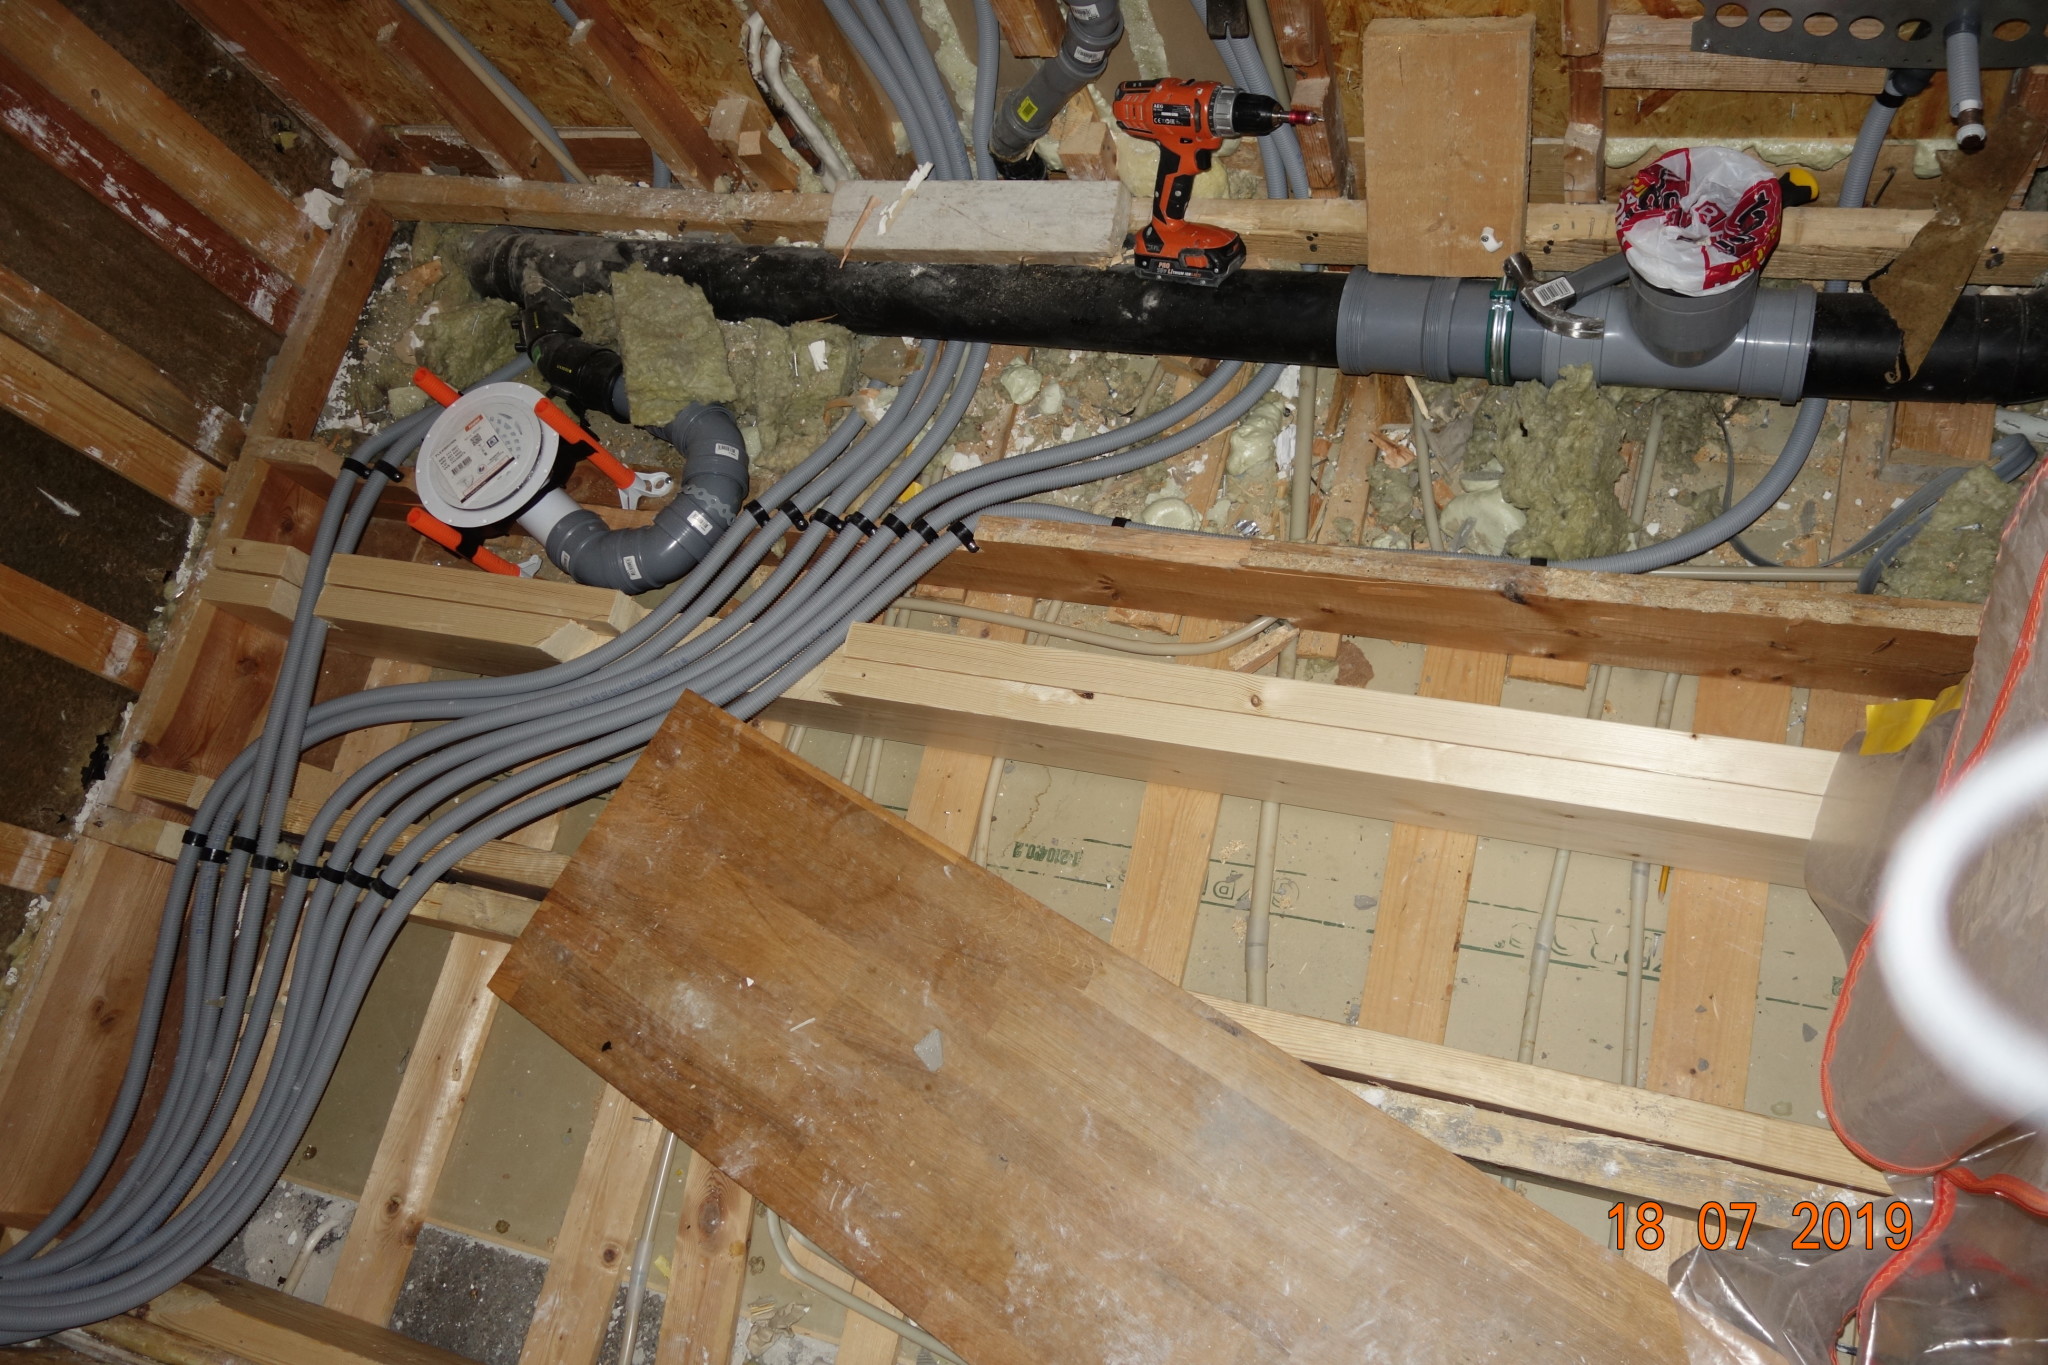
Is it gray electrical conduit/pipe laid over the floor?
One might think that the electrician should have discussed the most appropriate way to lay these pipes.
That is, one does as has always been done and is supposed to do by drilling in the middle of the beam to minimize the weakening of stiffness.
Did they have to install the floor drain right there? Couldn't an alternative location have been discussed instead of directly over a beam?
There is flooring chipboard now with (incorrect) mounting plate.
The gray ones are potable water pipes.
These are located just below the chipboard and are likely too close.
This means that the floor heating spreads to cold water = deviation according to the inspector.
After the modification, the floor structure deviates from industry regulations on important points (reinforcements, center-to-center distance, recesses), a structural engineer is needed to verify that it's built correctly.
In other words: for now, it goes against industry standards. Maybe it holds, but if it doesn't, I'm alone when it goes wrong.
The communication (and evidently competence) at the company is awful, to put it mildly.
Poor Swedish, poorly versed in industry regulations, fast and easy is the motto.
And the commercial, initial contact is in Swedish...
Ok, sounds like Poles/Eastern Europeans who are often significantly handicapped in how to build good wooden houses.
https://www.bkr.se/wp-content/uploads/byggkeramikhandboken/pdf/del_6_2012we.pdf
https://www.diva-portal.org/smash/get/diva2:962589/FULLTEXT01.pdf
There's a lot online to read up on before you make your bathroom.
https://www.bkr.se/wp-content/uploads/byggkeramikhandboken/pdf/del_6_2012we.pdf
https://www.diva-portal.org/smash/get/diva2:962589/FULLTEXT01.pdf
There's a lot online to read up on before you make your bathroom.
Click here to reply