34,449 views ·
25 replies
34k views
25 replies
How to offset a truss that is in the way of a chimney?
If you're lucky, you just need to cut the truss since it's cc 600 mm. But you need to know all the measurements of the trusses and what's on the roof, e.g., råspånt and tiles. The easiest way to get an answer is to bring out a good carpenter to take a look at it. That way, you might avoid a lot of hassle.
Many thanks for all the responses. Especially to Mathias for taking the time to insert all the pictures and explain how you did it.
Even though I haven't decided exactly what I'm going to do yet, I have gained a much clearer understanding of how I can and should proceed.
I will try to insert my own pictures when I'm done, so we'll see if it gets total disapproval or not")
The roof structure consists only of hardboard with roof tiles on top. I guess that's why the roof trusses are placed at 600 mm centers.
Even though I haven't decided exactly what I'm going to do yet, I have gained a much clearer understanding of how I can and should proceed.
I will try to insert my own pictures when I'm done, so we'll see if it gets total disapproval or not
The roof structure consists only of hardboard with roof tiles on top. I guess that's why the roof trusses are placed at 600 mm centers.
An idea, to be discussed and followed at your own risk.
MathiaS's suggestion not to cut the upper arm I think is excellent.
But with 60cc, shouldn't a traditional brace on the forearm combined with 4 diagonal stays in each compartment be sufficient?
That is, cut off the forearm where the chimney is to stand.
Then attach a new beam of the same dimension as the forearm to the cut forearm and the adjacent rafters. Now you have four compartments. In these compartments, you can place an additional beam diagonally in each compartment. From above, it should look like an X, with the chimney in the middle.
Additionally, you can connect the upper and lower arm with a few vertical beams.
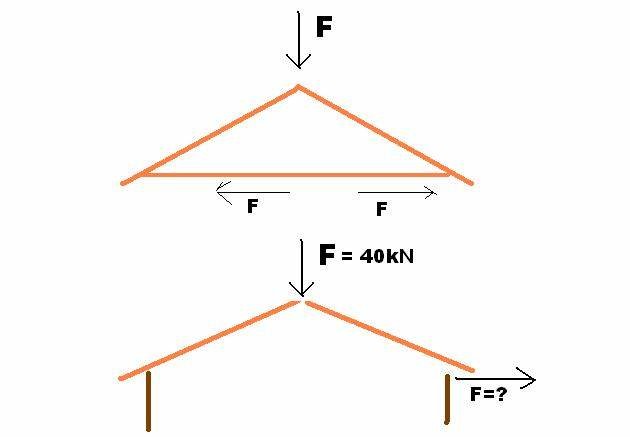
I had takbok calculate on a W-truss roof with a 27° pitch and an 8-meter span in snow zone 2.5.MathiasS said:
Trusses cc1200.
The tensile force in the bottom chord was calculated by the program to be 26.8 kN.
(Of course, with full snow load)
26 kN in tensile force is certainly no challenge for even a weak beam to handle.
But 2.6 tons of outward pressure on the walls' top edge feels a bit scary...
Last edited:

Micke, as you know, I am not a constructor, but as a truss is constructed, the walls only take up vertical loads. We must ensure as much as possible that it continues to be so.
You could also see it as, in the original state, no vertical forces are transferred to the wall, the truss is self-supporting and at rest laterally regardless of roof load.
When we have cut the lower arm, there is definitely nothing that can transfer 2.6t pressure to the wall........
You could also see it as, in the original state, no vertical forces are transferred to the wall, the truss is self-supporting and at rest laterally regardless of roof load.
When we have cut the lower arm, there is definitely nothing that can transfer 2.6t pressure to the wall........
Exactly, by not cutting the bottom chord, as it is the one that handles those forces, so that only vertical forces remain on the walls.MathiasS said:
I'm not a designer either ...
Last edited:
Regardless of how the load distribution is done, there will only be significant forces in the wall if the truss attachment can transmit the forces. Here in the house, the trusses are fastened with a few nails, so the wall is likely to remain standing while the truss starts to rotate...
In theory, and apparently in practice as well, it's the transverse beams in the pictures that transfer tension and compression forces to adjacent trusses. Evidently, it works even with the design snow load on the roof; I've tested it...
In theory, and apparently in practice as well, it's the transverse beams in the pictures that transfer tension and compression forces to adjacent trusses. Evidently, it works even with the design snow load on the roof; I've tested it...
Another way to figure out what works is to use proven constructions. I forgot to mention it earlier, but the construction I posted some pictures of above is a copy of the support structure around my former chimney. However, I have built it stronger in all respects. The support was made in 1947 and still seems to work. That's enough for me anyway.
Click here to reply