
5,137 views ·
26 replies
5k views
26 replies
3 or 4 stringers on my 1100 wide staircase to be tiled?
You are worth gold for all the wise words!
Now I have started building the staircase and I made an extra stringer. I was a bit confused about some ways to measure and think, but now it's starting to come together.
I have made my first step in wood now, as I made the first three in leca, to be extra moisture-resistant and things like that.
You are welcome to take a look here and see if I seem to be thinking correctly. So far, it feels very good and the first step is really stable now with two layers of plywood. Later I will put on a layer of gypsum, unless it becomes another layer of plywood, where I suspect the last word has not been spoken.
PS: What screws would you use down into the stringer? Right now I have 42mm decking screws, which feels a bit on the short side, but still reasonable. Maybe I should go up a size. When I look at the screw, it looks exactly like the drywall screw I have for OSB, so I don't think there's any big difference.
https://www.facebook.com/etthundratolvan/posts/760098114129912
Now I have started building the staircase and I made an extra stringer. I was a bit confused about some ways to measure and think, but now it's starting to come together.
I have made my first step in wood now, as I made the first three in leca, to be extra moisture-resistant and things like that.
You are welcome to take a look here and see if I seem to be thinking correctly. So far, it feels very good and the first step is really stable now with two layers of plywood. Later I will put on a layer of gypsum, unless it becomes another layer of plywood, where I suspect the last word has not been spoken.
PS: What screws would you use down into the stringer? Right now I have 42mm decking screws, which feels a bit on the short side, but still reasonable. Maybe I should go up a size. When I look at the screw, it looks exactly like the drywall screw I have for OSB, so I don't think there's any big difference.
https://www.facebook.com/etthundratolvan/posts/760098114129912
How have you attached the cleats of the stringer to the actual stringer board?
In the picture, it looks like you just drove a screw into the wall. But you have at least glued it against the board underneath as well, right? Otherwise, you can expect to get some movement there. I used both glue and two screws in my cleats, although there was no wall next to it.
In the picture, it looks like you just drove a screw into the wall. But you have at least glued it against the board underneath as well, right? Otherwise, you can expect to get some movement there. I used both glue and two screws in my cleats, although there was no wall next to it.
I have glued them down to the batten and screwed and glued into the wall. I haven't screwed down into the batten, but I initially considered it. Maybe I'll put a screw down there too. It probably won't hurt...
But I understand why you're asking because the ones you see in the picture are just test-mounted and are mostly up to test if all the heights match.
But I understand why you're asking because the ones you see in the picture are just test-mounted and are mostly up to test if all the heights match.
Today, there were a few more steps. The staircase feels incredibly solid. I've jumped on it, so I'm at least not worried about deflection. There's another layer of sheathing to come, most likely plasterboard then...
 .
.
Another picture is available on the Facebook page.
It feels unexpectedly stable, which is very reassuring since I've been a bit nervous about this stage.
.Another picture is available on the Facebook page.
It feels unexpectedly stable, which is very reassuring since I've been a bit nervous about this stage.
Look at whole stone to avoid joints that can crack and possibly a tile coming loose, and it's definitely more attractive too
http://www.stenbolaget.se/trappbekladnad-stockholm.html
I myself have a cellar staircase in stone with whole steps that was made sometime during the 50s.
http://www.stenbolaget.se/trappbekladnad-stockholm.html
I myself have a cellar staircase in stone with whole steps that was made sometime during the 50s.
Now the staircase is at least finished for this time. All woodwork is done.

More pictures are available on the Facebook page.
Each wooden step will get a layer of plaster, maybe also the risers. Then we plan to tile both the treads and risers in black/antracit.
I quite like how this one looks, found from random image-Googling
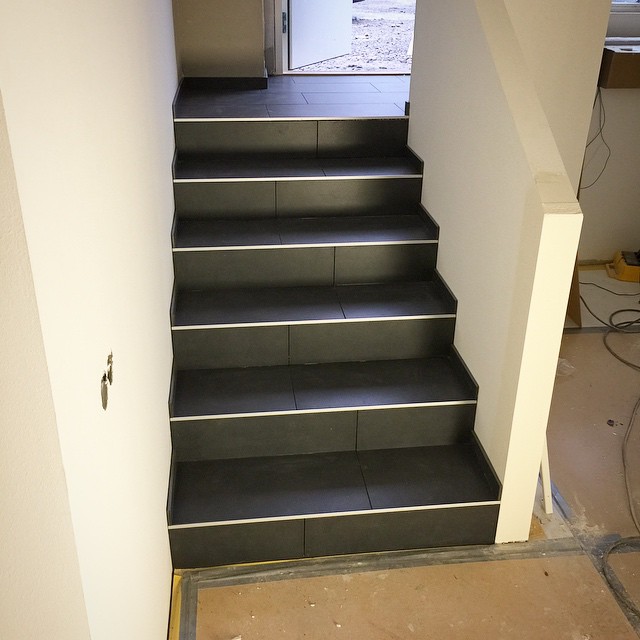
The biggest question for me is how it will look at the edge at the top, the corner that you will kick.
Perhaps there are really robust tile trims. I hope so. Ones that won't get scratched and ugly, because my prejudice is that tile trims are rarely made for you to walk on them.
Well, well. For now, it will stay like this for a while, so I will insulate it from below, which is to stuff some glass wool in each step and along the entire stringer. For the time being, it will be warm below and cold above, and a compressor will eventually be housed under the stairs, so it seems that the insulation is important not least from a sound perspective.
More pictures are available on the Facebook page.
Each wooden step will get a layer of plaster, maybe also the risers. Then we plan to tile both the treads and risers in black/antracit.
I quite like how this one looks, found from random image-Googling
The biggest question for me is how it will look at the edge at the top, the corner that you will kick.
Perhaps there are really robust tile trims. I hope so. Ones that won't get scratched and ugly, because my prejudice is that tile trims are rarely made for you to walk on them.
Well, well. For now, it will stay like this for a while, so I will insulate it from below, which is to stuff some glass wool in each step and along the entire stringer. For the time being, it will be warm below and cold above, and a compressor will eventually be housed under the stairs, so it seems that the insulation is important not least from a sound perspective.
Click here to reply