...and also use the protruding part of the rule here to attach a railing to. That would probably be best. But as I understand it, you think all these variants would be okay from a strength perspective, and it's mostly the aesthetics that differ?
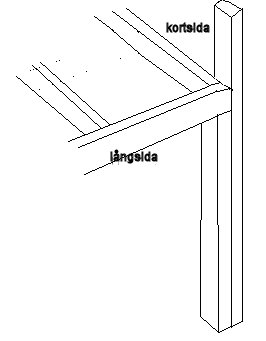
Do you mean like this (if it's possible to understand what I mean)? so that only the long side rests on (half of) the post?
[image]
I would also appreciate a description of how to screw-glue effectively.
Exactly, that's what I mean! It's enough for the long side to rest on the post, but if you want the post to extend all the way to the corner so the short side also rests on the post, that's easily fixed with a saw. Just cut away 45mm on the post so you can extend the post to the outer corner.
Edit.. saw in the thread that you figured it out yourself.
There are 95x95 unimpregnated at some "real" building supply stores, like Bolist, Beijer, Optimera, XL Bygg.
When I picked up some 95x95 and 70x70 last summer, the guy commented that he couldn't remember ever selling them. The computer systems at Bauhaus and Byggmax have, of course, figured out that they shouldn't have such shelf-warmers in the assortment.
I would also appreciate a description of how to screw glue properly.
Pull out thin strings along the entire length of the wood at about 2 cm intervals with regular white glue (for outdoor use if it is for outdoors).
About half a dl of glue should be enough to glue together 2.5 meters of 95mm wood.
Work quickly enough that the glue does not dry on the surface, put the pieces together within a maximum of 10 minutes.
Then you combine the woods and press them together tightly, the press pressure should be quite strong, a 2.5 meters long dm-wide wood should be pressed together with about 2.5-10 tons. And preferably with completely evenly distributed pressure.
Creating the pressure is actually not so difficult, for example, screw with 5x80 mm screws (with a long unthreaded part near the head) at 15-20 cm intervals crosswise along the wood, every other screw about 15mm from one edge, the next screw near the other edge.
The screws can be removed later if desired.
If you want to avoid screws and their marks, you use clamps.
Poor quality single-handed clamps might only apply about 50kg of pressure, so at least 20 are needed.
Really good single-handed clamps and quick clamps might apply around 300-500 kg, so fewer clamps are needed, then the uneven pressure distribution mostly comes into play, so at least 5 are still probably needed.
Screw clamps are usually quite strong regardless of quality.
Pull out narrow strings along the entire rule with about 2 cm spacing of regular white glue (for outdoor use if it would be outdoors). About half a dl of glue should be enough to glue together a 2.5 meter 95mm rule. Work quickly enough that the glue doesn't dry on the surface, assemble the pieces within a maximum of 10 minutes.
Then you put together the rules and press them tightly, the press pressure should be quite substantial, a 2.5 meter long dm-wide rule should be pressed together with about 2.5-10 tons. And preferably evenly distributed pressure.
The pressure is actually not so difficult to achieve, screw e.g. with 5x80 mm screws (with a long unthreaded part near the head) with 15-20 cm spacing crosswise along the rule, every other screw about 15mm from one edge, the next screw near the other edge.
The screws can be removed later if desired.
If you want to avoid screws and their marks, use clamps.
Poor single-handed clamps may pull no more than 50kg, so at least 20 are needed.
Really good single-handed clamps and quick clamps probably pull about 300-500 kg, so few clamps are needed, then it's mostly the uneven pressure distribution that plays a role, so at least 5 are still needed.
Screw clamps are usually quite strong regardless of quality.
It is not certain that you need to be completely this rigorous, but better it cannot be done. Also read the instructions for the glue.
type [link]
I can add here that if you don't use any screws at all, it significantly helps to use at least 2 wooden dowels that you drill into each piece to be glued.
This is because it is very easy for the two pieces being glued to slide in some direction when pressure is applied with clamps. It takes only the slightest misalignment for them to pull apart. A few wooden dowels as "guide rods" are very useful against this!
Another question now that it's getting closer to the point where I actually start building this loft. I suspect that the floor is (not insignificantly) lower a bit further into the room than right by the wall. How do I level the loft in the best way if that's the case?
Another question now that it's getting closer to actually building this loft. I suspect that the floor is (not insignificantly) lower a bit into the room than right by the wall. How do I get the loft level in the best way if that's the case?
A spirit level is perfect for that
Otherwise, I prefer a laser for this type of project.
Sure, I understand that I should use a level, but what I'm wondering is how I should adjust it, and where? Should I build the structure "tilted" to compensate for potentially uneven floors, different length legs, or what? Ideally, I would like to be able to use the loft bed in another location as well. I don't really mind adjusting it again then. Any tips on how to think about making it stable and level are welcome.
Draw a horizontal line around the walls where the "loft" will be built (use the spirit level).
Measure the distance from the line down to the floor where the posts will stand. Write down the measurements on a piece of paper, and number the measurements.
Write the post numbers and measurements on the wall as well.
Take the paper with the measurements to the saw, measure and cut the posts.
Draw a horizontal line around the walls where the "loft" is to be built (use the spirit level). Measure the distance from the line down to the floor where the posts will stand. Write down the measurements on a piece of paper and number the measurements. Also write down the post numbers and the measurements on the wall.
Take the paper with the measurements to the saw, measure and cut the posts.
Sounds good. However, one of the legs is not against a wall but out in the room, but I can calculate that measurement by measuring the floor slope from the other corners.
Or you take a pole/rule and place it where the "freestanding pillar" is.
Using the spirit level, you can determine the correct height and mark it on the pole.
Measure from the bottom end to the mark, and you have the measurement you're looking for.
If you have to crawl around and measure on the floor, you might get a backache.
Or you take a post/rule and place it where the "freestanding column" should be.
Using a spirit level, you can determine the right height and mark it on the post.
Measure from the bottom end to the mark, and you have the measurement you are looking for.
If you're going to crawl around and measure on the floor, you can get a backache.
Or you cut along the mark, and you'll have one leg ready.

")
