Hello,
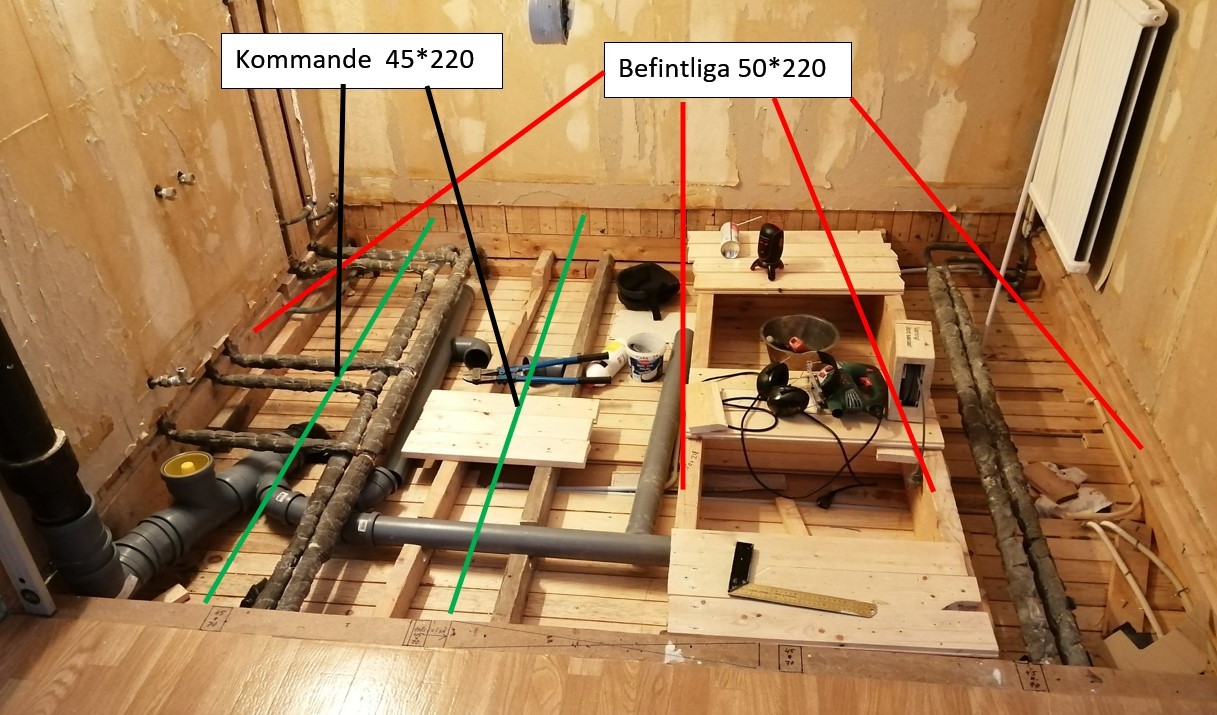
I am in the process of reinforcing the bathroom floor in preparation for laying floor tiles. There are already 2 beams of 50 x 220, but I need to add an additional 2.
How do I know how much the new beams will shrink as they acclimatize over time? I'm thinking that beams stored in unheated facilities at the supplier have a significantly higher moisture content than my existing ones, which have been in a floor in a heated room with a warm downstairs beneath them since 1968. If the new beams shrink by several mm, the floor will become uneven.
Can I calculate how much the new beams will shrink if I can determine the moisture content? How do you reliably measure moisture content?
All responses are appreciated.
/Martin

Studs do not shrink in length, and while the width may shrink slightly, if everything is done well, it won't matter. Gluing and screwing everything possible (type) is what I took away from watching two skilled craftsmen help me with exactly the same job.
Thank you Rickard!")
They can also shrink in height so that the level against the old beams differs slightly, just as you mentioned, but I don't think anything is done about it. Unless you can have them lying inside for a longer period for drying to the same level as the rest of the floor structure. However, they must then be fastened straight; otherwise, there is a risk that they warp.
There are rules of thumb for how much wood shrinks, but it varies depending on the wood quality and from which part of the log the beam is taken.
What significance this can have for the result over time, I do not know. Screw gluing can probably reduce differences to some extent, but it's not relevant when extra beams are to be added between existing ones to increase load capacity and reduce deflection. (cc 60cm => cc 30cm) However, it can ensure that the floor chipboard does not detach from the beams, which is important.
The glue screwing obviously has no effect on shrinkage, but what it does is prevent the fastenings/screw joints from settling over time, which can involve much more than just shrinkage from drying. However, shrinkage can be a reason for them to settle.
Last edited:
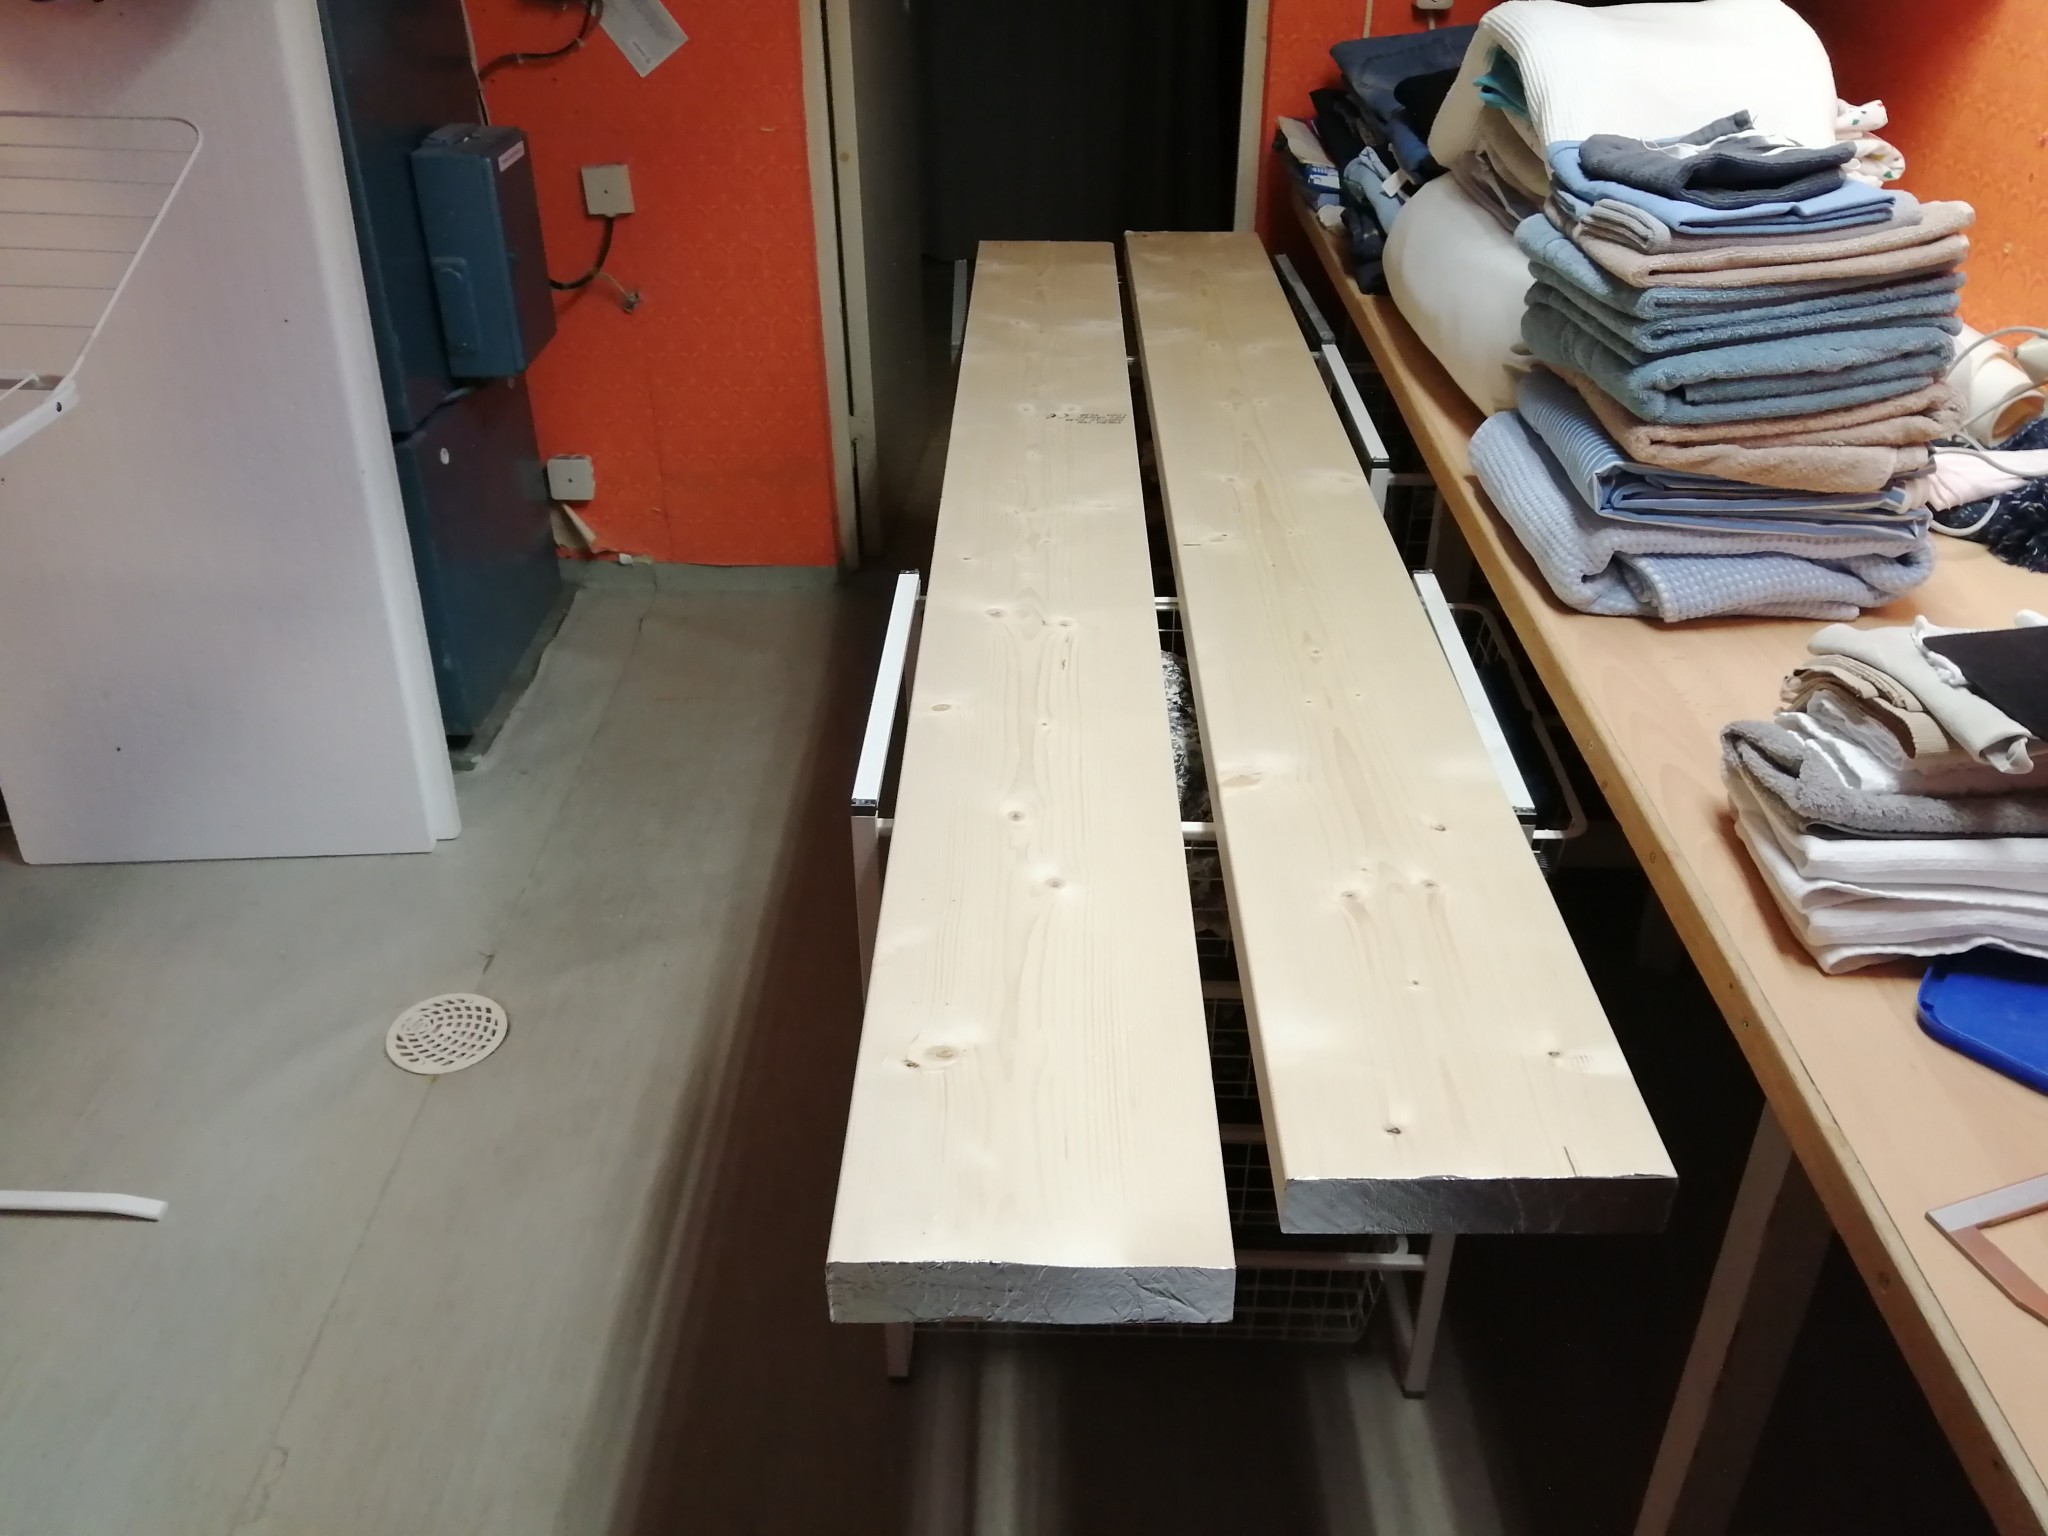
There are 4 load-bearing beams 50*220, and I want to complement with an additional 2, which I have now purchased. I have dried the new ones in the sauna at 50 degrees for about 36 hours. During this time, they have shrunk about 1.5 mm from the original 220.
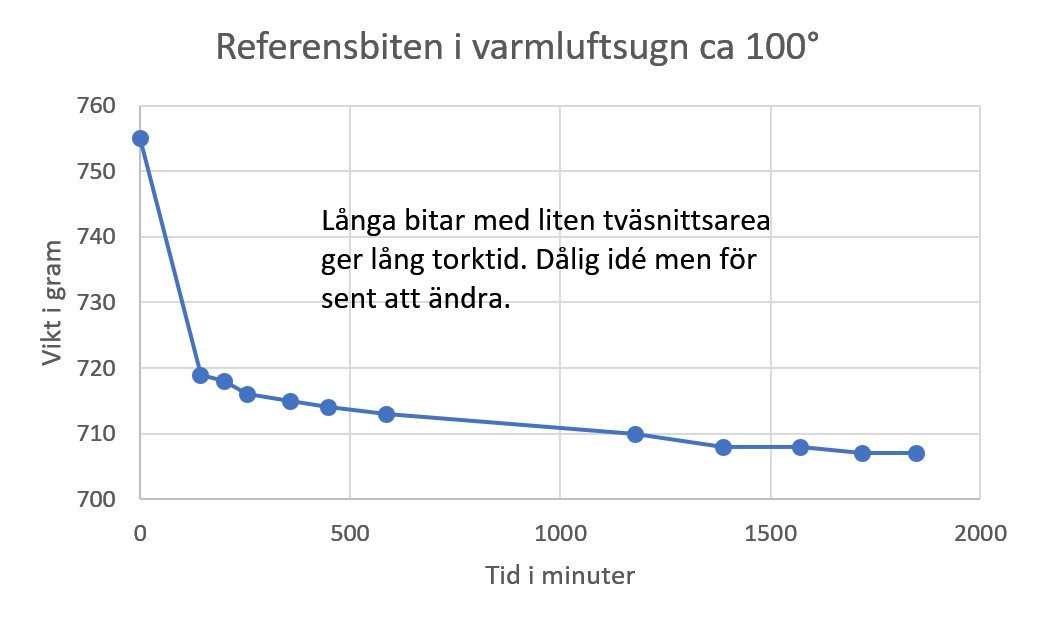
I have broken off a piece that I hope is representative from the floor structure, which I am now drying in the oven at 100° to determine the moisture content by seeing how much water evaporates. As of writing, it has decreased from 755 g to 714 g in about 8 hours. So about 5.5% if I haven't miscalculated. In the last hour, it has only decreased by 1 g, so it might be approaching its dry weight. I'll see how it looks tomorrow morning. If I assume that 714 g is the dry weight, the moisture content should have been exactly 5.5%. Is that correct?
I'm thinking that tomorrow I'll take a sample from the new beams that are in the sauna and measure the dry weight of that as a comparison. If I get the same percentage weight reduction as in the sample above, the moisture content should be the same. Right?
Attaching pictures of the subfloor and the planks, which I have covered with aluminum foil on the ends to prevent cracking due to faster drying through the end grain.
All comments, cheers, and warnings are gratefully received.
/Martin

Read a research report regarding water damage in bathrooms where several different risks were mentioned. I think it might have been from LTU... But I'm not quite sure. I can probably find it again. Among all the risk factors mentioned, one was that bathrooms are built very quickly and with not completely dry lumber from the lumberyard. Which then shrinks and causes stress in the construction. I believe they measured with strain gauges in several new bathrooms over time after construction. They also measured about ten studs on trial, and they shrank anywhere from 3-7mm. My own observations after all the building at home are that fast-grown lumber dries less while tightly grown lumber dries the most. I guess it might be because tightly grown lumber takes longer to dry and therefore isn't as dry when it's planed... The best thing you can do is to, as soon as possible before anything else, buy and bring in the floor studs.
Sounds reasonable considering that all timber nowadays is rapidly dried.Huddingebo said:
The drying curves should be exponentially decreasing. So with 2-3 measurement periods/values, you should be able to approximately determine if the studs are on the same part of the curves (measured in weight loss per unit of time, grams/hour).M Martin Sigge said:
Based on a bunch of assumptions, of course (such as the same temperature and RH in the drying spaces), but it seems reasonable.
Naturally, it's easy to overlook something when you're not thoroughly versed in the subject, but from a practical perspective, you've likely come a long way in post-drying the studs. Even if it might not be completely correct technically/academically, the shrinkage should be minimized for practical construction.
Thanks for the encouraging responses so far. Attached are charts showing the drying of the Reference piece and Test piece 1. The Reference piece is not reducing much further, but it will stay with Test piece 1 until tomorrow morning.
The Reference piece has decreased by 6.4% so far, and it will probably settle at around 7%, which is a reasonable moisture content for indoor wood in Uppsala at this time of year.
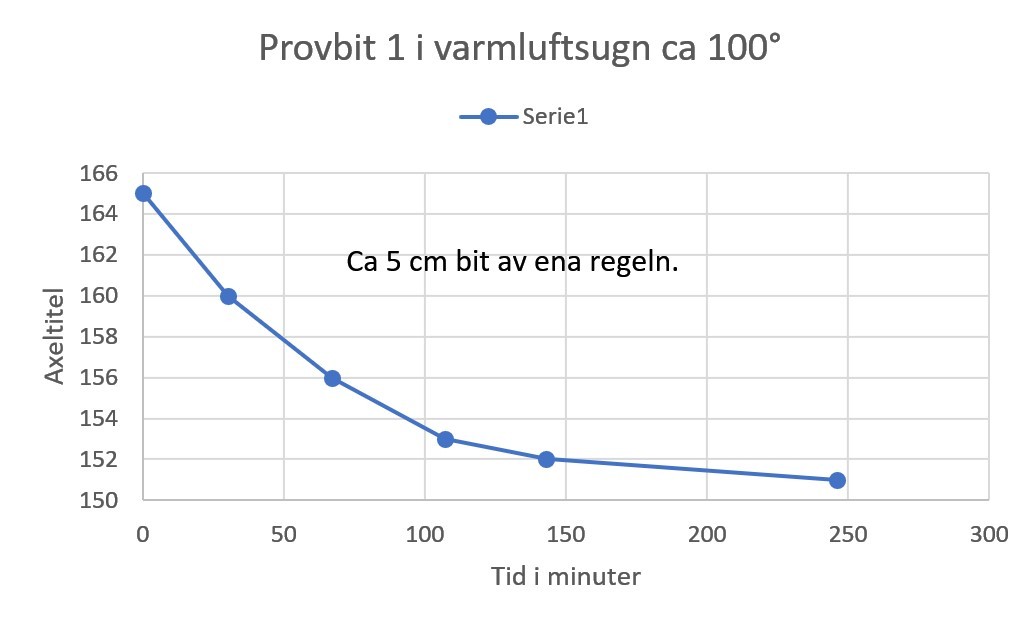
Test piece 1 has already decreased by 8.5% and looks like it could level out around 9%. If this is correct, I should aim to reduce the planks by an additional 2 percentage points. Objections, Anyone?
Unfortunately, I don't have initial values for the planks, but they were stored unheated indoors at Beijers, so they should have been around 13 - 16% (?)
If anyone is interested, I'll post more info tomorrow or on Saturday.
The Reference piece has decreased by 6.4% so far, and it will probably settle at around 7%, which is a reasonable moisture content for indoor wood in Uppsala at this time of year.
Test piece 1 has already decreased by 8.5% and looks like it could level out around 9%. If this is correct, I should aim to reduce the planks by an additional 2 percentage points. Objections, Anyone?
Unfortunately, I don't have initial values for the planks, but they were stored unheated indoors at Beijers, so they should have been around 13 - 16% (?)
If anyone is interested, I'll post more info tomorrow or on Saturday.
Rapid drying process on test piece 1...
The reference piece has been in the oven for almost 10 times as long?
Also looks like the mass/volume differs a lot between test 1 and ref?
Different areas on end grain too?
I assume this can affect the drying time, although in the long run it doesn't matter.
Does the scale have sufficient accuracy so that it doesn't impact too much? Thinking mainly about the small lightweight test piece 1. 1.65g is 1% of the initial value. Sure, if you observe the curve slope and leveling out, it's insignificant.
Excel is a really practical and convenient tool for these fun exercises.
Haha, yes funny exercises.
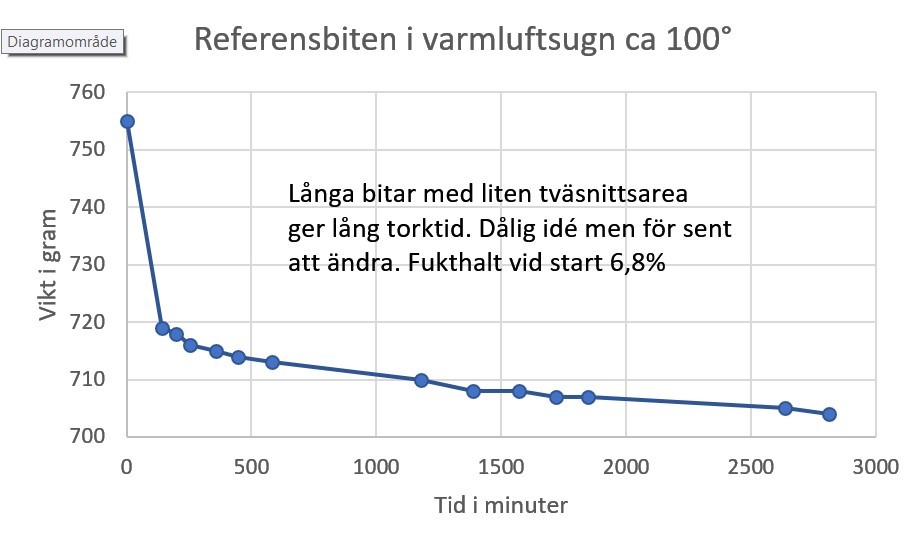
Very large difference in the end grain's areas compared to the total area, as I wrote in the reference piece's diagram, which must be the reason it took so long to dry. I ended the drying this morning after 2811 minutes. I think any further weight loss is negligible in this context. I estimate the moisture content to be 6.8%.
Test piece 1 is a 5 cm slice of the beam (which has a cross section of 45*220), meaning the end grain's area is in the same ballpark as the rest of the piece. As shown in the diagram, it was fully dried after 243 minutes. The moisture content becomes 8.5%.
Last night until this morning, I dried Test piece 2. With the experience of the end grain's impact on drying time, this time I took 2 slices of about 2.5 cm each. You can see it made a big difference. Fully dried already after 90 minutes. Moisture content 6.6%.
Since the test piece is so close to the reference piece (even a bit drier), I have stopped the drying in the sauna and consider the wood to be fully conditioned. It will take a few days before the beams are permanently in place, so I will probably dry another test piece just to be sure.
Attached are updated diagrams + a new one for Test piece 2 + a picture of the pieces.
The scale is a regular digital kitchen scale that seems to have decent accuracy, at least for this purpose. I guess the repeatability is better than 1 gram.


Click here to reply