
Since I seem unable to get in touch with the truss factory in Nässjö, I'm thinking of building my trusses myself. I tried to get help from an engineering student, but she hadn't quite reached that point in her studies yet. Can someone here help me by telling me if this will work? 45 mm timber thickness, width 195 everywhere except for the braces on the A-truss, which will be split to their 89 mm.
Roof angle 27°.
We live in inner Skåne (Klippans municipality).
Preferably calculated for a heavy roof, but if dimensions that don't exist/specials beams/whatever costly complications are required, we'll skip it and use metal roofing. That's probably what it'll be anyway, just want it to support the weight in case we decide on something else.
What type of nail plates are needed, and how many nails/screws?
Roof angle 27°.
We live in inner Skåne (Klippans municipality).
Preferably calculated for a heavy roof, but if dimensions that don't exist/specials beams/whatever costly complications are required, we'll skip it and use metal roofing. That's probably what it'll be anyway, just want it to support the weight in case we decide on something else.
What type of nail plates are needed, and how many nails/screws?
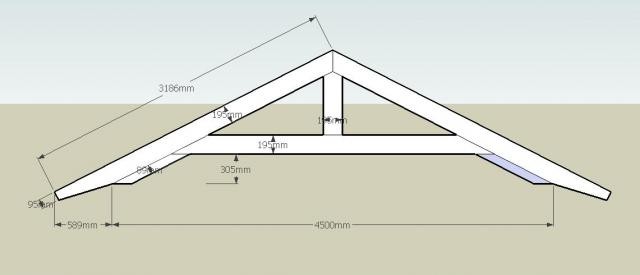
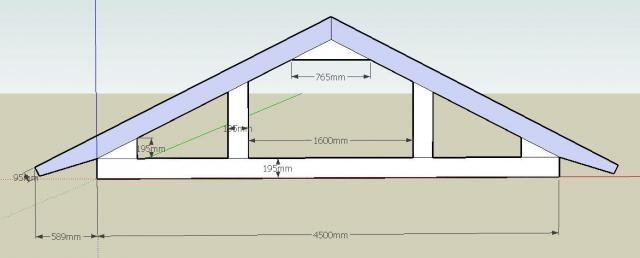

Hello Cheeta!
Both constructions will hold up, although I prefer chair 2, considering the ventilation and insulation. It also makes it easier for the ceiling to be straight.
I have personally built lots of chairs (of both models) in the same dimension and slope, for log cabins up here in Norrland, with lots of snow.
Do not skimp on the length of the nail plates.
(In fact, most of the time we haven't used nail plates but instead used boards 22x195 and nailed them on both sides of the rafters with a nail gun, 70 and 90 mm nails.
Build the chairs lying on top of each other, so they become identical.
Take care! Johan
Both constructions will hold up, although I prefer chair 2, considering the ventilation and insulation. It also makes it easier for the ceiling to be straight.
I have personally built lots of chairs (of both models) in the same dimension and slope, for log cabins up here in Norrland, with lots of snow.
Do not skimp on the length of the nail plates.
(In fact, most of the time we haven't used nail plates but instead used boards 22x195 and nailed them on both sides of the rafters with a nail gun, 70 and 90 mm nails.
Build the chairs lying on top of each other, so they become identical.
Take care! Johan
Thank you for a great response!
The idea is to use both trusses to create a low-built workshop section and a high-built garage section (albeit without a partition wall), to allow for accessing the "attic" from the gable and laying down boards. It will be a heated garage, but proper heating, around 18-20 degrees, will only be maintained during work in the garage; otherwise, it might suffice to keep it at 10-15 degrees, so the 195 mm available in the flooring will have to do.
I was thinking of using nail plates with anchor screws.
How do you join them at the ridge if you want to connect them with a 45x170 board as high up as possible, with nail plates vs. fastening the board? (see image)
The idea is to use both trusses to create a low-built workshop section and a high-built garage section (albeit without a partition wall), to allow for accessing the "attic" from the gable and laying down boards. It will be a heated garage, but proper heating, around 18-20 degrees, will only be maintained during work in the garage; otherwise, it might suffice to keep it at 10-15 degrees, so the 195 mm available in the flooring will have to do.
I was thinking of using nail plates with anchor screws.
How do you join them at the ridge if you want to connect them with a 45x170 board as high up as possible, with nail plates vs. fastening the board? (see image)
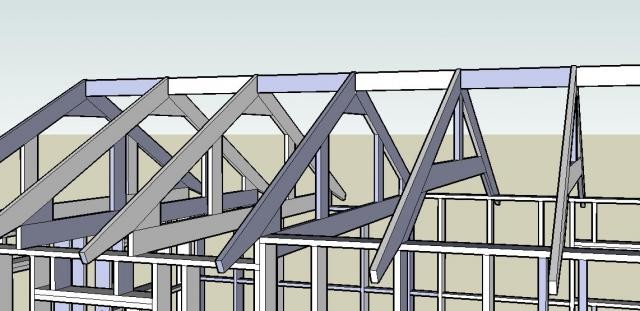
Ok! Sharks!
Since you live in Skåne, the insulation is probably sufficient, especially since you won't have full heat all the time.
Especially if you're planning to make a hatch up to the "vinden".
That way, you avoid losing many cubic meters of heated air up there.
The rafters closest to the gable peaks we usually reinforce only on the inside and then nail that "kloss" against the gable end.
It still becomes the most stable part of the roof structure.
Nail plates and anchor screws sound very reassuring.
(If only one could afford to build so sturdily!!)
Hadé! Johan
Since you live in Skåne, the insulation is probably sufficient, especially since you won't have full heat all the time.
Especially if you're planning to make a hatch up to the "vinden".
That way, you avoid losing many cubic meters of heated air up there.
The rafters closest to the gable peaks we usually reinforce only on the inside and then nail that "kloss" against the gable end.
It still becomes the most stable part of the roof structure.
Nail plates and anchor screws sound very reassuring.
(If only one could afford to build so sturdily!!)
Hadé! Johan
No, I usually don't put a board between the rafters at the ridge. Just temporarily when I'm erecting the rafters to make them sit correctly before I get the sheathing on.cheetah1 said:
Attaching to the frame. There are different ways, for example;
Notch out the rafters a little on the underside, (all exactly the same amount!) where they will rest on the top plate/ledger board. Toe-nail. If you don't have a ledger board you can notch out the top plate, which is good for achieving the same and correct distance, and more stability during the raising process.
With a ledger board, you can nail "cantings" downward and then into the rafter.
That's about all you need to do if you're having a ceiling, it locks the rafter against the inner wall.
If you want it open, nail a board, etc., underneath the entire thing, locking it against the inner wall.
When raising the rafters, raise the outermost ones first and stretch a string between them so the ridges align correctly. (It looks really bad otherwise!)
Don't forget to mark the rafters when you build them, so you don't twist or turn them, or get them out of order. Just a little tip. (Speaking from past mistakes!
)Take care! Johan


I placed angle irons where the chairs are supposed to be, this to speed up erection/lifting when the tractor was here.
Attached them to each other at the support legs with sparse paneling that I had lying around.
When the sheathing was in place, I removed all the 'supports'.
I started from the inside, mostly so the tractor could 'work its way out/back' and had measured the width of the framework in several places, and cross-measured it. However, I slightly neglected the cc measurement at the top, which will mean I'll have to 'pay for' this when the roof is to be insulated.
But as I just wrote in another garage thread - you live as long as you learn.
Attached them to each other at the support legs with sparse paneling that I had lying around.
When the sheathing was in place, I removed all the 'supports'.
I started from the inside, mostly so the tractor could 'work its way out/back' and had measured the width of the framework in several places, and cross-measured it. However, I slightly neglected the cc measurement at the top, which will mean I'll have to 'pay for' this when the roof is to be insulated.
But as I just wrote in another garage thread - you live as long as you learn.
Click here to reply