3,171 views ·
13 replies
3k views
13 replies
Repair large hole in aerated concrete
Hello,
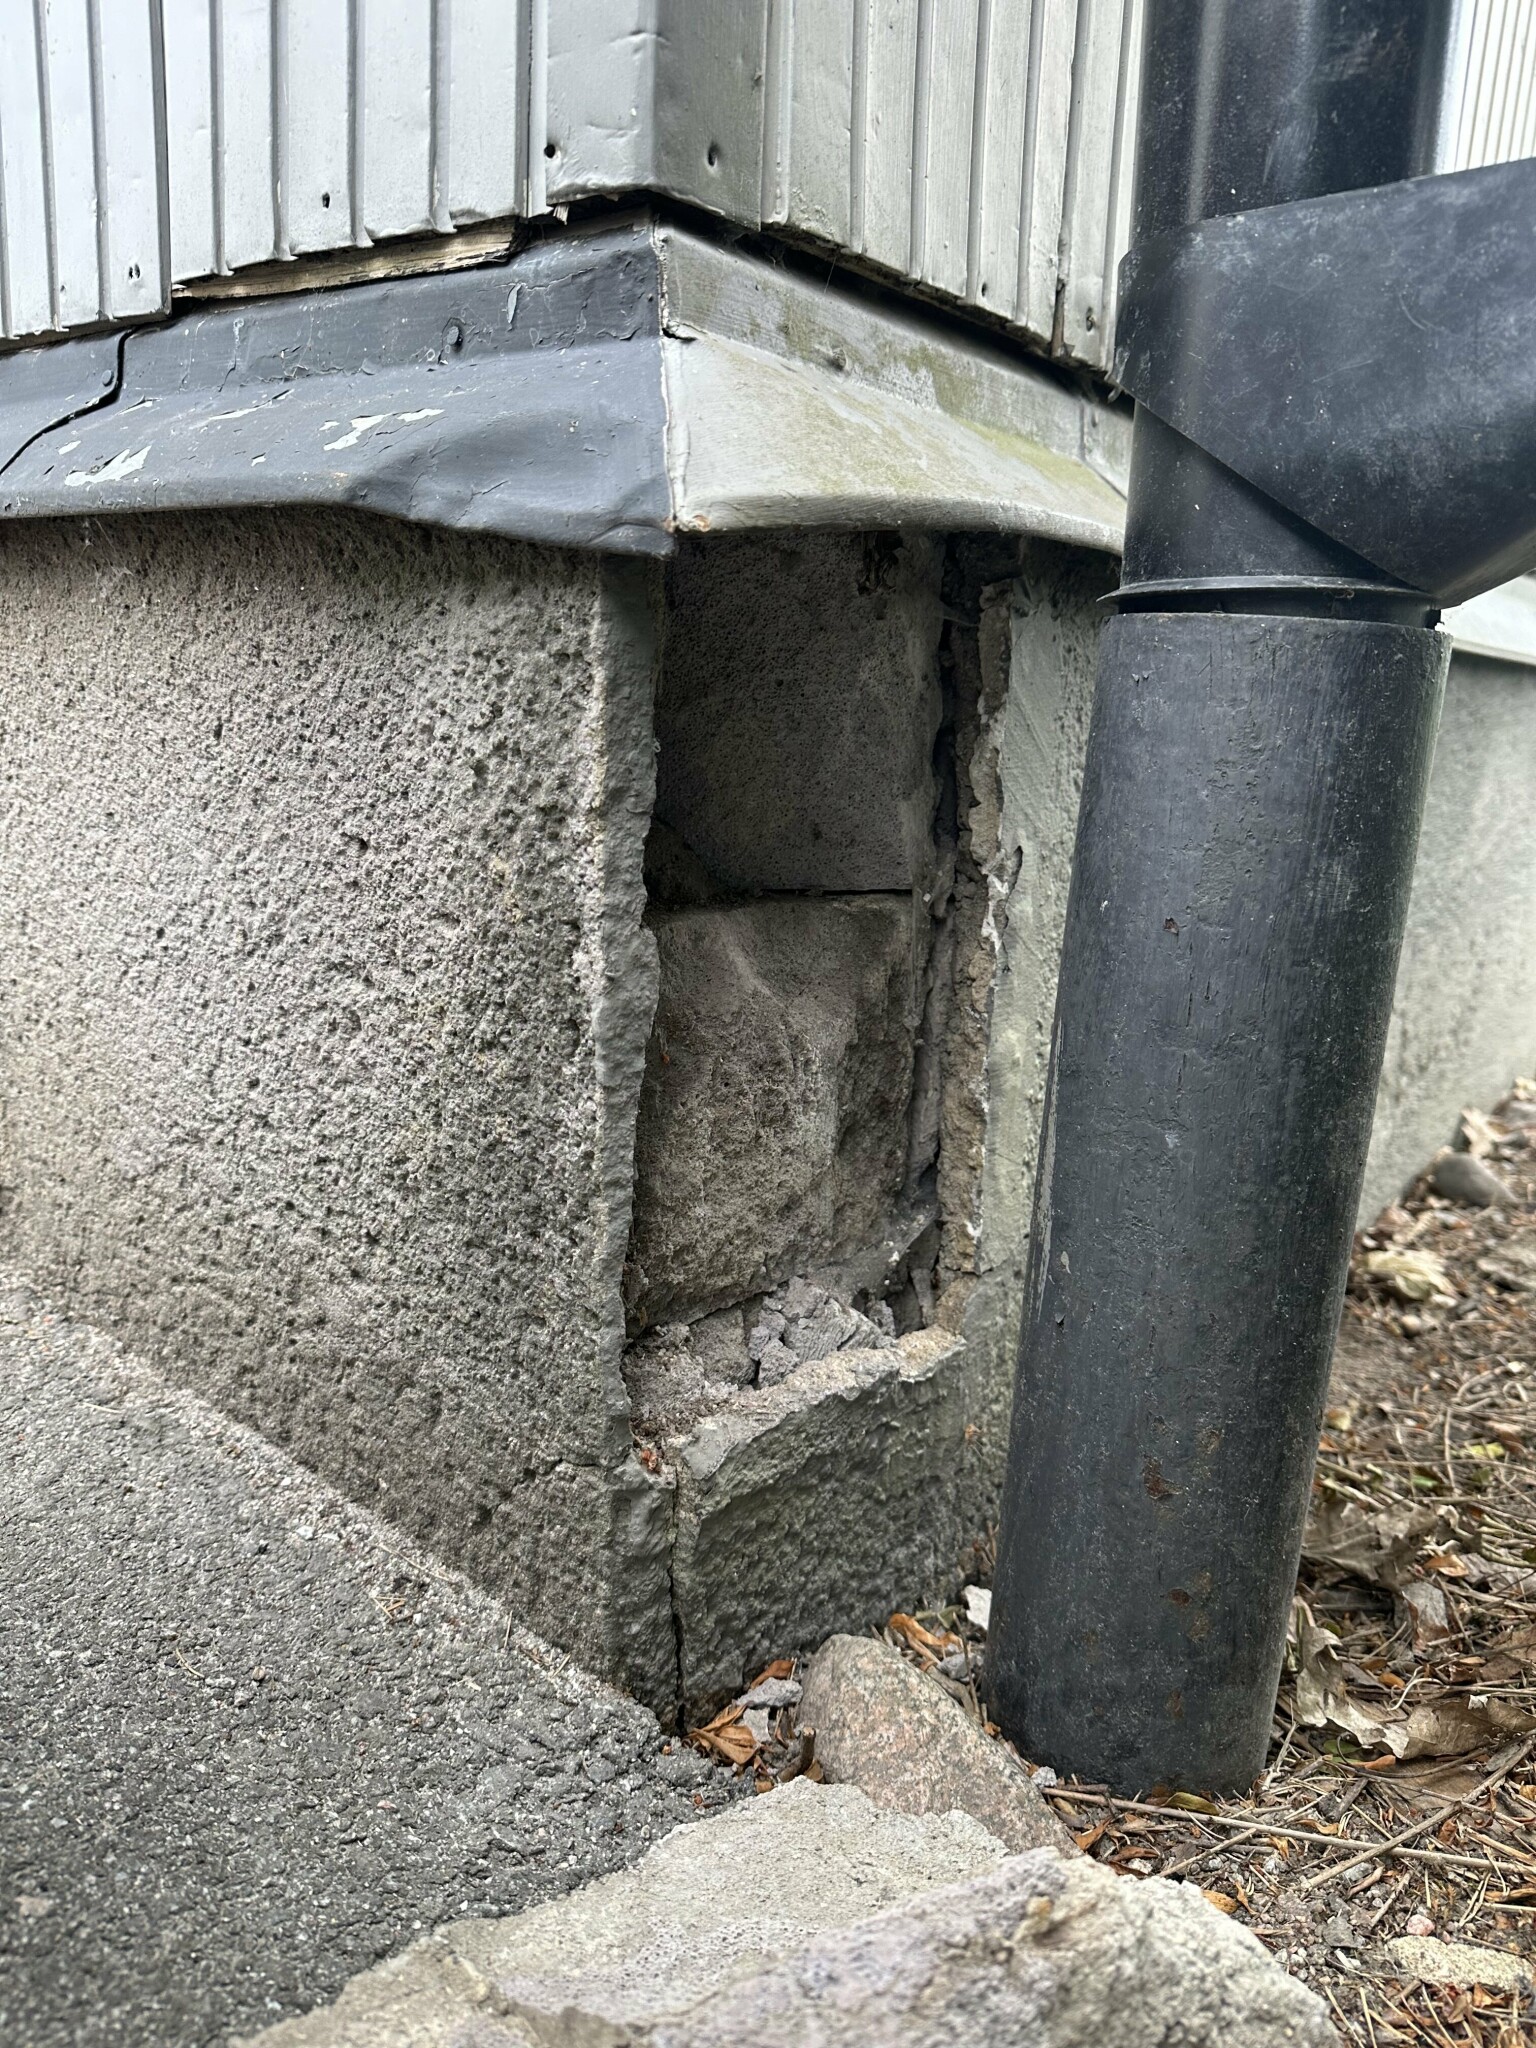
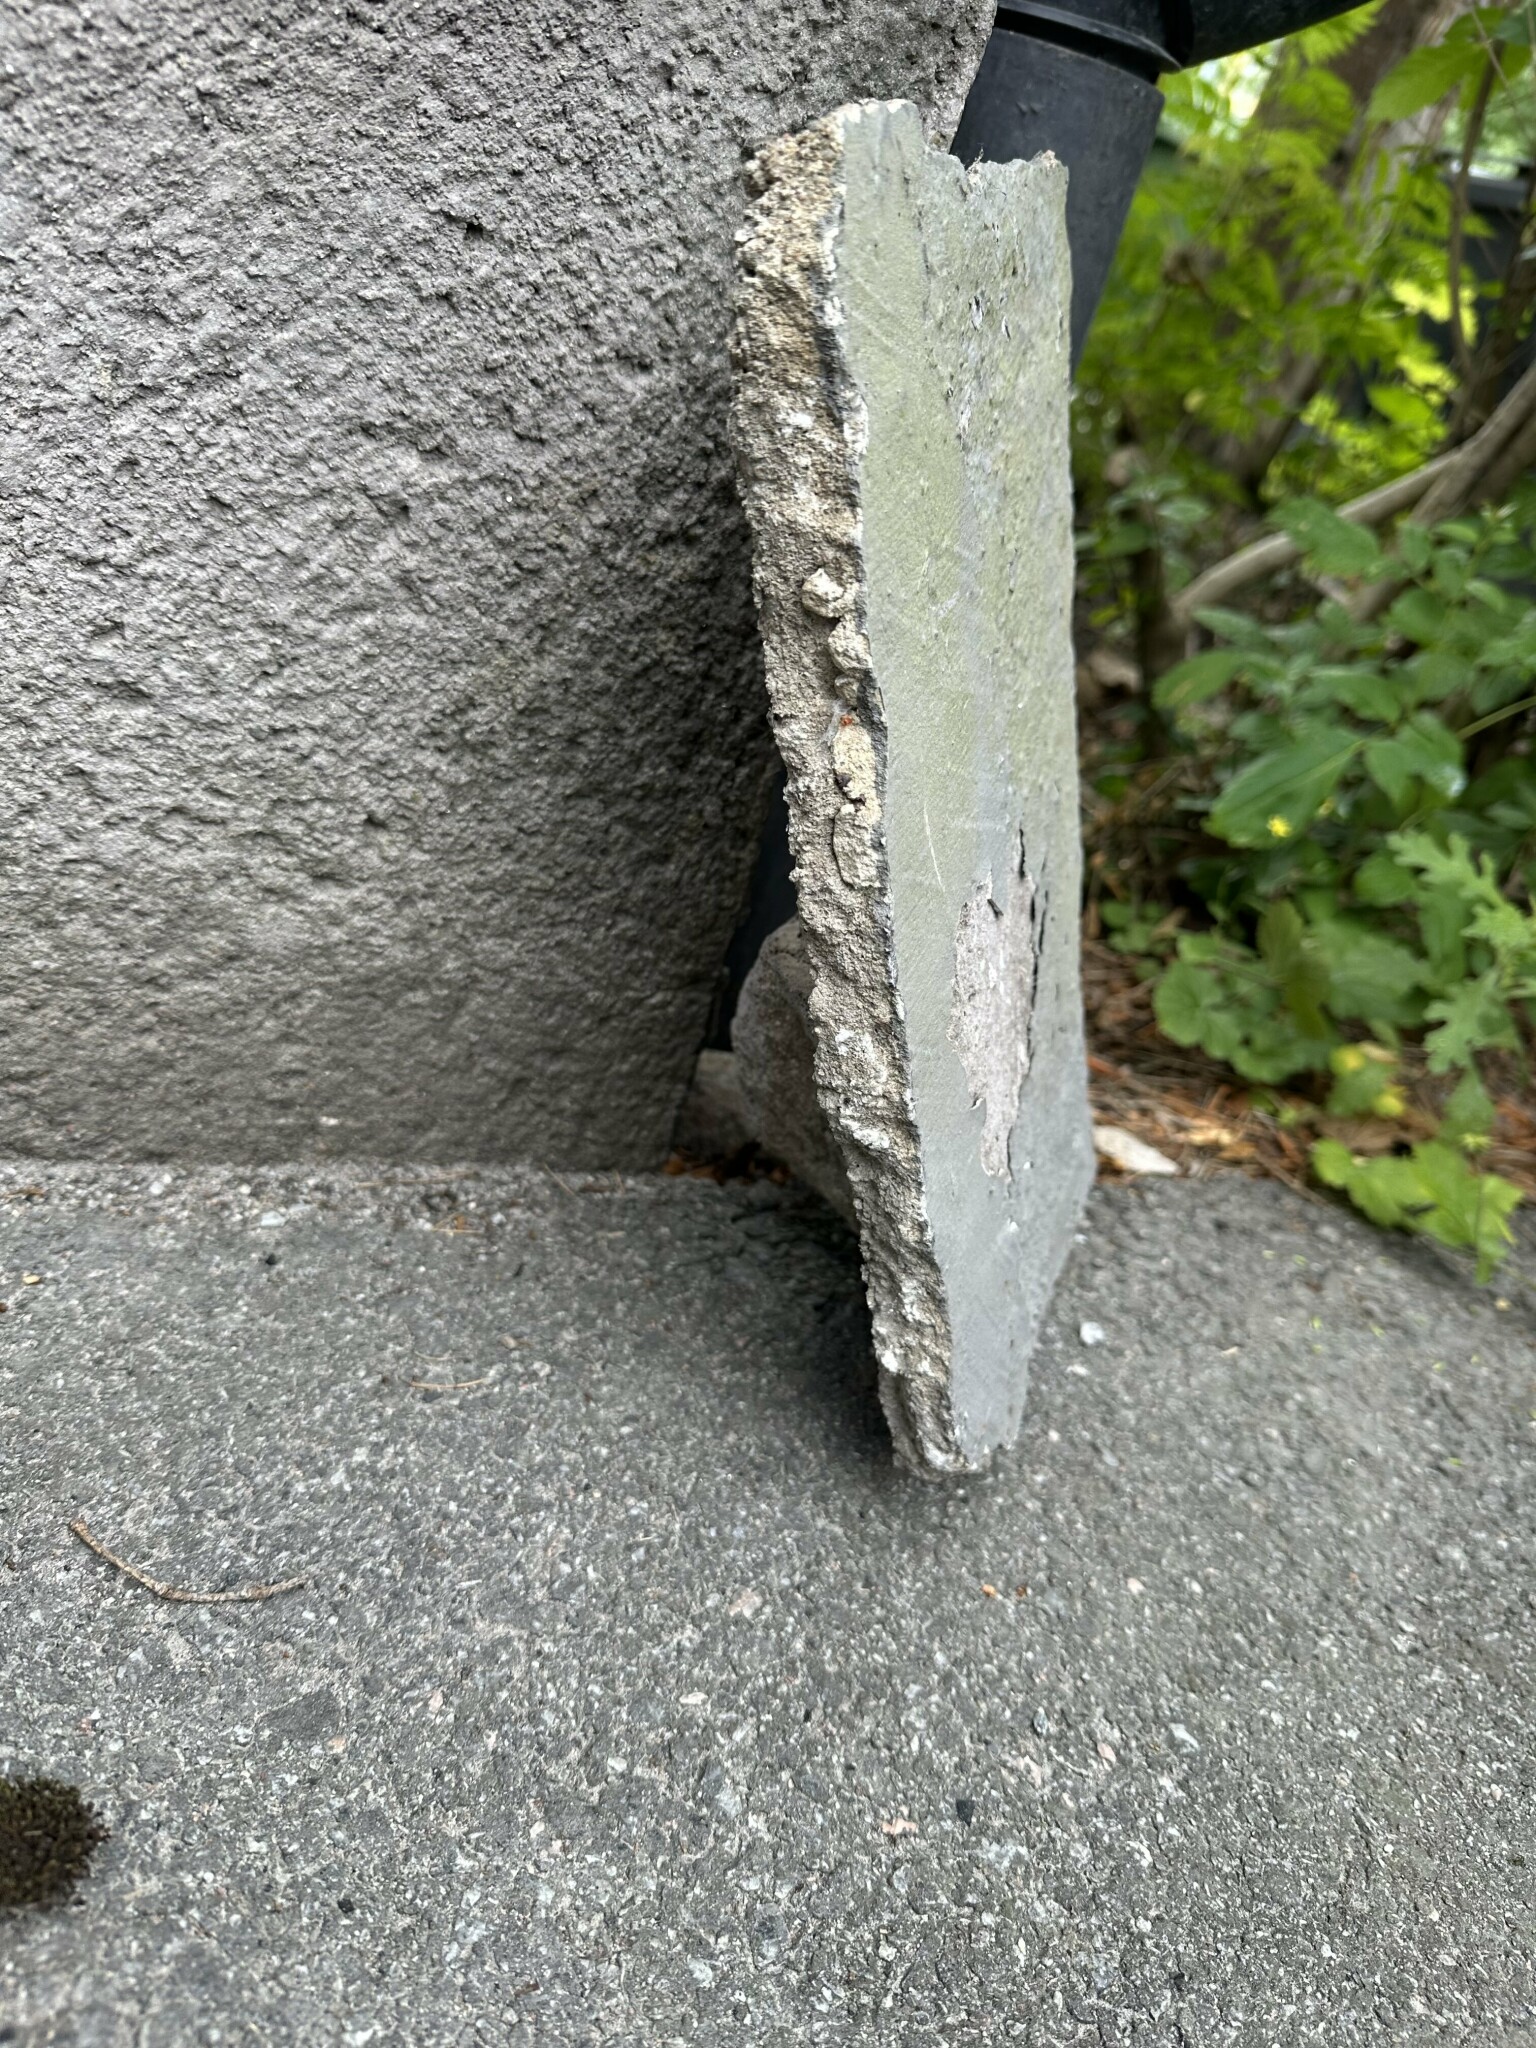
I have an exterior wall with large cracks and big "blocks" that have come off. See pictures. I'm wondering if anyone knows what the outermost "block" that is about 1-2 cm could be, fiber cement board?
Then I'm also wondering about materials. I've read around a bit, and some suggest fixing with husfix or Finja repairing wall, while others say you should fill it with a new lightweight concrete block that is cut to size. In that case, could the piece that fell off be reused, by cutting it down and gluing it with a bit of concrete?
Grateful for help, a mason wanted 30,000 for the job! Since he believed that one should redo the whole house at once rather than just repair.

30,000 SEK? Isn't it just a matter of mixing a bag of concrete and filling it in? Or am I wrong? That's what I would have done anyway. The 29,900 SEK I would've saved would probably have been spent on wine, so in my case, the benefit might have been greater with the mason 😄👍
He didn't want the job...
If the rest of the wall looks good, then you just need to knock away everything that's bad/loose, build up inside with some creatively adjusted lightweight concrete blocks and then plaster.
It's a bit too large a hole to simply fill with fix/mortar, and casting feels excessive when the rest is lightweight concrete. So buy a couple of blocks at the nearest building supply store, saw/knock them into a reasonable shape that fits "decently" in the hole. (You can do it with many pieces and you can saw with a handsaw you don't care too much about, although a concrete saw blade in a reciprocating saw is more fun.) Then mix some mortar and start applying it and filling up.
Once the hole is fixed, buy a bag of plaster, watch a couple of YouTube videos for handy tricks on getting a good surface on the plaster, and get started.
I also guess there will be about 29' left over, depending a bit on how many want-need items you buy and how much you're willing to make do with what you have.")
If the rest of the wall looks good, then you just need to knock away everything that's bad/loose, build up inside with some creatively adjusted lightweight concrete blocks and then plaster.
It's a bit too large a hole to simply fill with fix/mortar, and casting feels excessive when the rest is lightweight concrete. So buy a couple of blocks at the nearest building supply store, saw/knock them into a reasonable shape that fits "decently" in the hole. (You can do it with many pieces and you can saw with a handsaw you don't care too much about, although a concrete saw blade in a reciprocating saw is more fun.) Then mix some mortar and start applying it and filling up.
Once the hole is fixed, buy a bag of plaster, watch a couple of YouTube videos for handy tricks on getting a good surface on the plaster, and get started.
I also guess there will be about 29' left over, depending a bit on how many want-need items you buy and how much you're willing to make do with what you have.
If the rest of the wall looks terrible, but better than this, then you have just practiced plastering.Dowser4711 said:
He didn't want the job...
If the rest of the wall looks good, just knock off everything that's bad/loose, build up inside with some creatively adjusted lightweight concrete blocks and then plaster.
It's a bit too big of a hole to just fill with adhesive/mortar, and casting seems excessive when the rest is lightweight concrete. So, buy a couple of blocks at the nearest building store, cut/chisel them into a reasonable shape that fits "decently" in the hole. (Works perfectly with many pieces and you can cut them with a handsaw that you don't care too much about, although a concrete saw blade in a reciprocating saw is more fun)
Then mix some mortar and start spreading in and filling up.
Once the hole is fixed, buy a bag of plastering mortar, watch a couple of YouTube videos for handy tricks to get a good surface on the plaster, and get started.
I also guess there will be about 29' left, depending on how many "want/need" items you buy and how much you're willing to use what you have.
When you then think that another part needs to be addressed, just bring out what's left of the plaster and get started. If you're working at home yourself, it doesn't matter if it ends up being many small jobs. You have no travel costs and manageable setup time.

It is a plastering with cement mortar that is the "panel" as far as I can see. Probably a highly cement-rich variant, like A-mortar or possibly B-mortar.
It can be repaired with regular cement mortar, and B-mortar will likely work well. The difficult part is making it look nice. The base has been roughcasted, i.e., the last layer of mortar is sprayed on with a machine - hence its bumpiness. It may be difficult to achieve the same texture by hand. It requires the right hand technique, right dampness in the mortar and the right aggregate (sand/gravel) in the mortar. You have to experiment with the final layer.
Instructions:
1. Smear on A-mortar paste on underlying stones and edges so that the mortar adheres. Let it dry for a few hours.
2. Install a plaster net (fully galvanized or fiberglass).
3. Throw on (=apply) B-mortar over the plaster net. Do not smooth out. Let it dry.
4. Throw on the next layer of B-mortar so that you are about 5 mm from the surface edge. Smooth it out.
5. Now the difficult part: mix B-mortar fairly loose and throw it on. Try to get the same roughcast pattern as the rest of the base. Make sure to have different kinds of gravel at home which you can mix into the mortar to achieve the right roughcast look. You can buy sacks of graded sand in various dimensions for this purpose. You can also sieve natural sand if you have a sieve. If it looks bad, scrape it down, and try again. And again, until you are satisfied.
which is mixed almost earth-dry (meaning very dry).
When the plaster has come off, it's better to mix plaster mortar and redo the plastering, concrete is the wrong material.Farstatjej90 said:
Thank you so much for the great answers! I've read everything and am absorbing your knowledge!
I'll probably start with a primer using A-bruks välling or Grundningabruk KC. Then I'll fill in the deep holes with A-bruk using reinforcing mesh (leftover from a cast-in-place outdoor kitchen), and finally, I'll plaster with a C-kalkbruk (I believe that’s what was used previously).
As mentioned, a big thank you to this wonderful forum. I'll update with the outcome if someone in the future is searching with a similar house/problem.
Started the project now and began tapping, but the damage is just growing and when I lightly tap with my fist, I would say it sounds hollow throughout the red area.
Is it still a reasonable project for a DIY? I have previously thin-coated a laundry room and cast an outdoor kitchen, but none of that is really a construction project like this one.
Is it still just a matter of applying Grundningsbruk KC at the bottom and then continuing with Armerat Cementbruk A all the way out?

It looks like there are a few blocks behind it, aren't they the ones taking the weight? The plaster doesn't matter if it disappears, does it? If you can knock something off and it just falls apart, it's very unlikely that it was bearing any weight...
Remove anything that is loose/detached.
Rinse away dust with a water hose.
Prime and smooth it out with cement mortar A in stages.
Primer mortar KC is used on façades, not on the base.
No reinforcement/netting is needed.
Rinse away dust with a water hose.
Prime and smooth it out with cement mortar A in stages.
Primer mortar KC is used on façades, not on the base.
No reinforcement/netting is needed.
Click here to reply