You have a problem in a room, where you have an access panel that is open (i.e., ventilated) to the surroundings.
Don't know the location of the access panel in the room, but what I would do:
Quick test, cover the access panel with plastic and wait a few days, read the instrument.
Lower value, proceed to Nr2.
Nr2: try to fix the panel to its frame, i.e., screw the panel to the frame and then take some waterproofing (Kilto k2?) to paint over the frame and about 20-30cm outside the frame. Paint in several layers.
Measure for a few days, if the value is higher than expected.
Nr3. Drill a hole in the access panel and install a fan system that diverts to the atmosphere.
If it's ground radon, it fluctuates with air pressure, so the best is to do a measurement over a long period. Not for an hour, but at least a day.
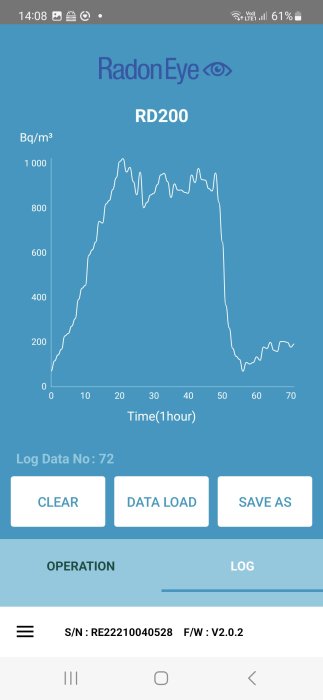
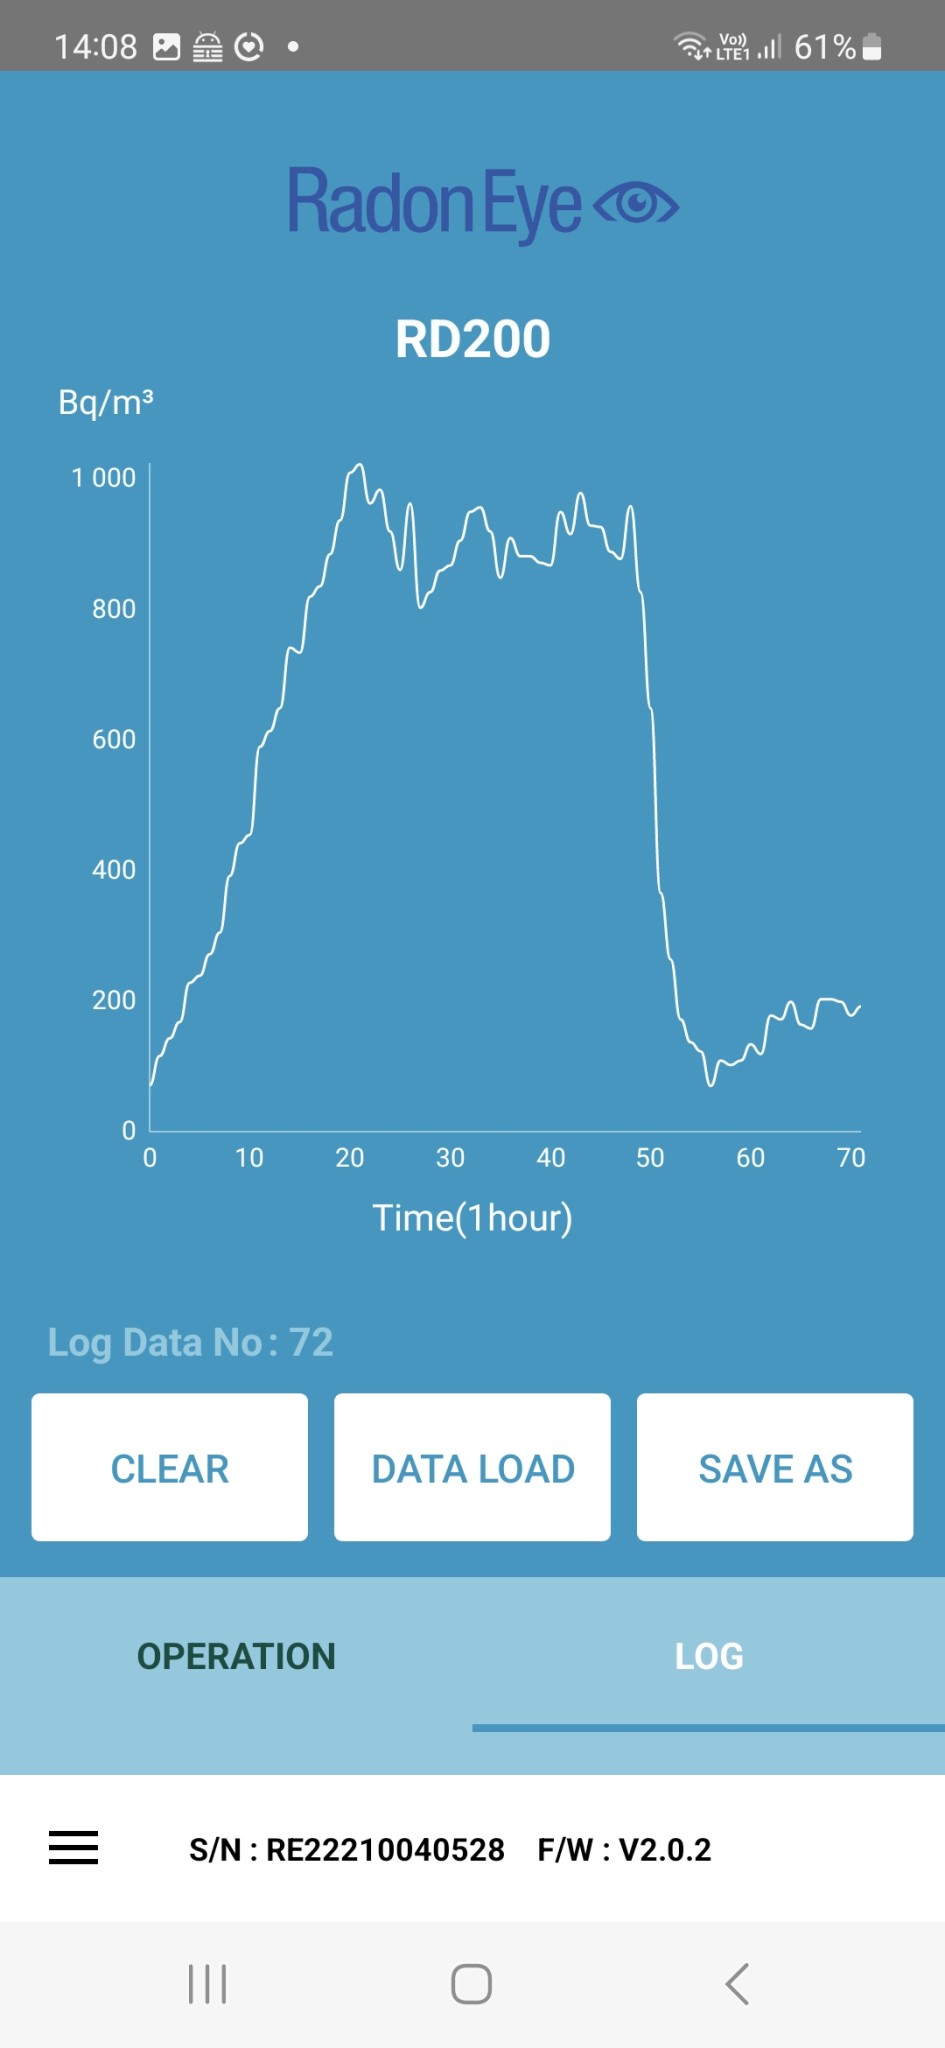
The value settled quite steadily around 1000 bq/m3, but when we opened the window slightly, it took no more than a couple of hours for the value to drop to under 200 bq/m3, so one can say that radon is very volatile, and there's a complete lack of ventilation here.
To determine if the radon comes from the well, I covered it with some plastic and closed the window again:
You can see that the curve is much lower; sure, we would have liked to see 0 rise here, but one must consider that the room has no ventilation. It is entirely possible that the radon level in the foundation is now the same in this room as in the rest of the basement, but with the difference that there is ventilation in the rest of the basement.
So the plan is clear: install a wall vent and seal the hatch.
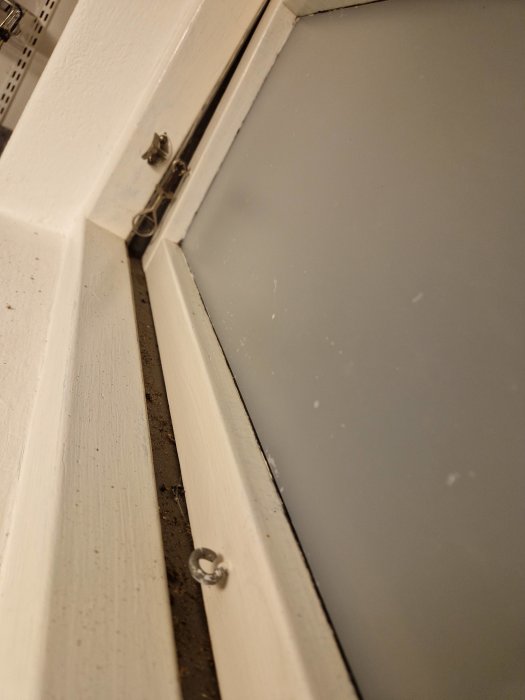
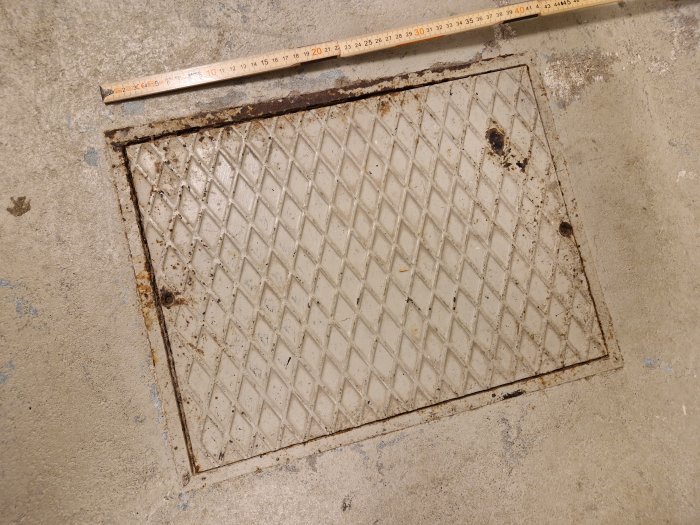
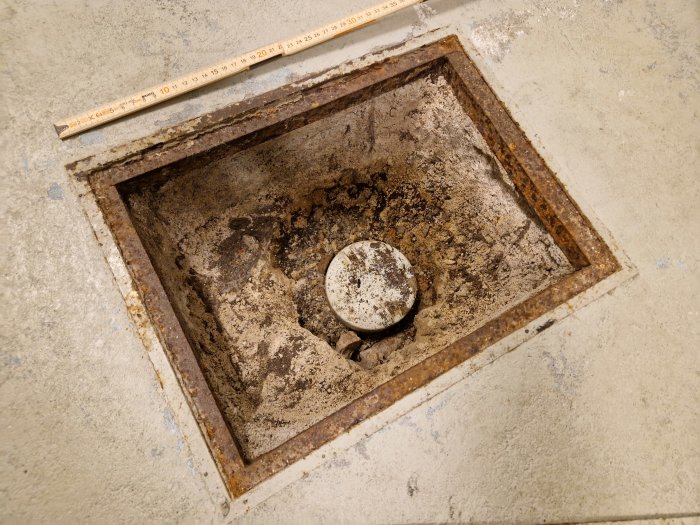
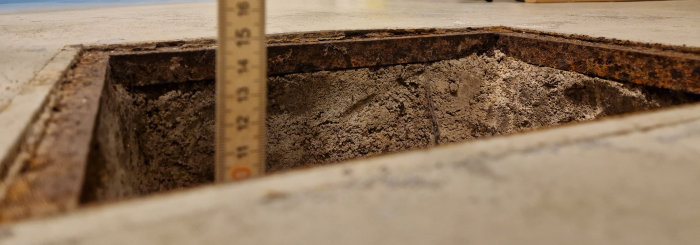
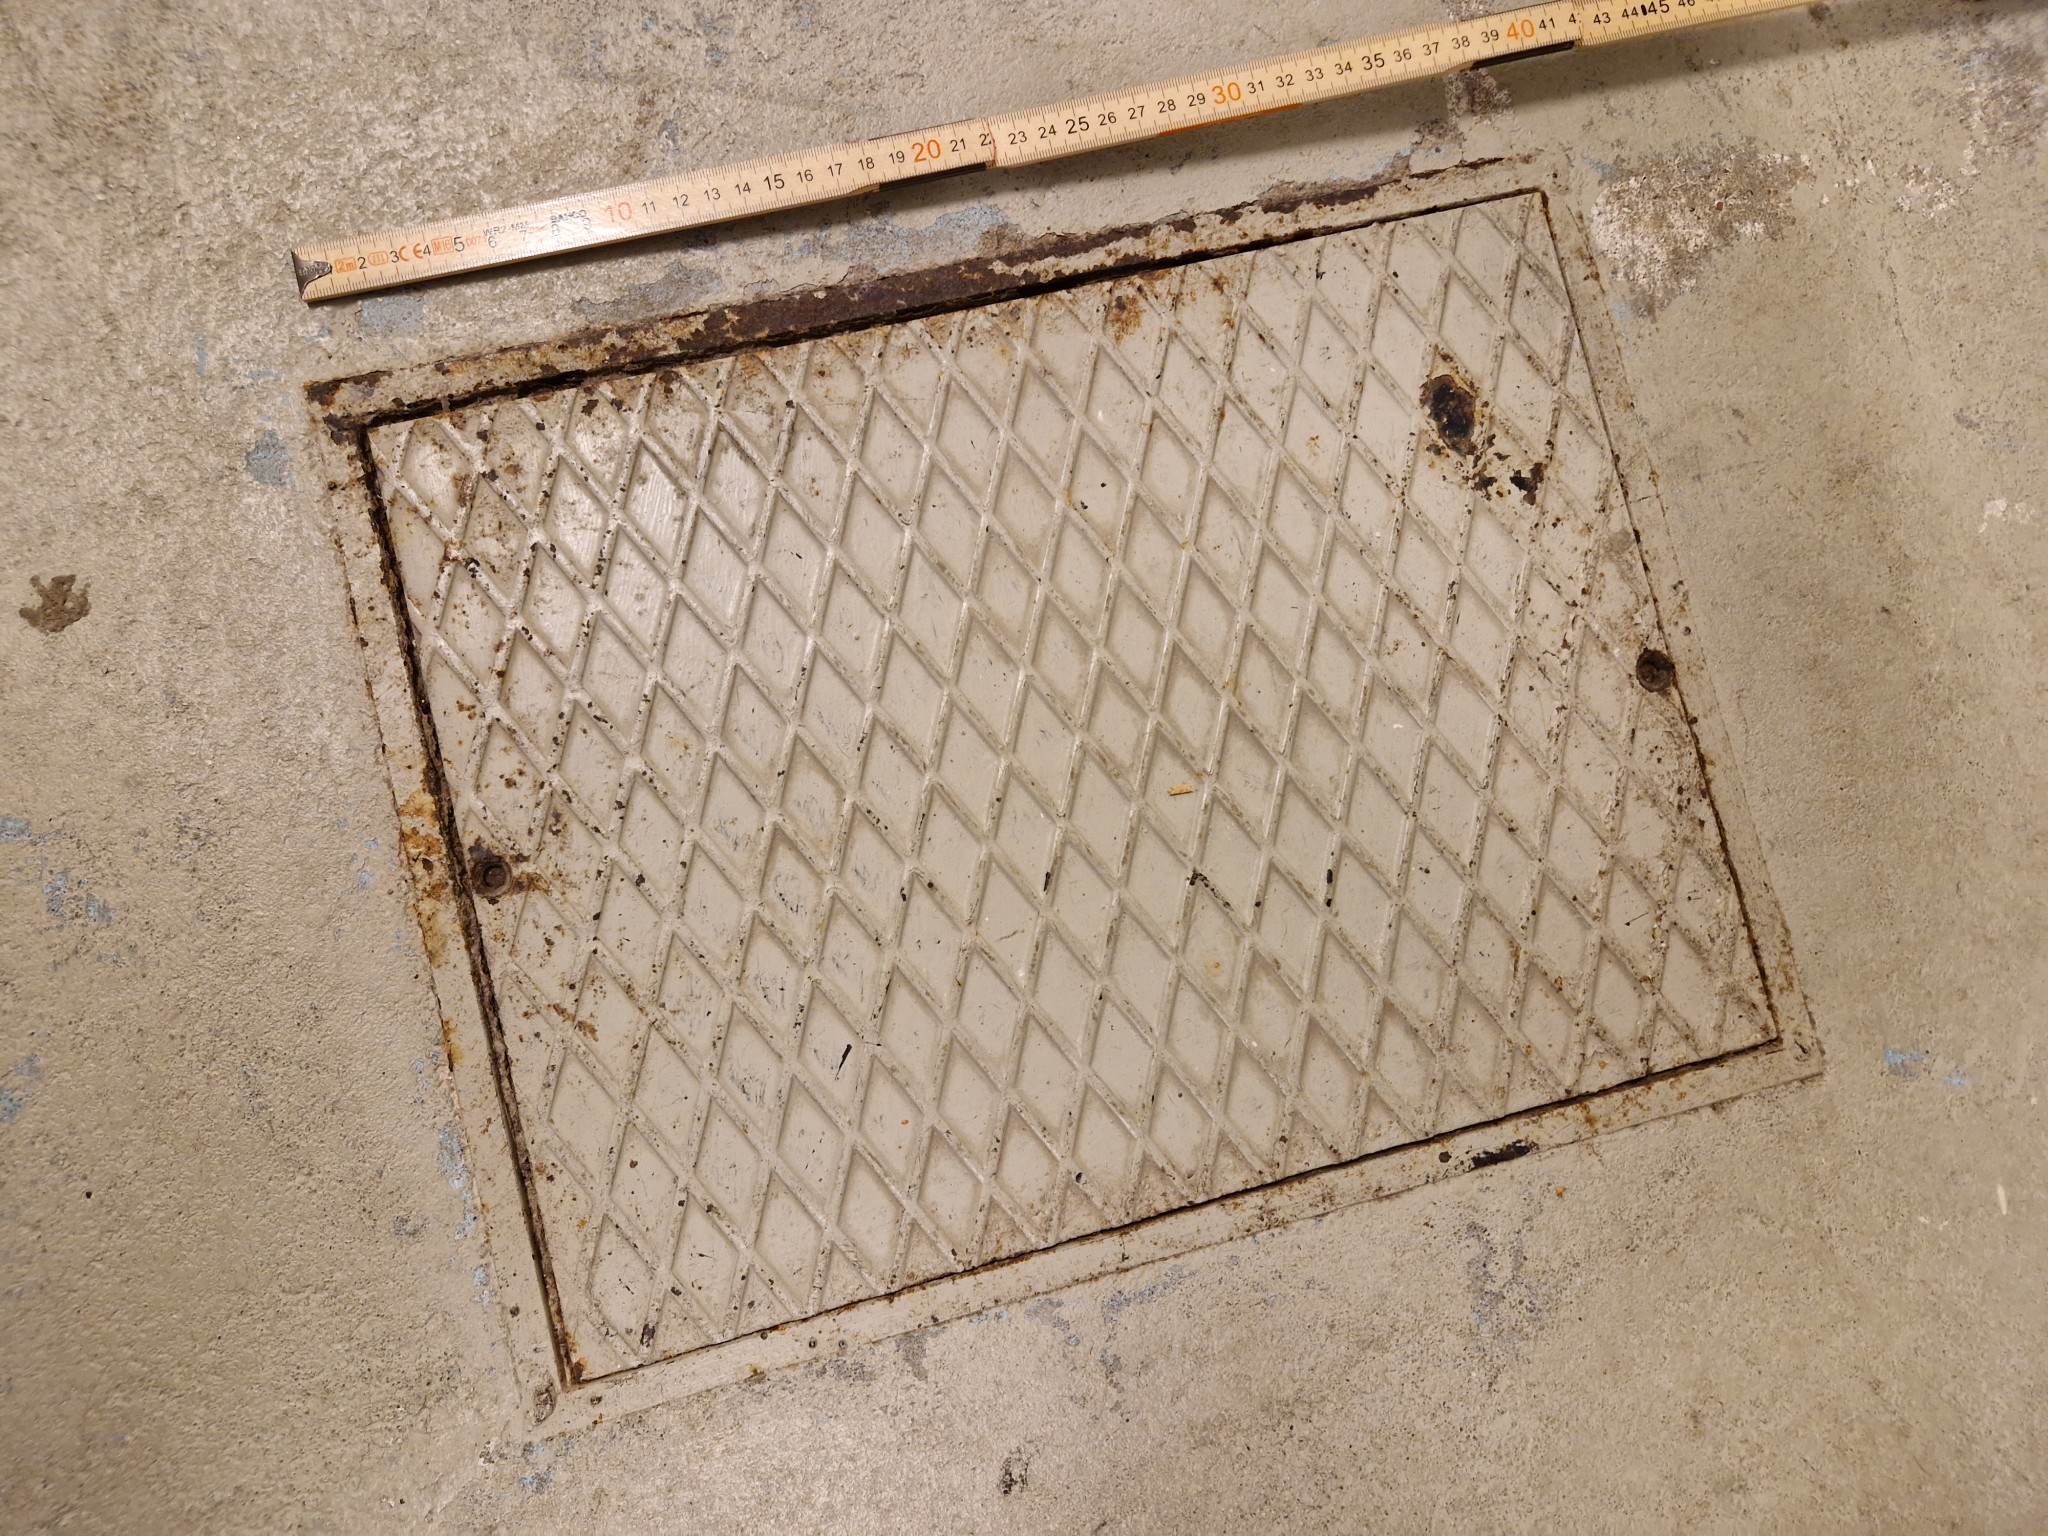
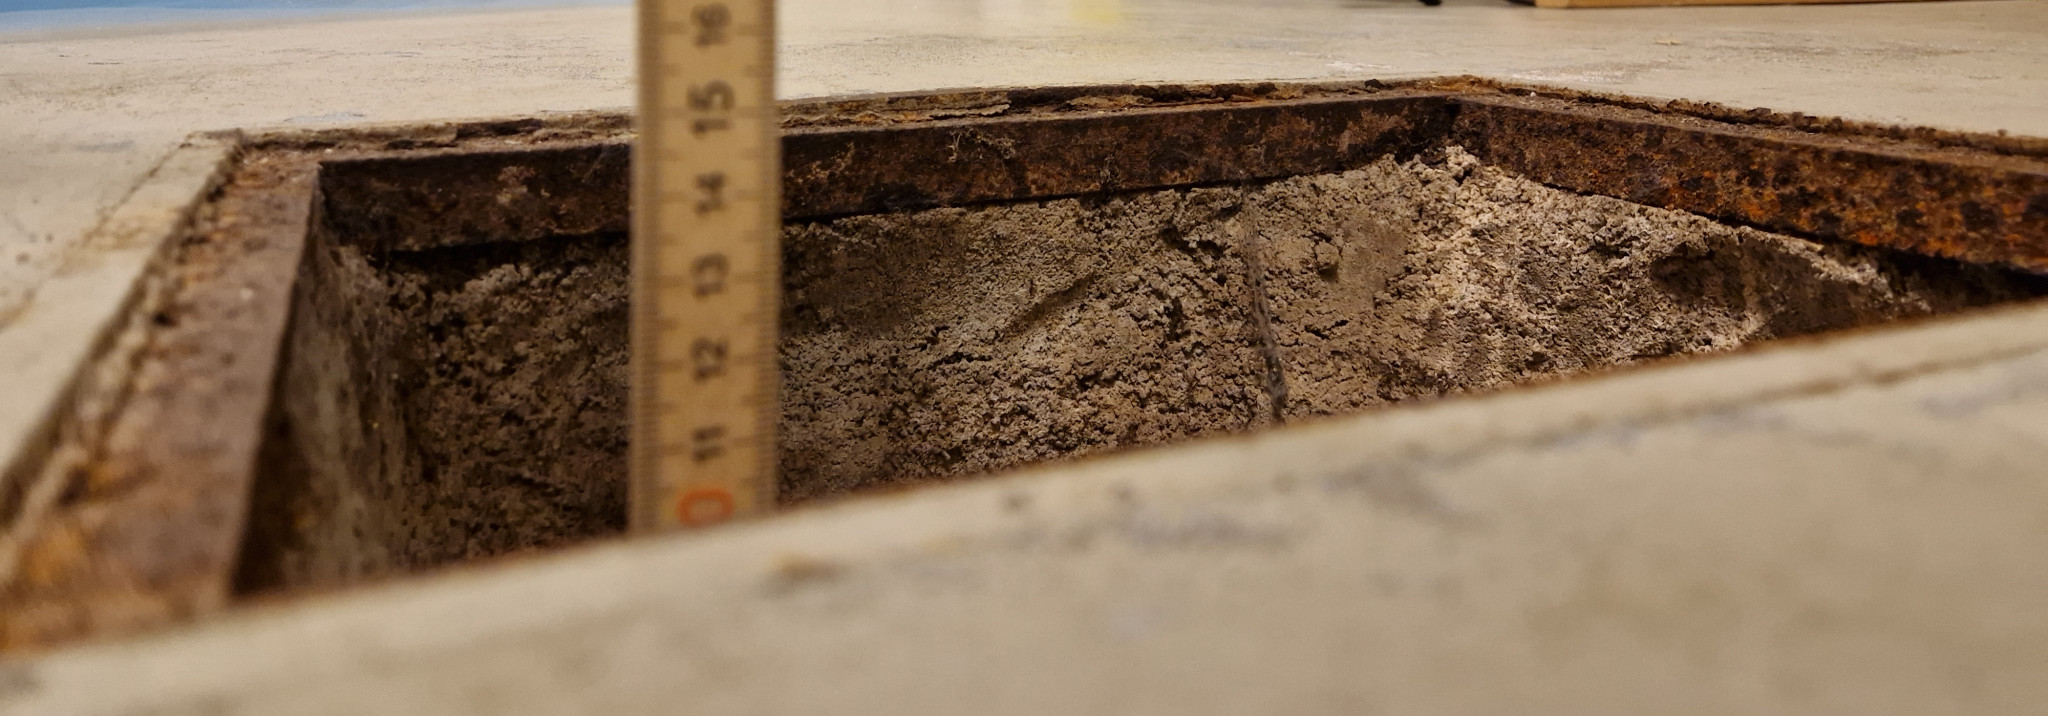
How do you seal the hatch then? Here's what it looks like:
Airthings Smartwave measures radon levels and you can view them via an app, it takes about a day to show the correct level. For me, it has been quite a good thing for finding the rooms where the radon is coming in.
Airthings Smartwave measures radon levels and you can see them through an app, it takes about a day before it shows the correct level. For me, it has been quite useful for identifying the rooms where the radon enters.
Have a different thread about it, I was also considering it for a while, especially since it can be connected to homey, which makes it much easier to get an overview. But there were too many cases showing strange measurements when compared with professional equipment.
Another thing is that Airthings is more about long-term measurement; if you place 2 Airthings in the same spot but with a couple of days' difference, there's a good chance they won't show the same value, especially if the value changes a lot. They have an explanation on their website, and in short, it's about how they calculate the average. In my case, it is worth its weight in gold when I can see the change in radon level within 1 hour from when I, for example, open the window.
Airthings can certainly work well if measuring over long periods (at least 7 days according to them), but that's not really where my needs were.
The value stabilized quite consistently around 1000 bq\m3, and when we opened the window slightly, it took no more than a couple of hours before the value was down to under 200 bq\m3, so one must say that radon is very volatile, as there is no ventilation here.
[image]
To determine if the radon comes from the well, I put some plastic over it and closed the window again:
[image]
[image]
You can see that the curve is much lower, and although we would have liked to see 0 increase here, one must consider that the room has no ventilation. It is entirely possible that the radon level in the foundation is now the same in this room as in the rest of the basement, but with the difference that the rest of the basement has ventilation.
So the plan is clear, install a wall vent and seal the hatch.
How does one seal the hatch then? Here's what it looks like:
[image] [image] [image]
The deepest point is about 20 cm.
Suggestions?
Your test with plastic and tape gave very good results, so it's worth experimenting. What happens if you put a regular rubber seal for windows and put the hatch back? If it provides a sufficiently good result, it's a very cheap solution.
Unfortunately, there hasn't been a vent installed in the wall yet, so for now, we've been leaving the door to the garage slightly open. This means, of course, that it gets very cold in this room, but it doesn't really matter. It feels safer to have the door slightly open than to have the window open directly to the garden.
I've been thinking about how to seal the floor drain; rubber seal sounded good, there are quite thin options available. The problem, however, is that the lid and the insert are very rusty, so attaching something there could be a problem. You'll probably need to sand it clean with an angle grinder and repaint it for it to work. However, there is still a risk that the lid sticks up a few mm so that someone might trip over it. There is also a risk that it won't be completely sealed.
Is there anything else that could be used to seal it? Maybe something you put in the hole at the base and around the pipe opening?
The hole is made and now there is a passive vent installed. With the door closed, the radon level has been just under 100, which is considered acceptable.
I will get a clean and nice plate for the floor hatch and hope that I can achieve a reasonable seal without using sealant.
A ventilation company has been here and replaced the bearings in the exhaust fan while also calibrating the airflow, which you can read about here. A short version means that they have increased an already according to them good airflow, especially in the basement, which has now resulted in a lower temperature (18 degrees). Whether we should adjust the airflow down again or reconsider the heating system remains to be seen.
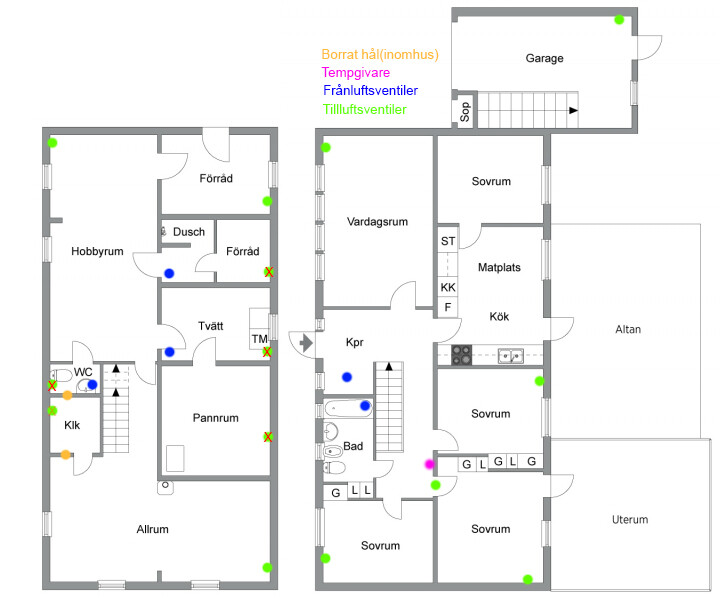
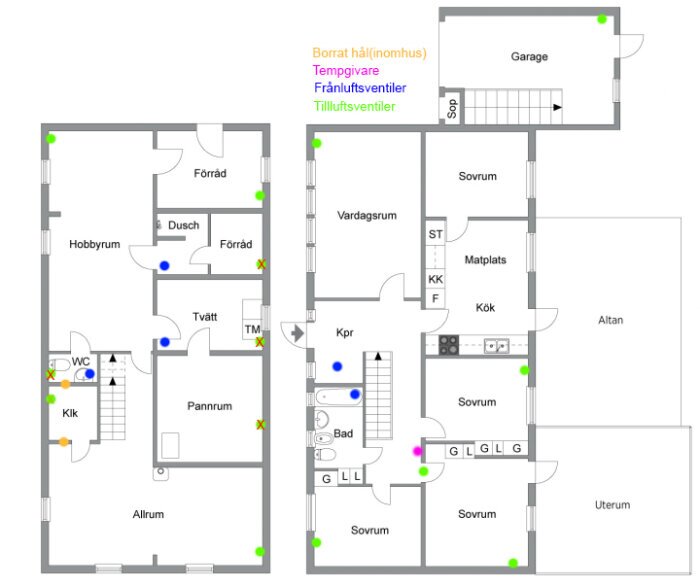
Additional drilling has been done between WC > Klk > Common room. The hope was to be able to pull air from the common room to the exhaust vent in the WC, but unfortunately, it turned out that Klk also has a radon exposure. Before drilling, we measured 300-400 bq\m3, hoping that the ventilation to WC would solve it. After we closed the air supply in Klk and did the drilling, it only went down by 100 bq\m3 (possibly less, the measurement is not completely finished yet). We were forced to open the air supply in Klk, which means that air is not drawn as effectively from the common room.
When we did the drilling in the wall between the WC and Klk, it became clear that this wall is entirely made of blåbetong. It differs somewhat from the other walls in the basement (as we know), being only 8 cm thick.
I have a thought about testing with one of our radon sensors if they detect any elevated value from the piece in the picture, but right now they are measuring the common room and Klk.
Now I know that it's not extremely high values we have and that one can generally disregard them, but it still means that one has to keep an eye on it, and it means that the ventilation must work in a certain way, which in turn leads to a poorer indoor climate or more expensive heating. So right now, I'm considering whether it might be an idea to carry out a proper radon remediation, i.e., drilling holes in the slab and extracting the radon from under the slab where most of it probably comes from. From what I understand, it doesn't have to be that expensive?
If so, it would mean that we can more easily manage the ventilation, heating, and possible soundproofing in the house.
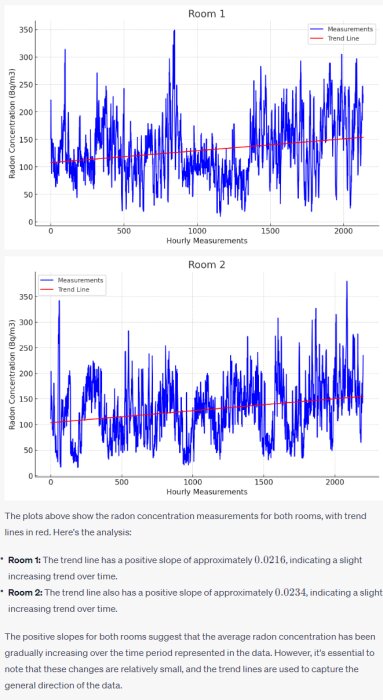
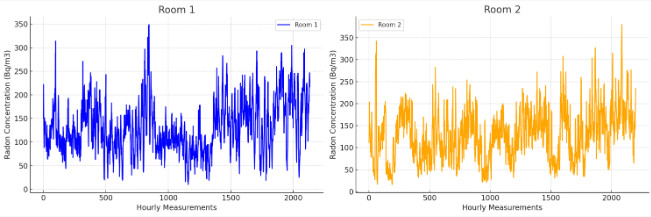
The 2 Radon Eye sensors have been measuring radon levels since 5/5 this year. Both indicate an average of 130 Bq/m3:
MAX value for the TV room is 350 Bq/m3 and 380 Bq/m3 for the storage.
Looking at the average for day and night, they are practically at the same average. However, there is a steady increase even though it is small:
Comparing to the outdoor temperature from where both these rooms draw air does not seem to significantly affect the level.
There is some impact, but it is quite modest.
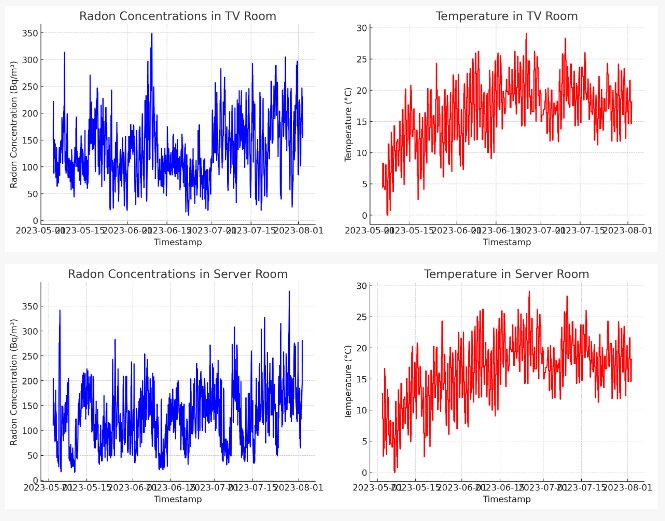
On June 22, the blåbetong piece was placed next to the RadonEye sensor in the storage. The analysis shows that before the average was 115.40 Bq/m3, afterwards it became 136.71 Bq/m3. However, when looking at the TV room, the values were indicated as 118 Bq/m3 before and 125.63 Bq/m3 after, suggesting a general increase. The blåbetong piece cannot have affected the sensor in the TV room, so the increase has another explanation. However, there is a difference, and it seems that the piece may have emitted some radon, but it looks quite modest.
What is worth mentioning is that these 2 rooms are painted with silicate paint, the rest of the basement has plastic paint. Perhaps there are elevated values in these rooms because the radon is sneaking past the silicate paint?
I believe the variations may be due to air pressure. That is, if there is low or high pressure, the radon levels vary, I have noticed. Get a barometer and you might see the relation with your radon values.
I have a couple of Aqara Temp sensors that also measure pressure and all show nearly identical curves, however, I can't see any correlation when I compare more with the radon curve.
I have had high levels in all rooms, so now I thought I would measure the radon levels in all rooms and the rooms in the basement. It turned out that the radon level in the bedrooms previously reached about 300 Bq. But now when I do new measurements with closed rooms, the instrument shows that the radon level in all bedrooms with closed doors is between 10 to 25 Bq. I measured the radon level in the bathroom and toilet with the door closed and it reaches about between 100 to 225 Bq.
Considering that my meter shows a max value of 9999 Bq if I place it in the drain catch basin, the question is whether the drain pipes from 1966 made of cast iron have any holes so that the radon level rises when there is negative pressure in the house. I suspected that it was the sand and gravel under the house that was the reason for the high radon levels. But considering that the drain pipes are made of cast iron and the drain pipes under the street and up to the treatment plant are made of concrete, I am wondering if the negative pressure is sucking the radon out of the drain pipes. I will try sealing the drain pipes to the sinks with silicone and see if the radon levels in the bathrooms and kitchen decrease.
My neighbor hired a company that sprayed a layer of plastic on the drain pipe, and the pipe that the company showed was so durable that the salesman could stand on the 5 mm thick pipe. I don't know if you can trust the pictures the company shows during the inspection of the pipes depicting cracks in the iron pipe. I suspect the film may have been taken in a much older house. And if you spray on a fairly fluid plastic, how can the coating in the pipe be evenly thick? I imagine that if you spray in so much plastic, the plastic should flow down and settle at the bottom of the pipe and only be a mm thick layer at the top of the pipe, which may not have such a long lifespan.
All pipes above the basement floor have been replaced with plastic pipes.
I'm considering if I could lay a temporary flexible pipe on the basement floor and make a hole in the concrete where the pipes go down under the basement floor and then somehow pull out the old pipes and lay a 100 mm thick flexible pipe. For then I would only need to make holes in the concrete floor where the access wells and pipes from the residential floor go down. In my case, three pipes from the residential floor and three floor drains in the basement floor.
Or could I wash the pipes and buy a camera that can photograph the pipes and then rent equipment that can spray plastic on the inside of the drain pipes? For then I could spray the plastic at intervals of a week and achieve a more even coating. It feels a bit like a waste of money to spend well over 200,000:- that my neighbor had to pay, and then the warranty period is ten years, but the lifespan is supposed to be over 50 years.
Start by identifying where all the penetrations are; there's always a small gap between the concrete and the pipe. You can apply a silicone string around that for sealing; just make sure it's clean from dust and other debris. If there is a flushing well/cleaning well in the floor, it's a good candidate. Then try placing a weighted plastic bag on it and measure. There might be a slight leakage from the underground if there is a negative pressure in the house.
New year, same problem, considering extending the ventilation to include an exhaust vent in the family room where we currently have 350 Bq/m3.
But, has anyone tried a different meter than RadonEye? I find RadonEye to be quite outdated, no data upload to the server, you have to manually copy data with Bluetooth, plus it doesn't display the date. Furthermore, the built-in tool for measuring in the curve is inadequate.
Maybe I should have invested in an FX-system, but it's quite expensive and requires a lot more pipes to be installed.
So is there anything better? I saw that a Corentium Home 2 has been released, which also shows on the display how much it is right now, but it also seems to only handle Bluetooth.
Assuming that the doors to the shower, laundry room, and WC are often closed, then it is the exhaust in the entrance hall on the entrance floor that applies for the air from the basement, so it is probably wise to do something.
Vi vill skicka notiser för ämnen du bevakar och händelser som berör dig.