It happens more often than I like that I get questions via PM. It deprives the questioner of input from all other knowledgeable people and deprives everyone who wonders the same thing of the opportunity to read the questions and answers. It's a bit cheeky to ask for free consulting services without sharing it with the entire forum.
Therefore, I will publish the questions and answers here unless I can see a reason not to. Reasons could be that the questioner is easily identifiable from the context.
The thread can be general. Others who receive interesting questions via PM are welcome to take the liberty of posting here.
A few rules.
No tags to the questioner unless they themselves go in and comment. The reason for PM might be a desire to remain anonymous even when it comes to a nickname on the internet. For my part, it could be that I've used the same nickname everywhere for decades and in some contexts, I've discussed sensitive topics that concern other people. Such matters I believe everyone should respect.
I've read in several threads that you seem to have a very good understanding of how to manufacture doors. I would appreciate answers to my thoughts. The thing is, I am in the process of making a garage door that consists of 2 door leaves for my garage; it is a double door/portal where each door leaf is 1.6x3.2m. I have built the frame out of steel, and the plan is to insulate with cellplast. Each door leaf consists of 2 steel frames with a 50mm air gap between them. The door leaves are a total of 100mm thick because the idea was to insert cellplast that is 100mm. The plan is to cover the inside and outside with plywood. There are a few things I've started to wonder about, and I would appreciate some input on before I apply the plywood and insulation.
× What I'm uncertain about now is whether there should have been an air gap between the panel and the cellplast? Now the plywood will be directly against the cellplast. I'm thinking there might be a risk of moisture/condensation if there is no venting possibility?
× Do people usually apply a wind barrier/vapor barrier on doors like they do in walls?
× Is it common to ventilate a door in some way? Through holes or vents on the inside?
Hi Xxxxx
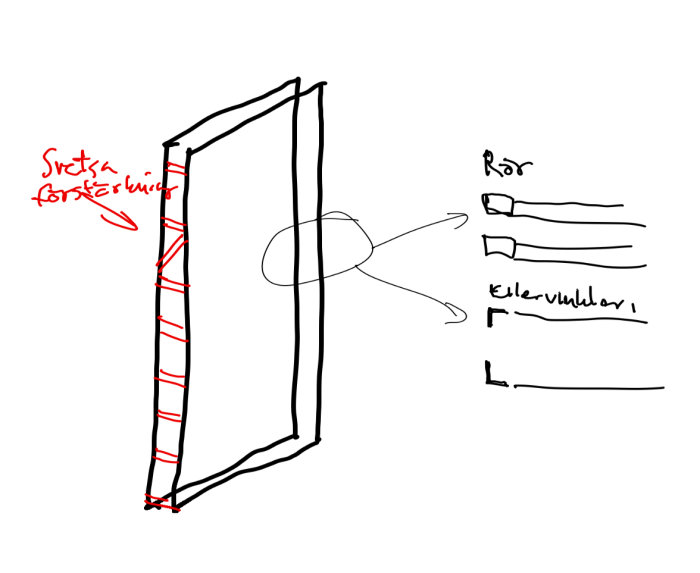
If I understand you correctly, you're planning to have two open frames with about 100mm external thickness. Either tubes or angles according to the sketch. If you weld the frames together with short pieces of flat iron that I've drawn in red in the sketch, the whole box will be so rigid that no plywood can bend it, even if it's soaking wet on one side and dry on the other.
You must use waterproof plywood (beware of so-called form plywood from lumberyards. Not waterproof). Now, 100mm is unusually large. It even becomes 124mm with 12mm plywood on each side. But I still believe that the heat will be able to press any moisture through the door without an air gap or moisture barrier. Doors with a total thickness of less than 90mm (that's my experience range) do not have moisture issues in this manner.
The way moisture can cause problems is when the outside becomes more humid than the inside, causing the doors to bend inward at the top and bottom. You don't need to worry about that bending if your frames are sufficiently reinforced.
The regulations in procurement documents often force me to use very expensive plywood with a moisture barrier of aluminum sheet. Throughout my experience, I haven't noticed any difference in bending compared to doors without a moisture barrier. Both bend a few mm. WBP-glued Finnish birch plywood has worked best for me, both in terms of function and economy, for painted doors. Such plywood is available in the formats you need.
In summary, my recommendation, assuming a rigid steel construction, is that you neither need an air gap nor a moisture barrier. These are large surfaces. An entire piece of plywood on that surface could potentially bubble. It won’t affect function but looks unsightly. Additionally, such large surfaces are weak. Insert continuous wooden beams in the foam that are screwed/glued to the plywood on both sides and it will sort itself out.
Don't forget blocks for the locks... or weld both the lock and hinges.
Finally,
I prefer if you ask questions in a thread rather than in PM.
Two reasons.
The forum has lots of knowledgeable members. My opinion is based on just my experiences and I could very well suffer from tunnel vision. A benefit of me is perhaps that I only write from my experiences, thus not being a megaphone for dogmatic beliefs.
Reason two.
The answers to questions like these are of general interest. Many want to know what you're inquiring about.
Hello!
I'm about to build a 1930s staircase in our 1930s house in Stockholm. Handy as few - but I've never built 1930s stairs...
Planning to have an expert draw and create a 1:1 drawing. Then I need to find material and build according to 1930s techniques... which you seem to have comprehensive knowledge of!? Thanks for the tips!
Can I ask you along the way?
The drawing needs material thickness - so I need to understand this already. Tips on where I can find glulam? Dimensions (U stairs, shaft is 850x1950, quite narrow)
Xxxx
Replied...
It's okay to ask questions. Feel free to do it in a thread so everyone can read. Questions about construction techniques are always of general interest. Tag by writing @findus42 in the text, so I get the same notification as if I receive a message.
The 1930s is a broad term. Mature 1920s, like Jugend, mixed with very traditional technique. Don't forget 1930s functionalism. See Carl Malmsten. Depending on placement and depending on the house, the material thickness can be anything from 27mm (quite typical in simpler stairs) and upwards.
Post a thread in the furniture carpentry or construction techniques subforum. Preferably some pictures so that we can get an idea of the environment. If you're lucky, several members will engage, and you'll get a discussion that can give you plenty.
I am working on a straight simple staircase for a client, and since it's my first staircase, I have some questions. I saw in some thread that you suggested bombarding the risers slightly so they support mostly in the middle of the treads, and that sounded reasonable, so I plan to do that. My problem right now is that I probably routed the stringers a little too tightly, so each step can go in on one side, but it's difficult to fit the other stringer where all the joints must fit simultaneously.
I have routed a groove in each tread where the riser fits in, and I had planned to glue each tread with its riser on the back so that there are fewer units to fit together. So far, I haven't gotten to that point yet, so I started by dry fitting everything, and it feels difficult, not to say impossible, to get it together as it is now.
Suggestions, tips, and corrections are gratefully received! Take care!
/Xxxx
Replied:
I can, of course, only say how I usually do it. It may in some cases deviate from the generally accepted. View attachment 527861
I only rout the treads into the stringer.
I only notch the top side.
I assemble the entire staircase without glue.
I attach each step by screwing in from below with nails or screws into the stringer. It becomes practically invisible.
When the staircase is assembled, I install the risers.
I press them up tightly into the groove at the front of the tread above and screw/nail to the back edge of the tread below. Glue can be used on the lower part but is not strictly necessary. Upward, glue is unsuitable.
The tenons of the steps should fit without gaps but not too tightly. The idea of not using glue is to allow some movement under load. There will be movements anyway, and the idea is to allow it in a way that does not require the stringer to move as well. Each step that has room to flex should be able to do so without the movement spreading further.
I understand your idea of fewer parts if the riser is glued to the tread. But my experience is that the pieces become less compliant if they are larger and extend in three dimensions. There must be clearance for all steps to fit with the stringers.
Therefore, the risers will not sit tightly against the step above. 1mm clearance becomes 1mm flex precisely where you don't want it. It is thus not compatible with the traditional construction of the staircase.
I get away with mounting the risers in my way by having them positioned between the stringer without being routed in. If you have already routed in the risers, then it's a bit too late to change that. What you can do in that case is to route through downwards so that they can still be retrofitted.
Hope I've written something useful to you.
I write on Byggahus to spread insights to more people. Therefore, I find it nicer if questions are asked in threads that everyone can read. I will clean from anything that identifies and post it.
Regards, Findus
PS. Tagging the forum's real stair specialist @Immobil DS.
Thanks for the response. I think you're right that it will be even harder to put the parts together if I glue them in advance - plus, I'll lose that fit that I planned to use to reduce the deflection. But it feels a bit inelegant with screws right there between the riser and tread. The underside of the stairs will be partially visible, so routing each tread into the stringer doesn't look so nice and also reduces the strength...?
I was planning to attach the treads with screws through the stringer, but I've been wondering if this, combined with having to route the holes with some play to assemble the staircase, could cause creaking. How does it work with your method of screwing/nailing the treads upwards into the stringer? It sounds a bit like forcing the treads upwards, which are then pushed downwards when you walk on the stairs.
The staircase (which is made of pine) will be painted, so in fact, the paint will probably occupy additional space in the routed mounting holes - that notch may not be such a bad idea... XXX
Hello,
Replying here as I don't want to be used as a free consultant if not everyone can read.
The way stairs are made has changed somewhat. I'll try to explain what differs and why you have to choose a path.
A little staircase mechanics.
First, a direct answer to your question about how to skew nail.
The nail/screw is driven in diagonally/upward deep in the corner. The purpose is not to lock the step firmly. On the contrary, the method allows the step to flex a little.
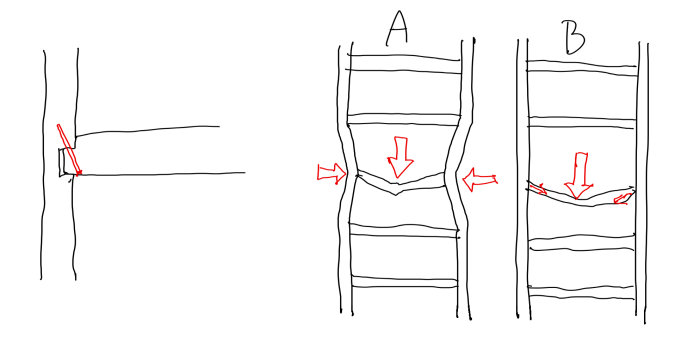
Figure A
With the method you intended to use. To screw directly into the tread through the stringer. Then the idea is to make everything as rigid and tightly joined as possible so that no wood will ever rub against other wood.
Figure B
With my method, everything should be able to move.
Figure A
If the steps are rigidly mounted in the stringer so they can't move at all (theoretical reasoning). If the step is then loaded to the point it bends. Then the stringer will be forced to follow the flex. See the red arrows and the exaggerated bending.
Fig B
If the tread isn't rigidly mounted, the dowels will slide slightly in and out if the step is loaded to the point it bends.
Figure A
Building stairs according to Fig A assumes you're completely sure that glue and screws can withstand any stresses, and that wood can be glued to wood in any grain direction. In a staircase, the wood is oriented in all possible directions. I may be pessimistic about the joining of parts in wood in complex structures exposed to point loads. Theoretically, one might consider increasing the thickness of the treads until they barely bend and reduce the dimension of the stringer so it bends more easily, thus reducing the load on the actual attachment of the step. At some point, the bending becomes irrelevant. Perhaps that's why modern stairs are so bulky and coarse.
If the entire staircase is rigid and, in a distant future, some joints or screws fail (in my experience just a matter of time). Then the staircase will start to creak. Not entirely sure here, but I assume the creaking could get worse as the joints that still hold together can transmit movements from other steps in the staircase to the joints that have loosened.
Fig B
On the other hand, the old way also seems to work. That system is designed to allow wood to behave like wood. The dowels of the treads should fit easily but without play. Or... a little play on any given step doesn't matter. With skew nailing, the step will rest entirely on the lower surface after someone has stood on the step at one point. Under load/flex, the top of the dowel won't press against the wood. The risk of creaking is reduced.
Regards,
Findus
PS. Built a gigantic wooden staircase between two floors in an office. From the top, a long leg with 14 steps to a landing. From there, another 8 steps. Some time after installation, the darn thing started to creak. And it wasn't a small charming creak but enough that you could see vibrations in a coffee cup held in hand. Sent there to troubleshoot.
The staircase was mounted freely a few mm from the wall along the long leg. When the wood adapted to the environment, both stringers got a slight bow towards the wall and started to rub. Managed to retrofit a support under the stringer where it met the wall. The moral is that anything can go wrong when you least expect it. DS.
Last edited:
Click here to reply
Vi vill skicka notiser för ämnen du bevakar och händelser som berör dig.