2,850 views ·
7 replies
3k views
7 replies
looking for a solution for sparse inner ceiling.
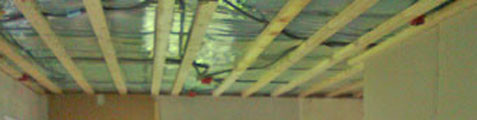
Throughout most of the house, I've used 2"4 timber as spacing for the plasterboard ceilings. But in the bathroom, I have other plans...
In the bathroom, I will use Huntonit 11x300x1220mm.
Fiber optics will be drilled and installed when each panel is mounted.
Problem 1: I'm looking for a solution with minimal spacing to achieve an even starry sky without being able to discern where the spacing is.
Problem 2: Since additional spacing is needed, it will lower the ceiling height too much. Therefore, I need a different foundation than 2"4.
The picture actually illustrates a completed room but gives some illustration of what I'm trying to describe in the text.
I'm considering replacing the 2"4 with the thinnest boards... Then just have short pieces right where I need to attach the ceiling. This way, I can run fiber threads in more places and avoid figuring out where the spacing goes.
Last edited:
Now there are three options there. Is it three choices for the main piece or a final solution?Niklas9 said:
Just this thing that I want to pull fibers without getting a starry sky without sparse stripes when having cozy lighting.
Well, now that you ask, I faintly remember it was to get the same height on the new ceiling as the old one was.JOW said:
The old one was a thicker cardboard history (and thinner mystics) and now it became thinner plasterboard. To avoid it being troublesome with wall panels or having to walk around thinking about it, we took the lumber which, luckily, got the right final height.
Or it was just to be able to have the device boxes in the ceiling... can't remember..
")
It turned out right anyway with both the boxes and ceiling height.
Last edited:
Forget about fiber optics, you'll regret it in 5 years when it becomes outdated.
Cut blocks approximately 70x70 mm from 19-22mm particle board (floor particle board?) or even thicker if needed.
Once you've drilled in your fibers, mark with a pen the appropriate spots to attach the huntonit board, i.e., along the board's grooved edge, max c-c 100 but not where a fiber is supposed to go.
Then screw/nail/glue the blocks here and finally install the board.
If you have nothing to screw/nail/glue the blocks into, you should start by placing sparse paneling at c-c 300.
Last edited:
Do you think so? I would certainly save a lot of time and money at least. But I'm determined to make it really pimped-out-ala-pirate cave with a black floor and ceiling, lots of things covered in black stone, and a built-in aquarium, etc... daring... but think how the ladies will be impressed... just need to buy pirate clothes too...Mikael_L said:

Last edited:
When attaching such a "real" ceiling... where do you place the screw/nail then... on the short side and long side on the thinner parts where the next board locks into place? Feels like there's a risk of sagging... compared to all the screws you have on the drywall...
Click here to reply