Previous owners have switched to larger windows; they are wider than the original windows were (which unfortunately have been discarded). I don't know exactly how they did it, there's foam everywhere making it difficult to see. We were planning to revert to the original dimensions, which means reducing the width by about 10cm.
We will install 70 studs in each section, and then add an additional 70 externally for the extra insulation, which will be attached to the existing studs/modules. All with a spacing of 60 cc. According to a structural engineer I've consulted, this should be sufficient to support what we're going to do with the roof: vertical studs under each eave and horizontal reinforcement at the top in the modules. This should be enough to take the roof load off the panel, so the panel is no longer load-bearing.
It sounds like it's going to be much more stable than before.
Exactly, 45x70. The existing wall today is about 45-50x90 studs, some of the crossbeams under the windows are rotten, I've bought new specially cut 90 studs to replace them.
The outer wall today is aligned with the foundation, meaning there's no overhang of the facade.
The idea was to place 45x70 outside the existing wall, thereby creating an overhang. That is, screw into the existing studs from the outside through the new stud. The new studs would thus hang on the side, without a base plate or foundation directly underneath them.
What are the dimensions of the vertical paneling that appears to be on the inside? Does it support the bottom chord of the trusses?
Hello!
Was going to "just" change the panel and add some insulation "quickly." Knew that some studs were rotten and some of the insulation moldy. So friend]
But you have at least three studs that go straight down to the sill, right? Why not just insert 3 vertical studs above them to support the top plate? (after you've jacked it up to the correct level, of course)
Possibly add a stud under the top plate if you're worried about the joint.
But you have at least three studs that go straight down to the sill, right? Why not just insert 3 vertical studs above them, to support the top plate? (after you have jacked it up to the right level, of course) Possibly put a piece under the top plate if you are worried about the joint.
[image]
The thing is, it turned out that it isn't a top plate, i.e., there is none. The panel was acting as the top plate. But what you're describing is basically what we're doing.
It's more about finding the "right" person and not what education one has. ANYONE who knows how this is set up could have answered the question. How do you know when you have the right answer? In construction, there are always 100 ways to solve it.
I am very technical and understand how forces and such affect each other. I realize the problem that has arisen.
But I could never in my wildest imagination have thought that panels, which most likely need to be replaced from time to time, are also load-bearing for a roof truss. Seems like an idiotic way to build.
But you learn things all the time.
Step one now should be to ensure that it doesn't sink in the future.
Step two should be to lift the hammer beams.
Step three to secure for the future so that you can access and change the panel when needed
TRJBerg said:
How many call a structural engineer when they replace exterior paneling?
Exactly! It's naturally completely unreasonable. A homeowner in an unattractive part of the country would have paid the structural engineer half the value of the house to be able to change the paneling.
It is a module house from the 1950s.
The only thing that has been done in the picture is that the paneling has been removed, and the fiberboards/insulation boards that were loose have been taken away (most of them fell out by themselves).
The paneling has been so poor that it can be crumbled with fingers, and several of the fiberboards are rotten and moldy, and haven't even had contact with the framework anymore.
The idea was just to replace the paneling and add 70 battens with more insulation behind, and replace the existing battens that are rotten.
But I assume from your post that it's a bad idea and that the new paneling should be placed as the old one was?
And that all the fiberboards, even those that were loose, should be placed back?
I have a Hulfreds house built in 1969. It is built with load-bearing 60 cm module boards.
The module boards are load-bearing and approximately 10-12 cm thick. On the outside, there is something resembling tretex approximately 15 mm, then fiber/pressed wood chips, and then a fiberboard/wood chipboard. Very unusual construction. I opened up the exterior wall to put in a door; according to the Hulfreds house original drawings that I have, you should then insert a steel beam.
The load-bearing interior walls are also a bit special, I don't remember the name, but they are approximately 70-100 mm thick and consist of 12 mm chipboard-50 mm corrugated paper-12 mm chipboard. The corrugated paper runs as strips from top to bottom with 50 mm corrugated paper and then 50 mm air. The idea is that the electrical wires coming from the ceiling can easily be fed down into the wall in the air channels that are obtained in the wall. If I didn't have the original drawings of the house, I would never believe this is a load-bearing wall (though you can see it in the attic where the trusses are supported in the middle).
Unfortunately, it looks like you have removed a load-bearing wall.... immediately set up supports and contact a structural engineer.
I am a trained civil engineer (and work as a constructor). But the education does not cover all old construction methods (there are both good and bad constructions that are no longer used), nor all current ones, although some are touched upon. In my job as a constructor, I have also not encountered this wall construction, simply because we do not primarily work with renovating old villas but design constructions for new production (mostly larger buildings with a different approach than small house factories).
I recognized this construction because I have almost identical load-bearing modules as the heart wall in our house from -62. However, we have a plank wall with exterior insulation and a brick facade as the outer wall.
I probably wouldn't have guessed that anyone would think of building with modules like these where the panel is part of the load-bearing frame.
Perhaps my more experienced colleagues or a constructor/inspector/carpenter with quite a few years under their belt would have understood this wall's construction at an earlier stage though.
I have a Hulfredshus built in 1969, it is built with load-bearing 60 cm module panels.
The module panels are load-bearing, about 10-12 cm thick. On the outermost side, there is something that resembles Tretex, about 15 mm, then fiber/pressed wood chips, and then a fiberboard/wood chipboard. Very unusual construction. I opened up the outer wall to install a door, according to the original Hulfredshus drawings that I have, you should then install a steel beam.
The load-bearing inner walls are also a bit special, I don't remember the name but they are about 70-100 mm thick and consist of a 12 mm chipboard-50 mm corrugated paper-12 mm chipboard. The corrugated paper runs as strips from top to bottom with 50 mm corrugated paper and then 50 mm air. The idea is that the electrical wires that come from the ceiling can easily be fed down into the wall in the air channels created in the wall. If I didn't have the original drawings of the house, I would never believe that this is a load-bearing wall (although you can see it in the attic how the roof trusses are supported in the middle).
Unfortunately, it looks like you have removed a load-bearing wall... immediately set up supports and contact a constructor.
Exactly as you say, it's not visible, and you can't assume according to current building standards. A builder suggested that we should knock out one wall (edit: interior wall, specifically, and just like in your case, super thin and really doesn't look load-bearing) to get a larger living room. After this experience, I can say that all those thoughts were immediately dismissed. Nothing is being moved here.
But the measure has already been taken, as I have written about several times in the thread. A proper top plate has been created and reinforcement downward in the structure.
Better late than never! Yes, the house is still standing, it just took some time to process the trauma 😅
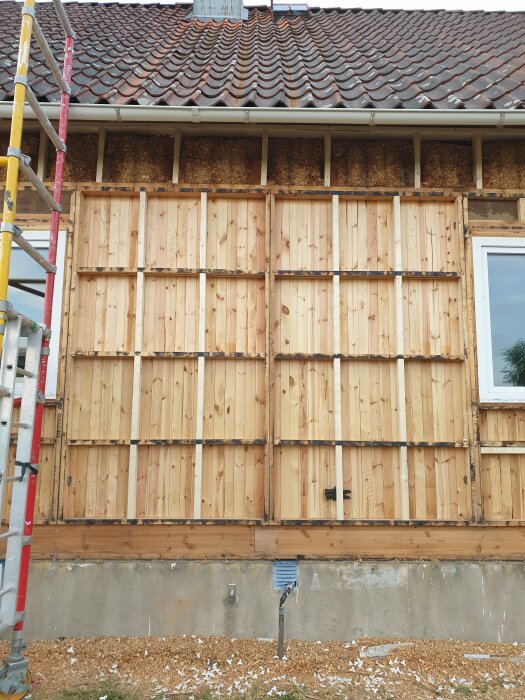
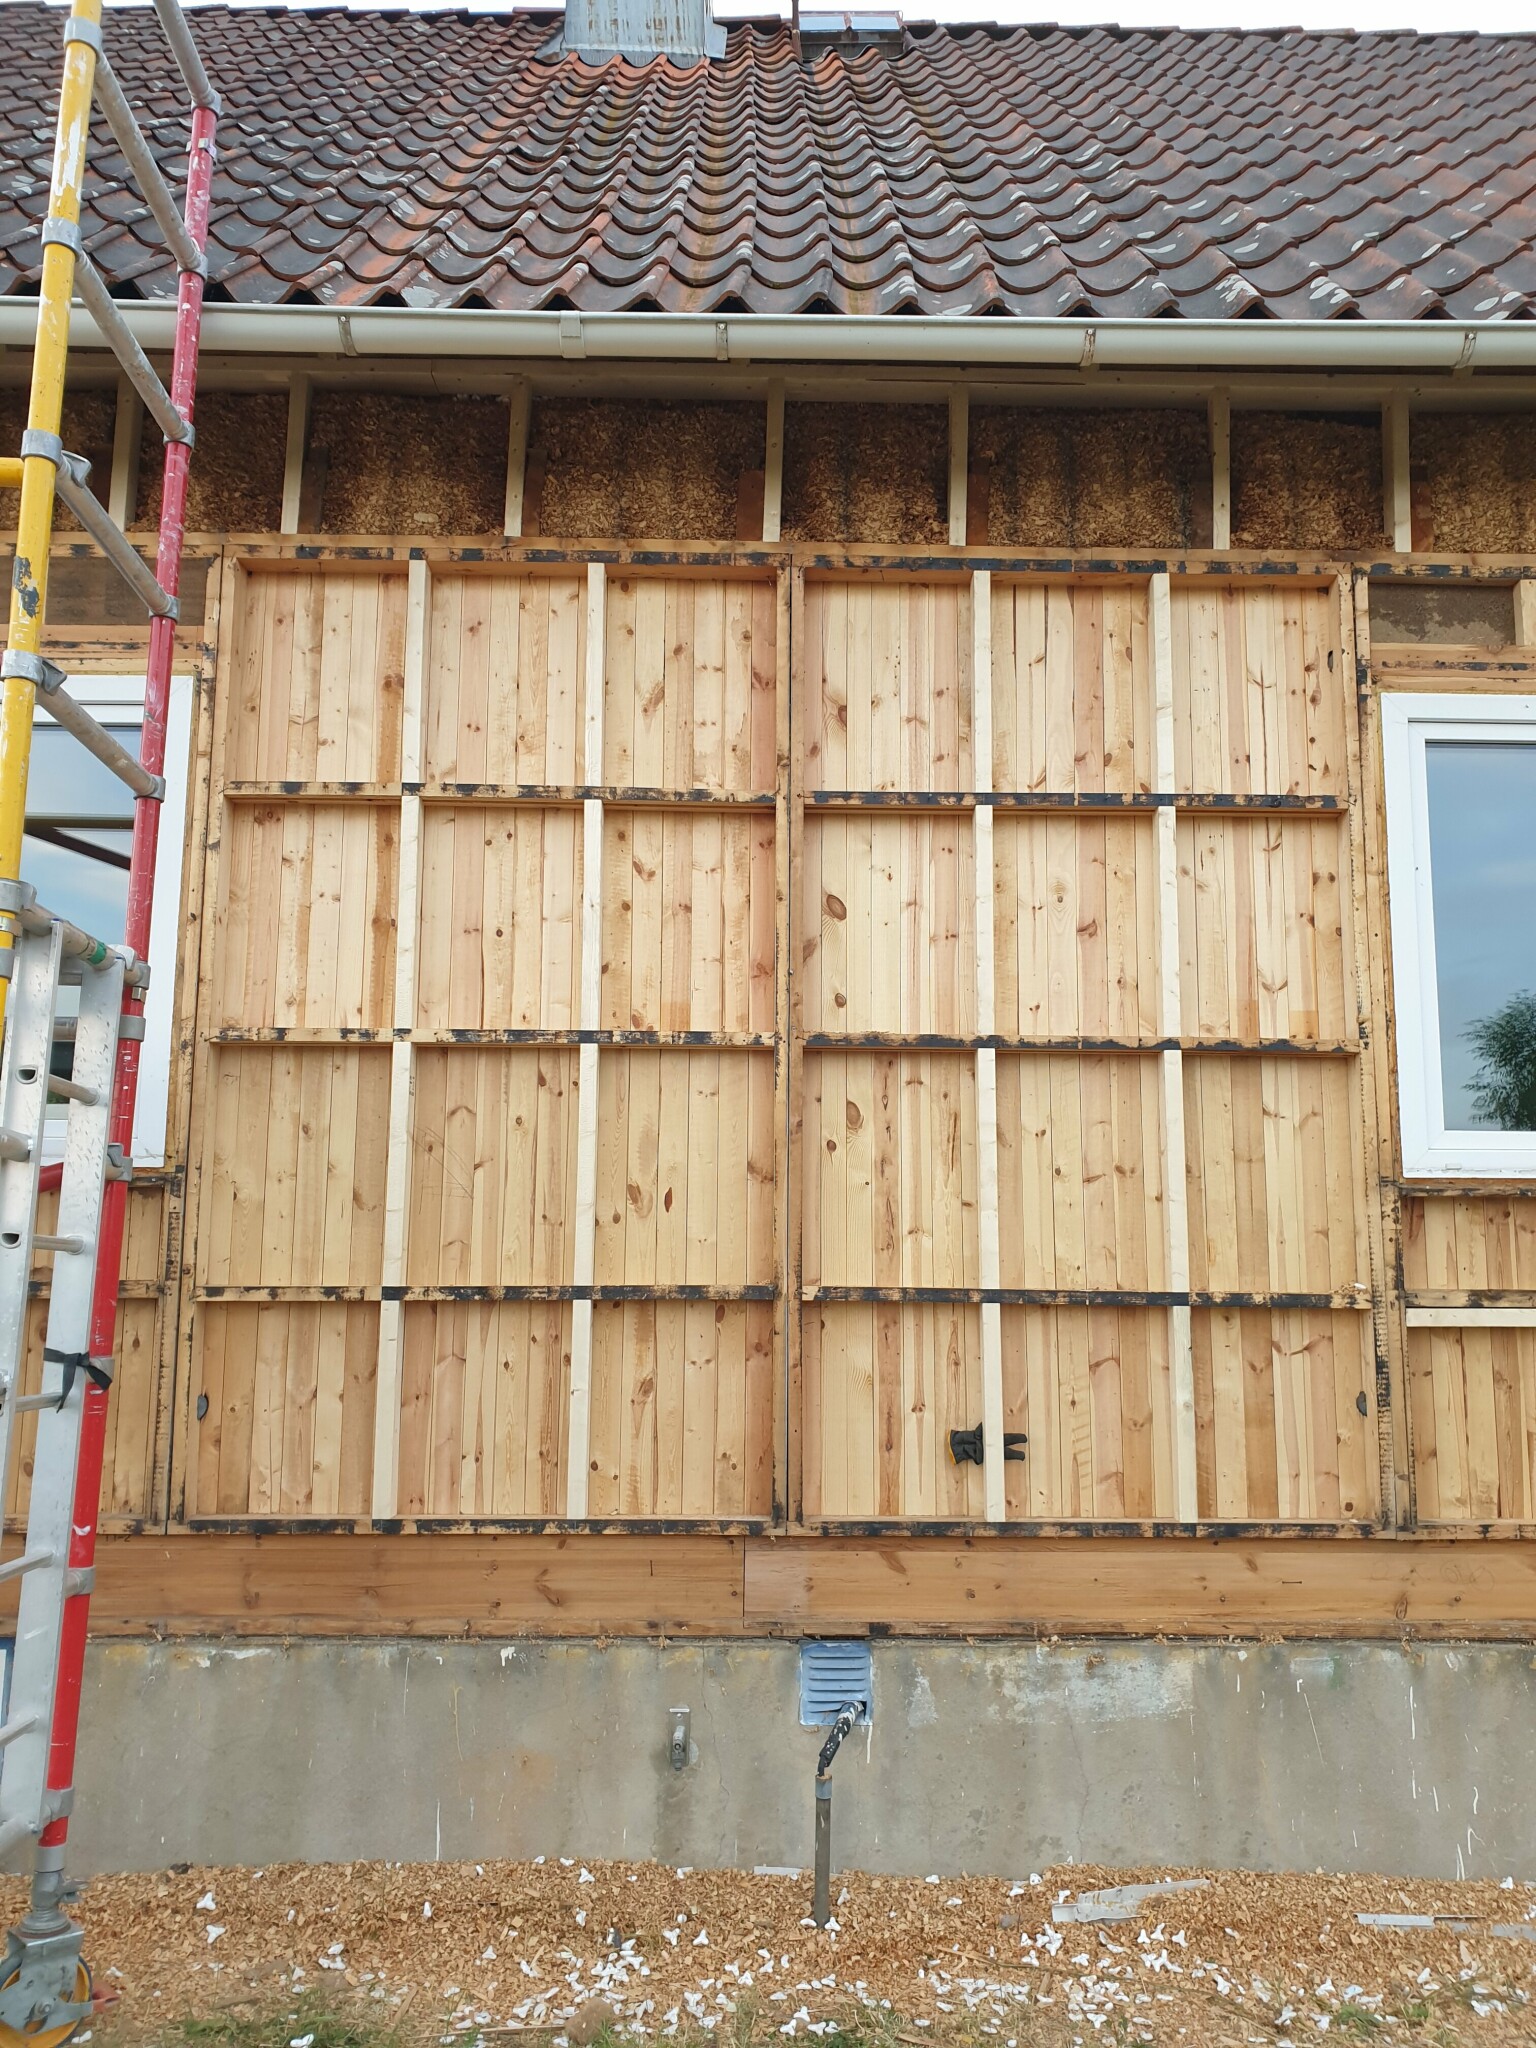
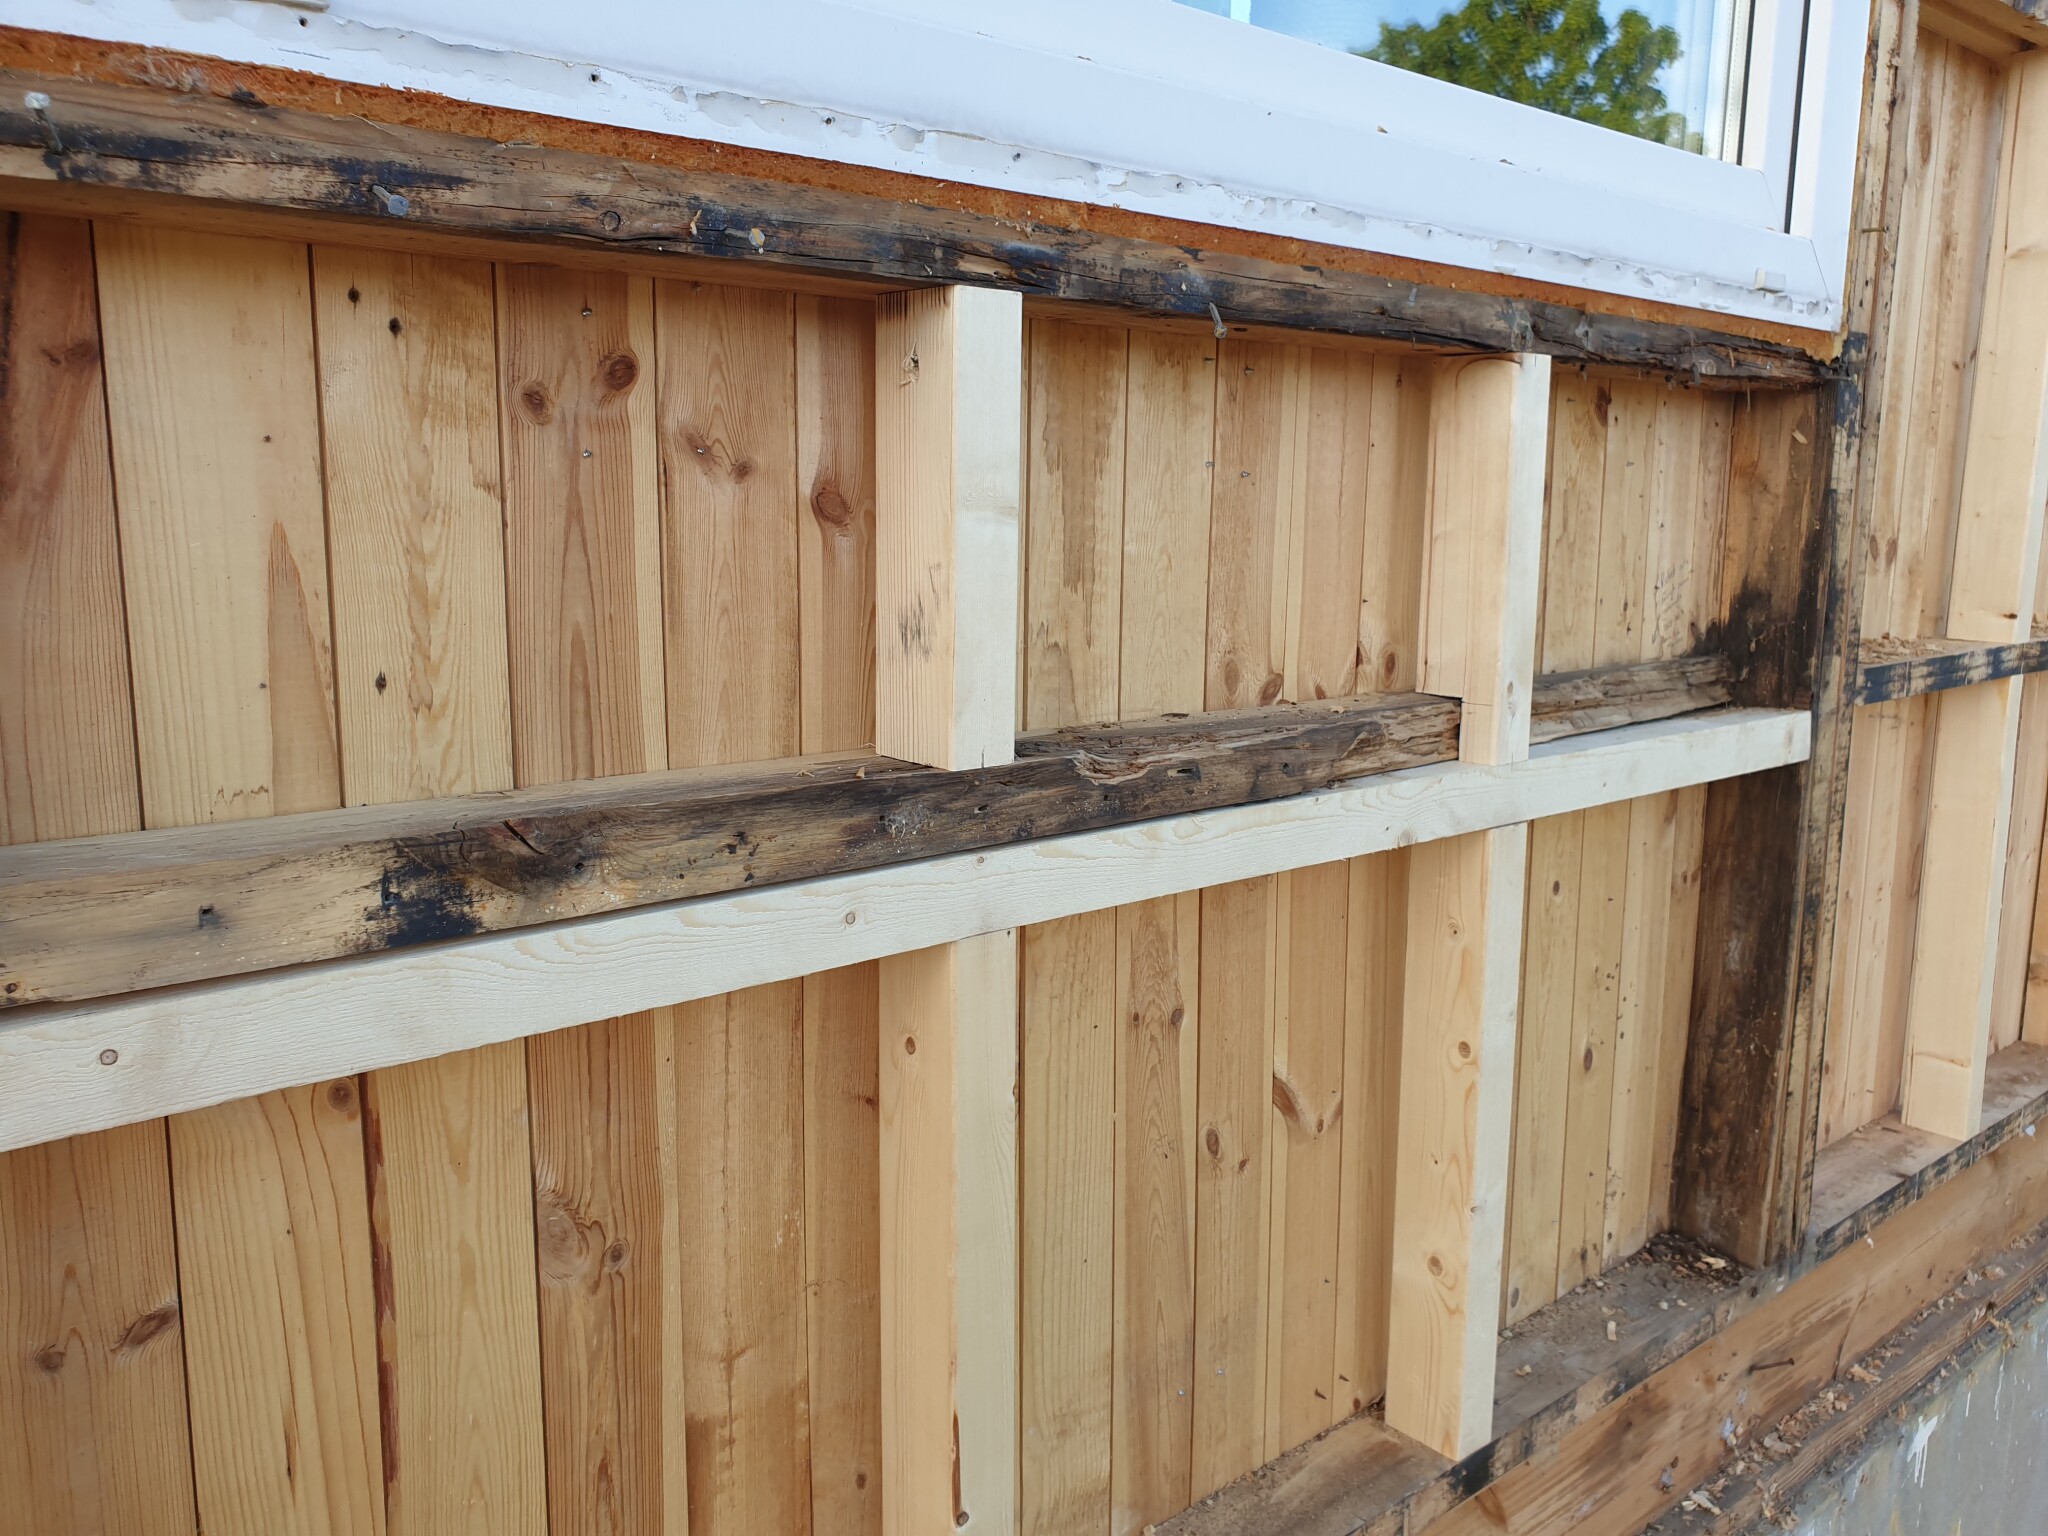
Here's how it turned out:
We pressed a horizontal 120 beam against what turned out not to be a hammer beam, and attached it from underneath.
Then we measured the distance from the bottom edge to the wall module at the edges where the roof was still straight, and then cut 120 beams accordingly. These 120 beams were inserted from the side at each floor joist, which they were also attached to. They were placed on the side of the joist that had the most support from underneath in the construction. We went from the sides towards the middle, and the roof lifted gradually. So we managed to raise it the approximately 5cm it had sunk.
Then we reinforced the wall modules with 70 beams. The wall is built with 90 beams, but the building designer we talked to advised against inserting beams all the way, as these can press on the inside of the wall and cause problems there. Therefore, 70 beams were used to have an air gap inward in the wall. We placed the beams at equal distances in the modules so nothing would be less than cc60.
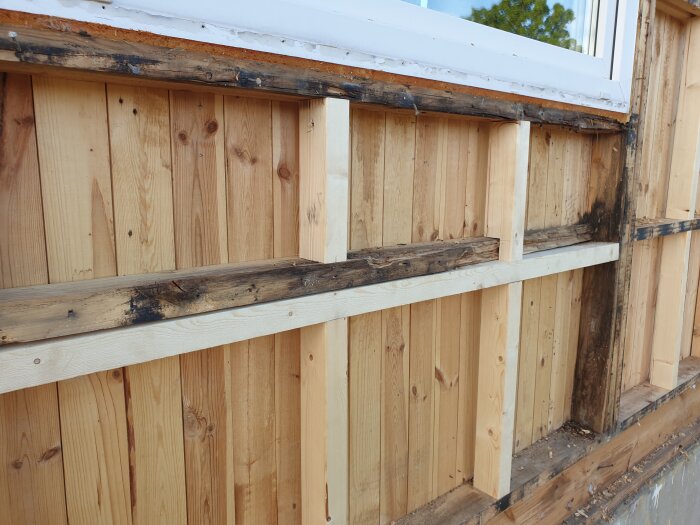
At the very bottom by the sill, we inserted what we could (not visible in the picture), it's about 3.5-4 cm deep to the first floor joist, so we cut beams to special measurements.
The beams that were bad were left in place, as the inner paneling (probably also load-bearing) is attached to it. We scraped away what had crumbled and reinforced as best we could.
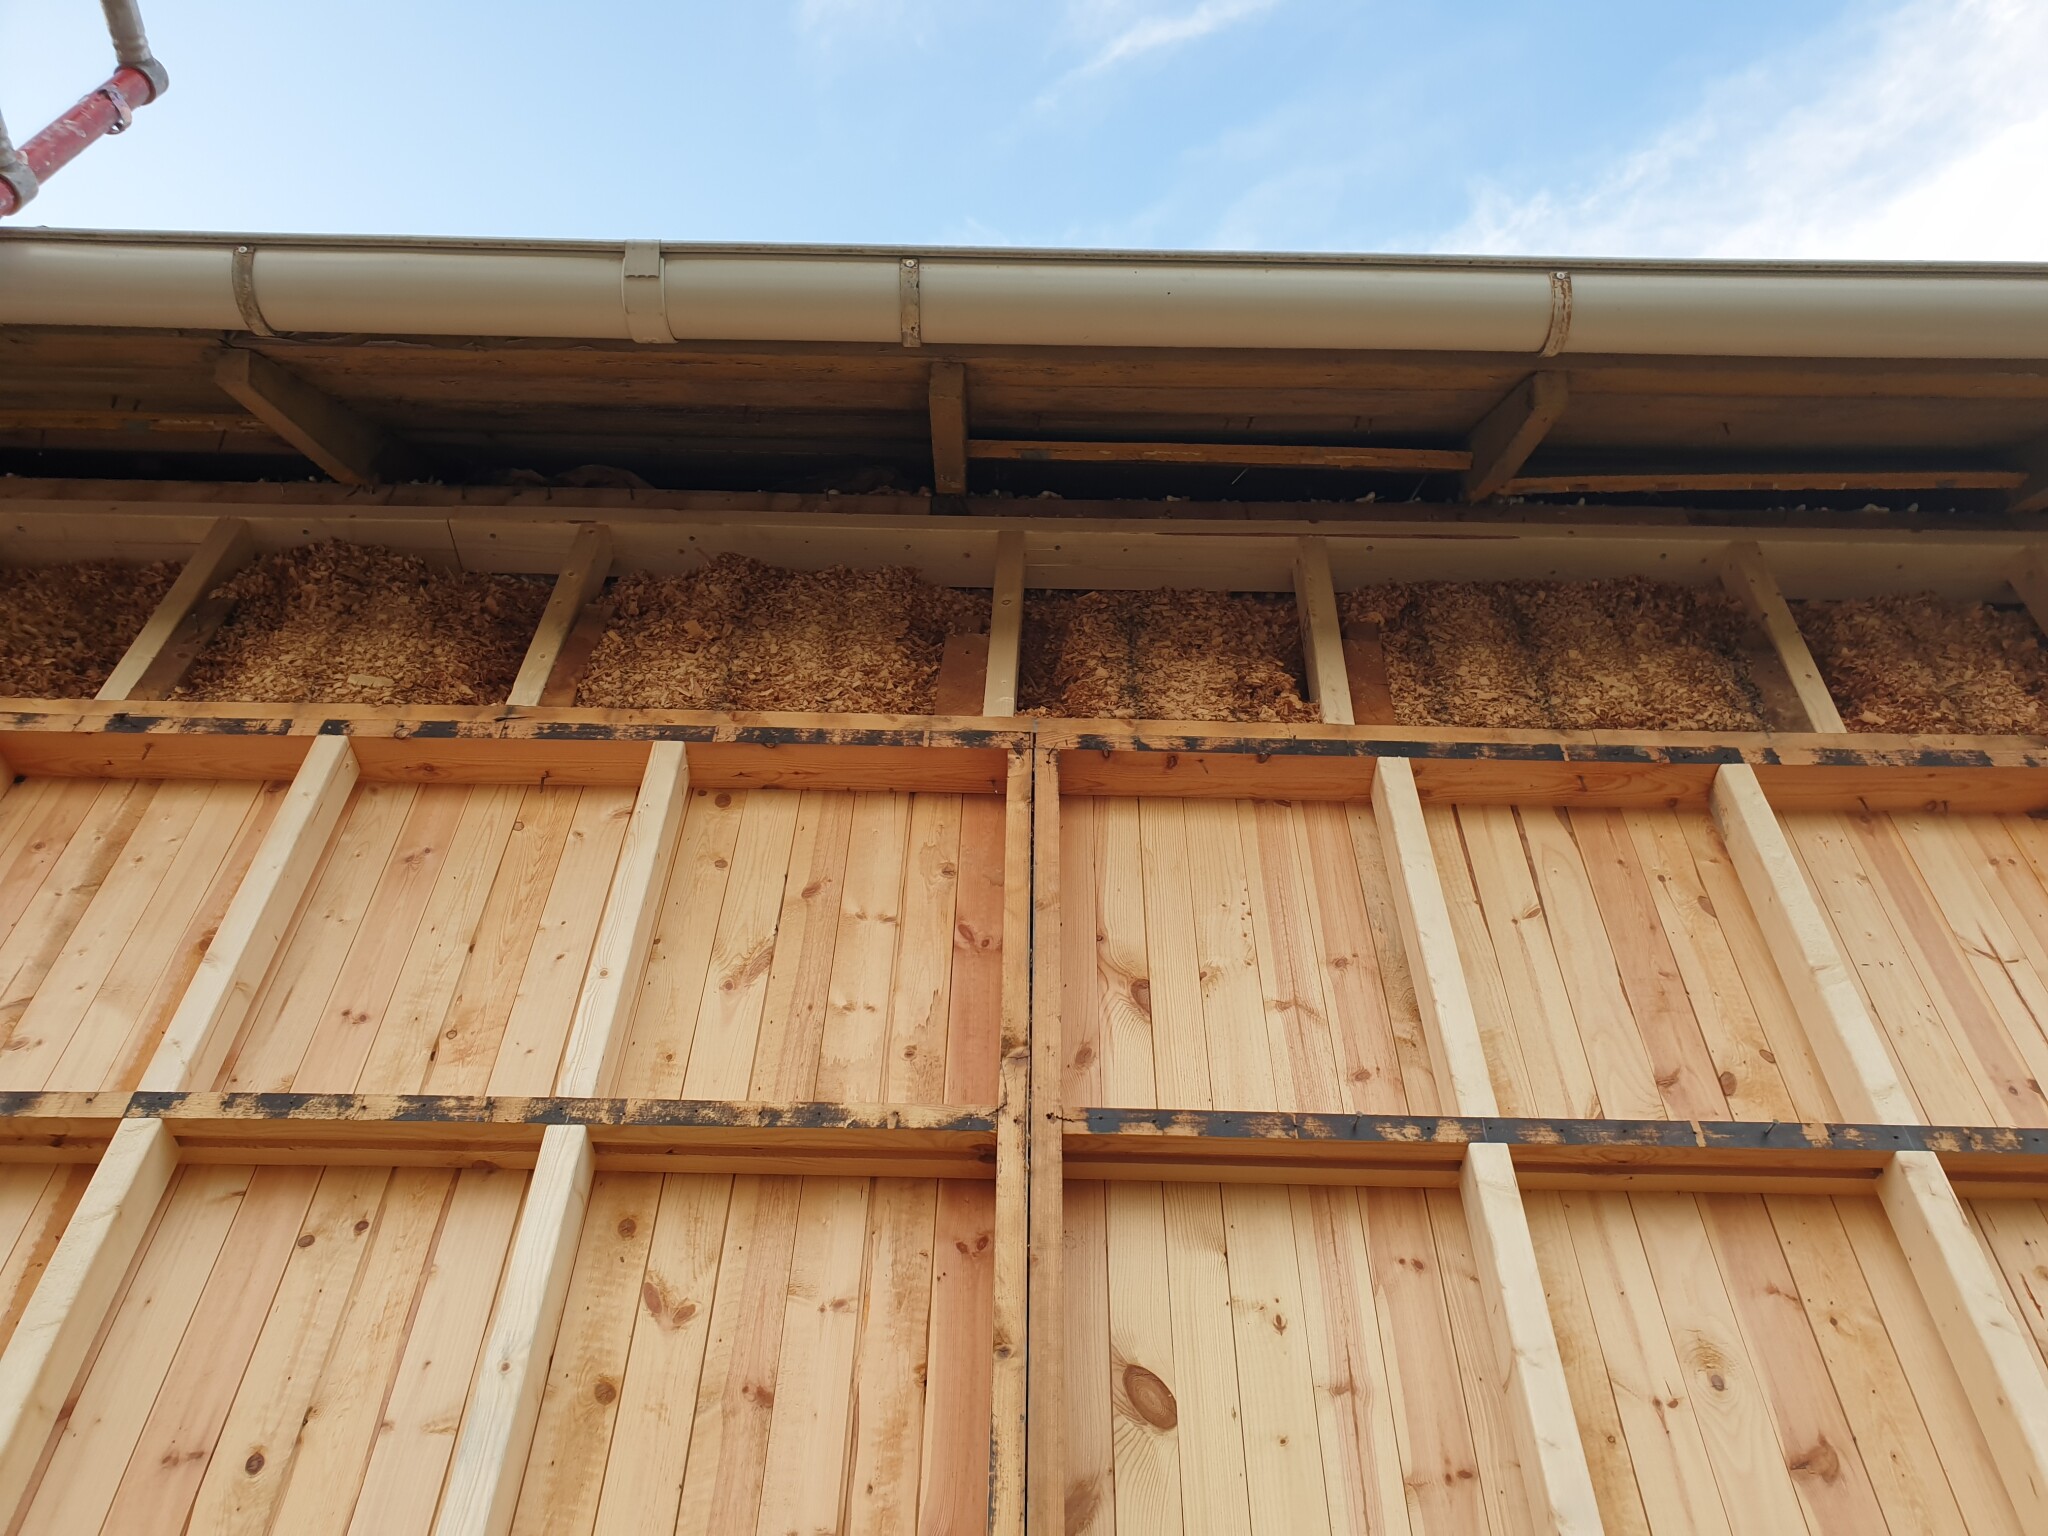
Then it took a whole day to poke insulation everywhere, everything is special measured.
On top of that, we added 70 insulation as planned, which was definitely needed now since there are a lot of beams in the wall.
The plan for this year was just to do this wall, which was the worst. It is highly unclear at the moment how we will handle the other walls.
Better late than never! Yes, the house is still standing, it just took some time to process the trauma 😅
This is how it turned out:
We pressed a horizontal 120 beam up against what turned out to not be a hammarband and attached from underneath.
Then we measured the distance from the bottom edge to the wall module at the edges where the roof was still straight, and cut 120 beams accordingly. These 120 beams were inserted from the side at each floor joist, to which they were also attached. They ended up on the side of the joist where they had the most support underneath in the construction. We went from the sides towards the middle, and the roof lifted gradually. So we managed to lift it the approximately 5cm it had sunk.
Then we reinforced the wall modules with 70 beams. The wall is built with 90 beams, but the building engineer we talked to advised us against driving beams all the way in, as these could press on the inside of the wall and cause problems there. Therefore, 70 beams were used to have an air gap inward in the wall. We placed the beams evenly in the modules so nothing would be less than cc60.
[image]
[image]
At the bottom by the sill, we inserted what we could (not visible in the picture), it's about 3.5-4 cm deep to the first floor joist, so we cut beams to special measurements.
The beams that were bad were left in place, as the interior paneling (probably also load-bearing) is attached to them. We scraped away what had crumbled and reinforced as best we could.
[image]
After that, it took a whole day to insert insulation everywhere, everything is special measurements.
On top of this, we added 70 insulation as planned, which was definitely needed now since there are a lot of beams in the wall.
The plan this year was just to do this wall, which was the worst. It's very unclear at the moment how we will do with the other walls.
Highly unclear at the moment how we should proceed with the other walls.
You're probably doing the same, right? Now you know how to do it.
Apart from that, I can only say: good job and valuable with feedback and pictures. Now, the next happy remover of load-bearing panels can see how it's done.
Vi vill skicka notiser för ämnen du bevakar och händelser som berör dig.
Tinker_cat said:
Previous owners have switched to larger windows; they are wider than the original windows were (which unfortunately have been discarded). I don't know exactly how they did it, there's foam everywhere making it difficult to see. We were planning to revert to the original dimensions, which means reducing the width by about 10cm.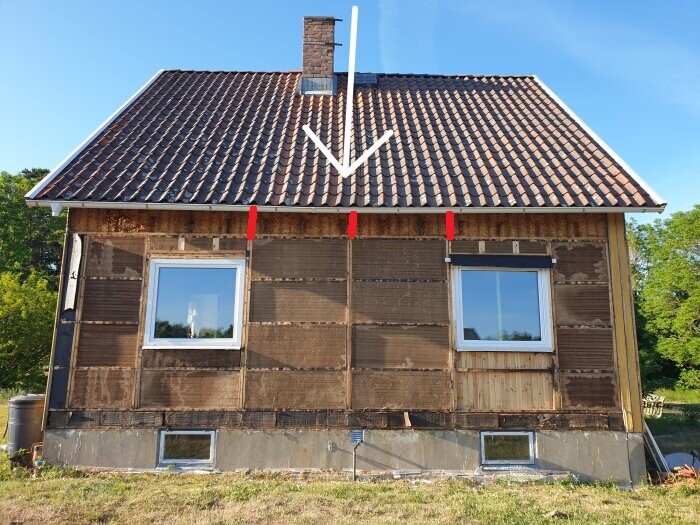
Dr Benz said:
It's more about finding the "right" person and not what education one has. ANYONE who knows how this is set up could have answered the question. How do you know when you have the right answer? In construction, there are always 100 ways to solve it.TRJBerg said:
MultiMan said: