73,772 views ·
82 replies
74k views
82 replies
Concrete for casting countertop
Reviving an old thread... What was really the problem with placing the reinforcement first?pjapen said:
hello
have you made the mold yet otherwise I have pretty good tips, have cast both sink and countertop.
you can say that Bemix works well but it's hard to get out air bubbles,
I made my mold with melamine particle board, great results except for the seams, no need to wax at all.
for the edges I used form ply that I screwed onto 45x45 then into the particle board. the sink turned out best but with large bubbles, I had 3 different vibrators and one was a sex toy, but not the best, the toothbrush is best because you can attach a stick with a little modification that you can insert into the concrete.
I used black iron oxide in both my castings, experimented to 6% relative to the cement weight. a bit tricky to calculate though so I ended up sprinkling a bit on.
the one in the kitchen is made with regular fine concrete, I missed that you're not supposed to put the reinforcement in first since I got streaks around it that show on the surface, best is to pour in the concrete, let it set a bit then add the reinforcement, I think that's the best result.
my one in the kitchen is a bit too long too, about 3 meters, broke it when I lowered it so will have to make a new one sometime. too bad I complicated things by embedding the sink in it. ask if you have more questions,
But can't say Bemix is best, depends on how you mix correctly, have the right mold or good vibration capability,
but feeling the surface it's denser than standard fine casting.
Some pictures [image][image][image]
I am a bit afraid it might sink when vibrating if you just lay it in instead of letting it hang with some wires in the corners etc.
I plan to use Weber expander concrete 702.
If you use expanding concrete, you should not vibrate at all, but just lightly tap around the edges with a rubber mallet. However, there is still a significant risk that the reinforcement will be misplaced without something to stabilize it, as the margins are small.
Ok, so you have to, since the bottom of the mold will be the top of the slab, hang up the reinforcement. It's a bit trickier to smooth out the surface with a straightedge over the edge, but you can use a wide putty knife, etc.
If you do as I did, i.e., the countertop's top side goes down in the mold, you hang the reinforcement and pour around it so you get a pattern where it meets, see my pictures earlier in this thread. If you want to hang it, you should fix hooks or some nails in the corners and pour concrete without the reinforcement getting in the way so you can pour without the concrete hitting the reinforcement. Then you vibrate like crazy to remove all the air bubbles. Then you place the reinforcement, and you can have wire it hangs on.A Alko said:
All of this is just an appearance thing, but I regret not doing as above. Now I have a grid visible across the entire slab, not very clearly but it's there.
Ok, you mean that it creates such an effect around the reinforcement if you pour concrete on already positioned (hanging etc) reinforcement? Thanks for the warning, I hadn't thought about that. I wonder if this also applies to expanding concrete? I've got the impression it fills better.if you do as I did, that is, the top of the countertop becomes the bottom in the form, you hang the reinforcement and pour around it to create a pattern where it meets, see my pictures earlier in this thread. If you want to hang it up, you should fix hooks or some nails in the corners and pour concrete without the reinforcement being in the way so you can pour without the concrete hitting the reinforcement. If you then vibrate like crazy to get rid of all the air bubbles. Then you lay the reinforcement and you can use wire for it to hang.
All of this is just an appearance thing, but I regret not doing as above. Now I have a grid that is visible across the entire slab, not very clearly but it is there.
No, that's not what I meant, but rather that there's a risk the reinforcement might end up slightly skewed in the horizontal plane, so it doesn't end up far enough from the surface (above or below). If you hang the reinforcement, you can be sure it ends up exactly right. Just make sure you have plenty of space between the form edge and what you're hanging the reinforcement from.
I filled half the form with concrete first, then lifted in the reinforcement and filled the rest. I used formplywood and screwed 45x45 battens into the base plate with strips of formplywood on them.
The result was perfect, and the form could be reused for two slabs as I intended.
Don't forget to oil the form before casting.
Last edited:

Renovator
· Stockholm
· 20 351 posts
If I were to do it today, I would fill the whole mold, level it off, wait a moment, and then go down with the iron. If you do it in two rounds, it shows as mentioned, and if you try to hang up the net, you can't smooth it out.
The horror when you drop the hook into the concrete to hang up the iron and realize it has sunk to the bottom 
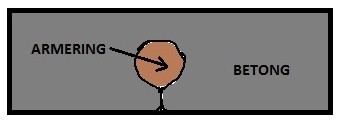
I understood pjapen's post #66 as saying that the "pattern" appears at the bottom (top side) when you lay the iron freely before pouring concrete, which then doesn't fill in well around the reinforcement - see my drawn picture. But perhaps it's the joint between the layer above and below the reinforcement that is meant.
I understood pjapen's post #66 as saying that the "pattern" appears at the bottom (top side) when you lay the iron freely before pouring concrete, which then doesn't fill in well around the reinforcement - see my drawn picture. But perhaps it's the joint between the layer above and below the reinforcement that is meant.
No, no - not like that. You build a frame in which you hang the entire reinforcement structure using something like binding wire. Fill half the height in the mold, place the frame, and fill in the rest of the concrete.A Alko said:
No problem pulling it off; if you make the slab upside down, it's also not necessary to have 100% perfection on the underside other than that it is flat.
I haven't had any patterns from the reinforcement mesh and rods on my slabs, but the expanding concrete is likely much more forgiving than regular concrete.
My slabs are completely pore-free, and that's just with a little tapping against the mold edges. The expanding concrete is well worth its price.
exactly, well drawn!A Alko said:Ok, you mean that there will be such an effect around the reinforcement if concrete is poured on already laid (hanging etc) reinforcement? Thanks for the warning, I hadn't thought of that. I wonder if it applies to expanding concrete as well? I've got the impression that it fills out better.
[image]
But if you pour between the rebar so that the concrete fills from underneath (i.e., you get a rising surface), this won't be visible on the top side, right?
However, this does require that the rebar is quite sparse and the concrete is free-flowing...
However, this does require that the rebar is quite sparse and the concrete is free-flowing...
I use form plywood and I've never needed any oil, it releases easily anyway.P psau said:Don't forget the form oil or release powder, I prefer the oil as it also provides a certain impregnation to the form if you get small damages in the form that otherwise swell or otherwise ruin what you are going to cast.
I often use laminated MDF but these forms tend to be more of the disposable type.....
/Peter
Renovator
· Stockholm
· 20 351 posts
Strongly regret choosing concrete in the bathroom. Soap, toothpaste, etc. soak in even with surface treatment. You have to remove it immediately if you don't want stains, which you don't typically do in everyday life.
Will probably replace it with stone.
Will probably replace it with stone.