
46,582 views ·
74 replies
47k views
74 replies
Build stairs yourself?

lifting this thread a bit as my staircase has also been discussed here.
I was thinking of tackling the staircase. Considering painting the back white with a semi-gloss lacquer and sanding, staining, and lacquering the steps.
first, however, we must try to see if we can fit the staircase at all.
Would like tips on different ways to cut out the steps besides the one linked above.
I was thinking of tackling the staircase. Considering painting the back white with a semi-gloss lacquer and sanding, staining, and lacquering the steps.
first, however, we must try to see if we can fit the staircase at all.
Would like tips on different ways to cut out the steps besides the one linked above.
Now we have cut out nine centimeters on each step.
That was what the saw could handle before it met resistance.
sitting and waiting for someone who isn't us to come and test walk the stairs.
You can always get up, but going down shouldn't be too difficult.
I don't really want to fall later when there are kids in the house
not now either, for that matter.
That was what the saw could handle before it met resistance.
sitting and waiting for someone who isn't us to come and test walk the stairs.
You can always get up, but going down shouldn't be too difficult.
I don't really want to fall later when there are kids in the house
not now either, for that matter.

Sorry to butt in.fn76 said:
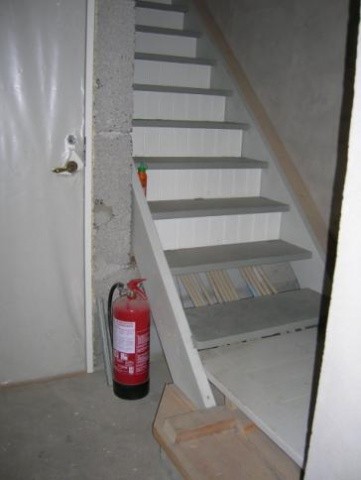
I built a staircase down to the basement, routed grooves in the stringers with the hand router (no problem), though I first made a routing template so I could move it along the stringer to route the correct angle. The staircase is entirely built with hand tools.
Now it’s not completely finished, the last step hasn't been put in place.
I'm building so that I run up and down the stairs a lot, so it has become a bit worn, and I probably won't finish the staircase until I am more done with the rest of the building.
Oh, right... cost less than 3000:-
45x220 in stringers, 34mm tongue and groove in the steps, beadboard on OSB in the backing
Last edited:
Ok, you can build with power tools. You can also build with hand tools, like a hand saw, plane, chisel, and sandpaper. That's how it was done in the past.Krillew said:Sorry for butting in.
I built a staircase down to the basement, milled grooves in the stringers with the hand router (no problem). I first made a routing template so I could move it along the stringer to mill the right angle. The staircase is entirely built with power tools.
It's not quite finished yet as the last step hasn't been installed.
I'm building as I go so I've used the staircase a lot, and it's become a bit worn, so I probably won't complete the staircase until I'm closer to finishing the rest of the construction.
Oh right... cost less than 3000:-
45x220 in stringers, 34mm tongue and groove in the steps, beadboard on OSB in the back
A question about your staircase, are the stringers made from pine ribs 45x220?
No pine, as a rule, I chose ones that "probably" won't warp.. (I hope)
I've run some M10 threaded rods through in a few places to keep it all together
and also screwed into the end of the steps. Then the stringer is screwed to one wall, so it should stay straight
and not flex either. The far side in the picture is currently just resting on the ends but will be braced in the middle. But it feels completely stable. Yes, it won't hold if someone stands on each step and jumps at the same time, but after bracing it should work. Now it's a staircase to the basement, so I don't need the best appearance.
Now I'm working on the stairs to the upper floor, so I'm considering using glulam instead, it will probably look a bit nicer. Or clad it with other wood for appearance's sake. I'm currently drawing intensely.. The problem is that a sliding door has to go under the stairs, so I have a fixed height about 2 steps down. So I'm currently working on the sliding door to make it build as little as possible with the track.
Otherwise, I will build in the same way as for the basement, milling grooves in the stringers with a router and sliding the steps in from the back.
I've run some M10 threaded rods through in a few places to keep it all together
and also screwed into the end of the steps. Then the stringer is screwed to one wall, so it should stay straight
and not flex either. The far side in the picture is currently just resting on the ends but will be braced in the middle. But it feels completely stable. Yes, it won't hold if someone stands on each step and jumps at the same time, but after bracing it should work. Now it's a staircase to the basement, so I don't need the best appearance.
Now I'm working on the stairs to the upper floor, so I'm considering using glulam instead, it will probably look a bit nicer. Or clad it with other wood for appearance's sake. I'm currently drawing intensely.. The problem is that a sliding door has to go under the stairs, so I have a fixed height about 2 steps down. So I'm currently working on the sliding door to make it build as little as possible with the track.
Otherwise, I will build in the same way as for the basement, milling grooves in the stringers with a router and sliding the steps in from the back.
I'm just getting started on a stair-building project. I've drawn up a plan and am now about to begin the actual construction. I've based my work on the theories from the book "bygg trappan" ISBN 978-91-976146-0-3. http://biblioteket.stockholm.se/titel/373827
I can definitely recommend that book if you want to build a staircase. Mine will be a U-shaped staircase fully enclosed between three walls, with a closet underneath. I plan to attach each step directly to the wall without any stringers. We'll see how it goes, but when I think about it, it doesn't seem that difficult. Then again, that's what I said about the whole house before we started a few years ago...
I can definitely recommend that book if you want to build a staircase. Mine will be a U-shaped staircase fully enclosed between three walls, with a closet underneath. I plan to attach each step directly to the wall without any stringers. We'll see how it goes, but when I think about it, it doesn't seem that difficult. Then again, that's what I said about the whole house before we started a few years ago...
Krillew. You don't happen to have a picture of your welding template. It would be interesting to see what it looks like. What type of fit should you have, to the extent that you tap with a hammer (or sledgehammer)? Do you glue?
My template was quite simple, a 5mm plywood board with a groove in it.
I will see if I can find it and then I'll take a picture. It's late now, but I'll check tomorrow.
Yes, I had quite a good fit. I tapped with a rubber mallet.
Indeed, I both glued and screwed from the outside. You can risk creaking if it doesn't sit properly.
I will see if I can find it and then I'll take a picture. It's late now, but I'll check tomorrow.
Yes, I had quite a good fit. I tapped with a rubber mallet.
Indeed, I both glued and screwed from the outside. You can risk creaking if it doesn't sit properly.
Last edited:
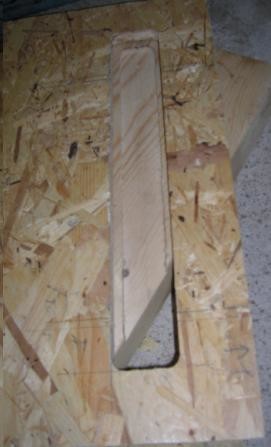
My mistake, the routing template was in 12mm OSB.
I placed the first test routing underneath so you can see how I did it.
I first marked out the distance between the steps on the vangstycket. Placed the vang side in position, used a level to get a horizontal line. Took down the vangstycket and took the angle with a sliding bevel, drew all the horizontal lines.
Measured about 5cm from the front edge and made a mark on each line, then placed the routing template and secured it with 2 screws, making sure the screw holes are positioned so they won't be visible on the finished staircase.
Then out with the router and start routing...
Yes, this particular site is good http://www.blocklayer.com/stairs/stairseng.aspx
I placed the first test routing underneath so you can see how I did it.
I first marked out the distance between the steps on the vangstycket. Placed the vang side in position, used a level to get a horizontal line. Took down the vangstycket and took the angle with a sliding bevel, drew all the horizontal lines.
Measured about 5cm from the front edge and made a mark on each line, then placed the routing template and secured it with 2 screws, making sure the screw holes are positioned so they won't be visible on the finished staircase.
Then out with the router and start routing...
Yes, this particular site is good http://www.blocklayer.com/stairs/stairseng.aspx
Last edited:
Thanks, I probably got a bit wiser, maybe not completely. I assume you fastened some form of guide rail to the template so you only let the template slide along the stringer to each horizontal line.
Did you use clamps to fixate?
The reason for my ignorant questions is that I don't even own a hand router, but I can borrow one when the time comes.
Did you use clamps to fixate?
The reason for my ignorant questions is that I don't even own a hand router, but I can borrow one when the time comes.
Ok.Amatörbyggaren said:
then I will explain a little more.
I used a copy ring for the router
found an explanation here http://www.youtube.com/watch?v=F8Cqq4AHgGo
I'm not good at German but it looks like he's working on a vangstycke.
I just drew lines on the vangstycke, aligned the line in the hole on my routed plate visually with my eyes.. screwed it in place.. sure, you can screw a strip on the underside, so it's easier to get the same depth on all steps. but I figured if it varies by 2mm between the steps, it won't be noticeable..
Yes, please. Now I understand.

Click here to reply