Hello!
Lacking sufficient mathematics, physics, and construction engineering knowledge, I need help from your brains—I'm tearing my hair out over this.
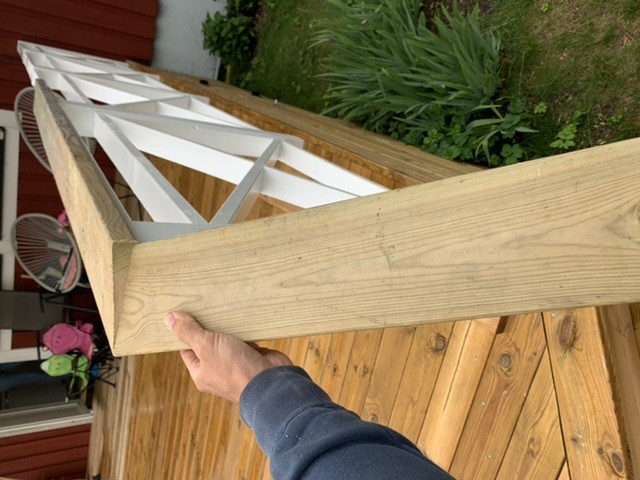
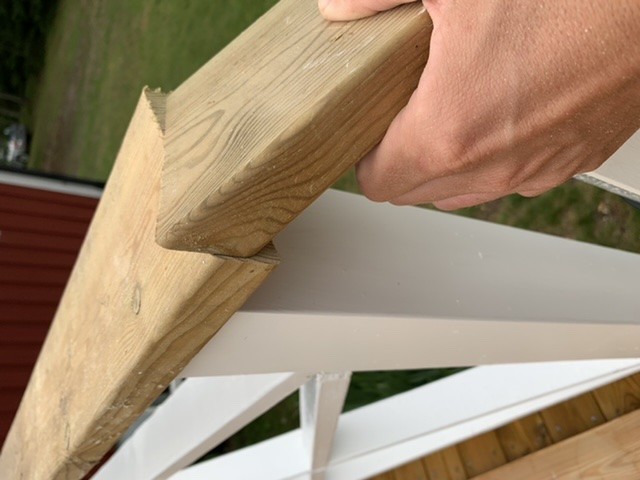
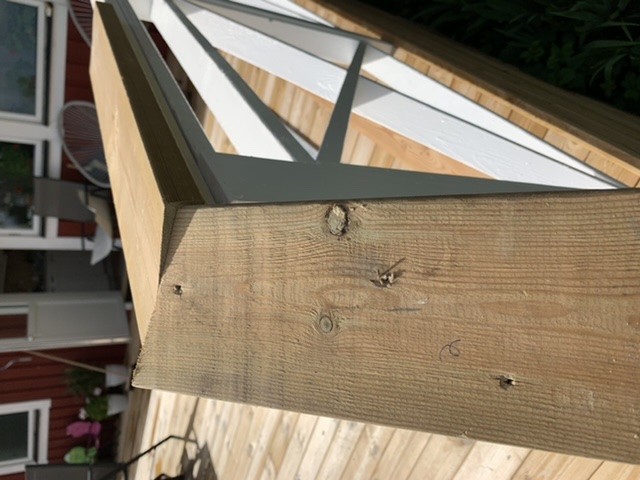
The situation is that I need to finish a cross fence built on a raised deck and connecting stairs by gluing a larch handrail onto the otherwise white fence. This handrail should go "seamlessly" from the deck down into the stairs, but after hours with the miter saw, I'm unsure if this is even possible...
The problem is the angles. The stairs, of course, slope downwards. Additionally, they are angled outward from the deck railing's direction. Double angles on the miter saw are no problem, and I divided the outward angle on both boards so that the cut surface would be equal.
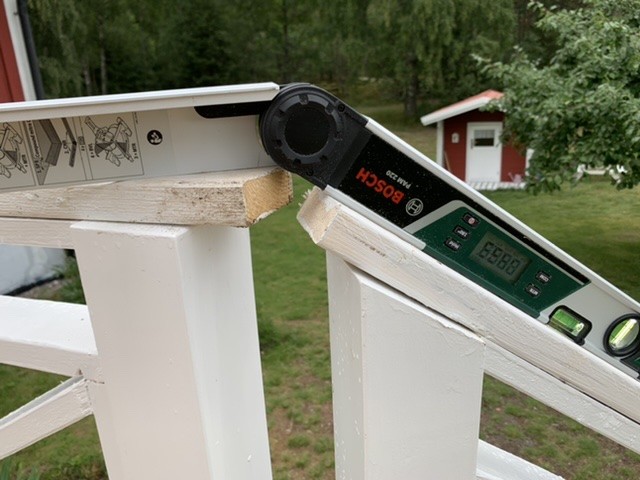
BUT, I don't understand how I can avoid the board rising from the stairs from sticking up above the one on the deck's handrail. See pictures for hopefully clarifying description. Can this be solved with smart miter cutting, or do I simply have to cut off the protruding part somehow?
Ps. If this is the wrong forum section, some kind admin can feel free to move it. Ds.
Kristofer
Lacking sufficient mathematics, physics, and construction engineering knowledge, I need help from your brains—I'm tearing my hair out over this.
The situation is that I need to finish a cross fence built on a raised deck and connecting stairs by gluing a larch handrail onto the otherwise white fence. This handrail should go "seamlessly" from the deck down into the stairs, but after hours with the miter saw, I'm unsure if this is even possible...
The problem is the angles. The stairs, of course, slope downwards. Additionally, they are angled outward from the deck railing's direction. Double angles on the miter saw are no problem, and I divided the outward angle on both boards so that the cut surface would be equal.
BUT, I don't understand how I can avoid the board rising from the stairs from sticking up above the one on the deck's handrail. See pictures for hopefully clarifying description. Can this be solved with smart miter cutting, or do I simply have to cut off the protruding part somehow?
Ps. If this is the wrong forum section, some kind admin can feel free to move it. Ds.
Kristofer
Now I'm sitting alone and am admittedly a little tired, but it shouldn't be particularly difficult.
Are you sure that the posts for the railing in the stairs are cut correctly at the top?
To get it to fit, it shouldn't be harder than mitering 50/50 on both handrails on the flat side and on the width. As you show now, the posts for the stair railing seem to be cut at an angle.
Are you sure that the posts for the railing in the stairs are cut correctly at the top?
To get it to fit, it shouldn't be harder than mitering 50/50 on both handrails on the flat side and on the width. As you show now, the posts for the stair railing seem to be cut at an angle.
M
Marcussjogren
Member
· Västra Götaland
· 3 081 posts
Marcussjogren
Member
- Västra Götaland
- 3,081 posts
I also think you need to disregard the posts.
If you take one angle at a time, i.e. the one that bevels the top rail horizontally by itself and the one that bevels the top rail vertically by itself, then it should be possible to calculate, but you need a protractor.
The sum of all angles horizontally should be 180 degrees and the sum of all angles vertically should be 180 degrees.
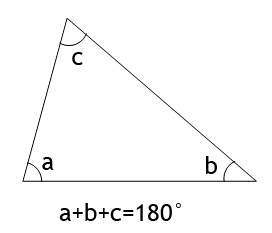
The easiest way is to see the top rail as a triangle where a-c is the top rail on the fence and c-b is the top rail for the stair railing. A-b becomes imaginary.
If you then assume that b is 90 degrees and measure angle a, you should bevel the boards at a divided by two, otherwise, the boards won't fit against each other in width.
Take two test pieces, one you clamp to the top rail on the fence and the other you hold by hand until it looks like it fits.
Anyone who knows this better than me is welcome to correct me if I'm wrong, I've been pondering it myself since I'm building a patio with a border")
If you take one angle at a time, i.e. the one that bevels the top rail horizontally by itself and the one that bevels the top rail vertically by itself, then it should be possible to calculate, but you need a protractor.
The sum of all angles horizontally should be 180 degrees and the sum of all angles vertically should be 180 degrees.
The easiest way is to see the top rail as a triangle where a-c is the top rail on the fence and c-b is the top rail for the stair railing. A-b becomes imaginary.
If you then assume that b is 90 degrees and measure angle a, you should bevel the boards at a divided by two, otherwise, the boards won't fit against each other in width.
Take two test pieces, one you clamp to the top rail on the fence and the other you hold by hand until it looks like it fits.
Anyone who knows this better than me is welcome to correct me if I'm wrong, I've been pondering it myself since I'm building a patio with a border
M
Marcussjogren
Member
· Västra Götaland
· 3 081 posts
Marcussjogren
Member
- Västra Götaland
- 3,081 posts
More suitable examples for your case came to mind.
Then I probably described it poorly. I'll try again.
Imagine a line across the railing of the fence and imagine that the line corresponds to B-A.
We envision angle A as 90 degrees, and angle C is irrelevant.
The railing for the staircase is the line B-C, and it's angle B that you need to mitre.
Again, measure the angle and divide it by two to get the mitering angle horizontally.
M
Marcussjogren
Member
· Västra Götaland
· 3 081 posts
Marcussjogren
Member
- Västra Götaland
- 3,081 posts

Hello!M Marcussjogren said:
Many thanks for your detailed (and pedagogical!) answer!
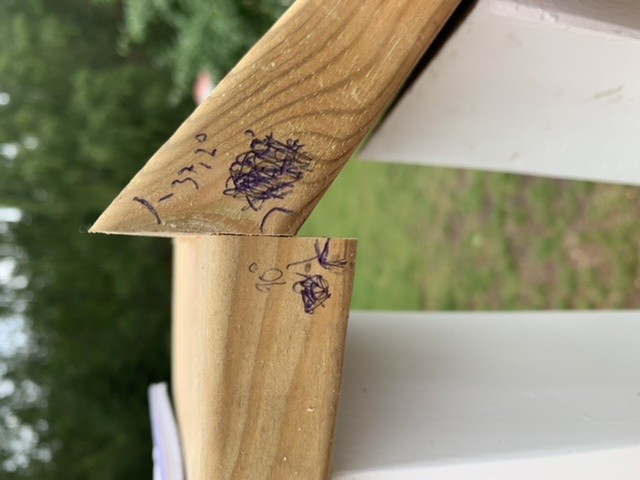
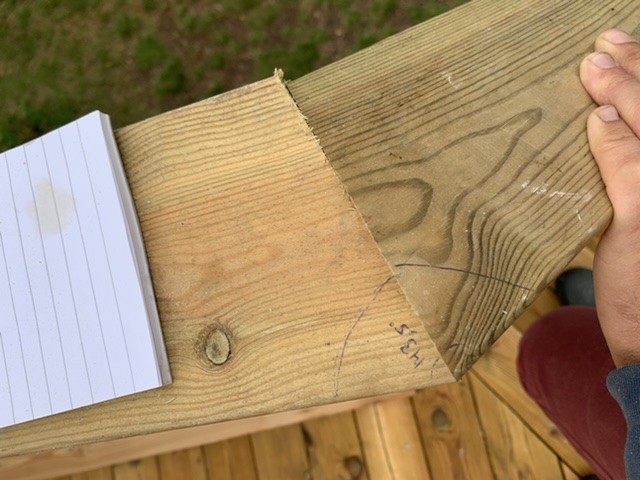
Despite this, I couldn't get it to work perfectly. When I adjust the angle sideways on two boards (where one is sloping upwards), the longer side sits higher than the lower one (see picture). When I instead take the full angle on the upper, horizontal board, it works regarding any protruding parts, BUT of course with different sized cut surfaces (see picture).
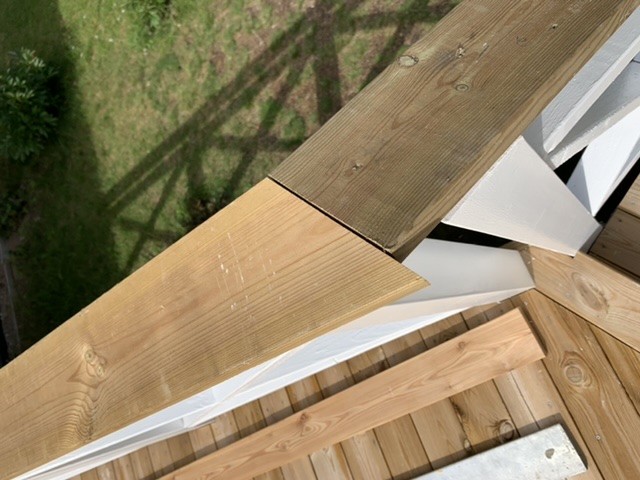
The solution was option 2, work for the jigsaw and sander afterwards.
Turned out quite ok, and thanks again!
Kristofer

an orthopedic response:
we deal with that a bit when we correct improperly healed fractures. we have the advantage that bone fragments are (more or less) round - with rectangular cut surfaces, torsion, which is the issue here, cannot be sawn to fit.
we deal with that a bit when we correct improperly healed fractures. we have the advantage that bone fragments are (more or less) round - with rectangular cut surfaces, torsion, which is the issue here, cannot be sawn to fit.
Thanks for the clarification! Nice to stop pondering over this and relax, realizing it's unsolvable! /Clinical physiologistD danne_i_huset said:

So you have to train to be an orthopedist to build stair railings now too.D danne_i_huset said:
Very unexpected!
Now we also want to see the final result!K krihe932 said:Hello!
Thank you so much for your detailed (and educational!) response!
Despite this, I couldn't get the whole thing to work perfectly. When I adjust the angle sideways on two boards (where one is sloping upwards), the longer side ends up higher than the lower one (see picture). When I instead cut the entire angle on the upper, horizontal board, it's correct regarding any protruding parts, BUT obviously different size cut surfaces (see picture).
The solution was option 2, work for the jigsaw and sander afterwards.
Turned out alright, and thanks again!
Kristofer
Click here to reply