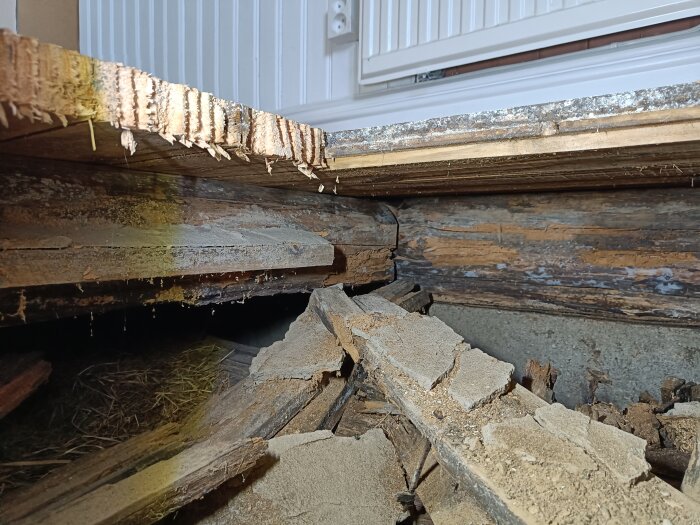
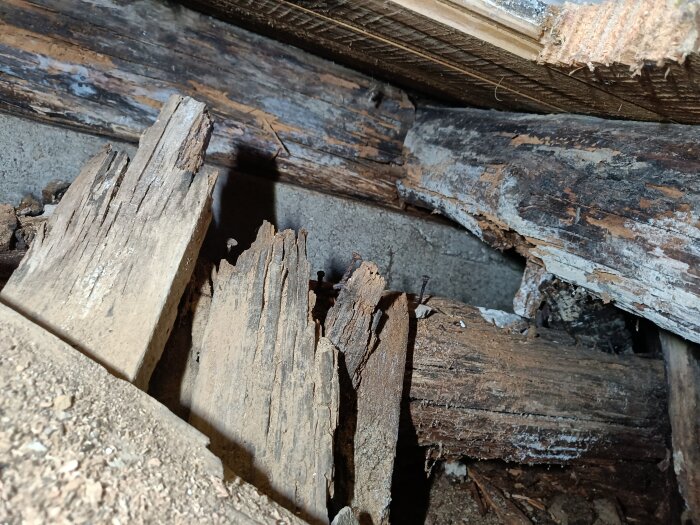
Is it possible to renovate the bottom plate by chiseling away the rotten part (about 1-2cm) and screwing 195 studs from the inside as support for the new floor? Or are there risks with this so that the entire bottom plate must be replaced?
Moreover, it's strange how the support beams are attached to the bottom plate?
I have realized that there is no point in patching and repairing, and it is therefore necessary to replace the sill. It was simply more decayed in some areas than I first thought. The idea now is to replace it "section by section," starting in the kitchen where the above pictures were taken.
The problem is that it's very difficult to find descriptions and information on how to proceed, in my case with a crawl space and poured foundation wall.
I talked to an acquaintance who suggested that you basically just cut out holes for jacks, raise the house a few centimeters, and insert a new sill piece. Move the jacks to the next piece that needs to be replaced until the entire section is finished. Can it really be that simple? Don't you need to brace the walls with some form of support? And what type of wood is used for this, can you cut sill stock from your own trees, like spruce?
Of course, I have in mind to contact a carpenter but want to try to do as much as I can myself if possible.
If you want to do it thoroughly yet simply, you cut down some suitable spruce or pine trees and saw them on three sides. One sawn side facing down towards the cast stone foundation, one sawn side facing out, and one facing in. The round side facing upwards against the notch in the next log. The longer the lengths of the lumber, the quicker the work goes. The problem is that many sawmills can't handle logs that long. Between 7.5 and 9 meters is usually the longest you can saw, depending on the saw model. It takes an unnecessary amount of time to mess around with pieces. Bring in new logs from corner to corner. Generally, you lose 4-5 cm in height when fitting the round side of a log against an old notch. You just trim off with a chainsaw, bark knife, and axe until it fits the old notch. Measure the height of the old timber at both the top and base ends, and ensure that the newly sawn wood achieves roughly the same height +4 or 5 cm.
It's possible to use freshly cut timber, but then the repair must be made higher so that the height is correct once everything has dried. If the timber is really fresh, add 5 cm extra height per height meter. So about a centimeter on a sill.
When lifting, you can either bolt standing posts, for example, 6x6 inches to lift underneath, or come up with some homemade lifting bracket. Or you can be brutal and cut holes and push through a suitable iron piece, such as a piece from a regular two-share Kvärneland or Fiskars plow.
Doorways that reach down to the timber being replaced must be braced. For example, with a nailed 2x4 inch plank across so that the doorway maintains the correct width at the bottom.
There will be a sill replacement course in Bjurholm in northern Ångermanland this summer if all goes well. An acquaintance will be the instructor. Just a tip.
If you want to do it properly but simply, you cut down some suitable spruces or pines and saw them on three sides. One sawn side faces the concrete foundation, one sawn side outwards, and one inwards. The round side faces up against the next beam.
The longer lengths of timber you have, the faster the work goes. The problem is that many block saws can't handle such long logs. Usually, between 7.5 and 9 meters is the longest you can saw, depending on the saw model.
It's a huge waste of time to puzzle with stumps for no reason. Bring in new logs from corner to corner.
You generally lose 4-5 cm in height when fitting the round side of a log against an old fitting. You just shave it off with a chainsaw, bark knife, and axe until it fits the old fitting. Mark the height of the old timber at both the top and root ends and ensure that the newly sawn gets roughly the same height +4or5 cm.
You can use freshly cut timber, but then you have to make the repair higher so the height becomes correct when everything has dried. If the timber is really fresh, add 5 cm extra height per height meter. So about a centimeter on a base.
When lifting, you can either bolt on vertical posts, for example, 6x6 inches to lift under, or come up with some homemade lifting brackets. Or you can be brutal and cut a hole and pass through a suitable iron, for example, a piece of a beam from a regular two-share Kverneland or Fiskars plow.
Doorways that reach down to timber that needs to be replaced must be tied together. For example, with a nailed 2x4 inch plank across it, so the doorway maintains the correct width at the bottom.
There will be a base replacement course in Bjurholm in northern Ångermanland this summer if all goes well. An acquaintance will be the teacher. Just a tip.
Thank you for a detailed and descriptive response.
The house in question has horizontal timber where the base appears to be sawn on the top and bottom, which should make replacement easier as you don't have to worry about the "fitting" you described above. Replacing the entire base of the house won't be an option this year as I only plan to replace the part of the base that is in the kitchen, in lengths of max 4.5 m.
I have access to a mini sawmill (for chainsaw) and pines from last winter.
Regarding the lift. Would it work if you cut holes in the base for two jacks on either side of the piece you want to replace and then remove them and wedge in two pieces in the base to finish/seal?
Thanks for the tip. Unfortunately, it's a bit too far away for me.
The house in question has horizontal timber where the sill appears to be sawn on the top and bottom sides, which should facilitate replacement as it avoids the need to account for the "drag" as you described above. Replacing the sill on the entire house will not be relevant this year as I only plan to replace the part of the sill that is in the kitchen, in lengths of up to 4.5 m.
I have access to a mini-sawmill (for a chainsaw) and pines from last winter.
Regarding the lift. Would it work if one sawed holes in the sill for two jacks on either side of the piece to be replaced? Then remove it and wedge two pieces into the sill as a finishing/sealing?
Thanks for the tip. Unfortunately, that's a bit too far for me.
In Ostrobothnia we call it "ondislaag." A square log course under the actual timber. To make it easy to replace.
I would recommend splicing the new timbers with the old so that the "ondislaaji" forms a continuous frame under the house. In those days there was no reinforcement in the concrete and the wooden house stands loosely on the foundation and must hold its own shape. Therefore, it's not a good idea to saw holes for jacks. Better to bolt on something to lift with. Or saw a small hole and thread a piece of a beam from a scrapped plow through it and lift with a jack under each end of it.
In Österbotten, we call it "ondislaag". A square log course under the actual timbers. So that it is easy to replace.
I would recommend that you splice
the new timbers with the old ones so that the "ondislaaji" forms a continuous frame under the house. At that time, there was no reinforcement in the concrete, and the wooden house stands loosely on the foundation and must hold its own shape. Therefore, it is not a good idea to saw holes for jacks. Better to bolt something to lift with. Or saw a small hole and pass through a piece of a beam from a scrapped plow and lift with a jack under each end of it.
Interesting, thanks for the info!
Ah, I see, definitely a safer approach. Forgive my ignorance now, but by ås do you basically mean a strong steel beam?
Ah, I see, definitely a safer approach. Excuse my ignorance, but by ås do you basically mean a strong steel beam?
Yes, exactly. They are usually around 40x80 mm and made of a slightly harder and tougher steel that doesn't bend easily. I haven't encountered that material in those dimensions anywhere else except as åsar, meaning the curved beams that the turntables attach to in older tractor-drawn plows.
Yes, exactly. They are usually around 40x80 mm and made of a slightly harder and tougher steel that doesn't bend easily. I haven't encountered that material in those dimensions anywhere else than as ridges, that is, the curved beams that the turntables attach to in older tractor-drawn plows.
Ah, thanks so much for the tip. It might be difficult to find, but now I know what to look for at least. It would undeniably be easiest if you can avoid making any damage to the wall.
Click here to reply
Vi vill skicka notiser för ämnen du bevakar och händelser som berör dig.