So, like many others, it's time to renovate the staircase. I am currently looking at different "kits" to cover the staircase - essentially putting solid wooden treads with a stair nose on top of the existing ones to create a new surface.
The problem I have now is that the staircase has an intermediate landing halfway up, and it goes up into a small hall at the top. I would like the floor up there and the landing to match the stair treads.
So, Lundbergs has "Stairfix" but I emailed them, and they had no solution for the floor part, only the stair treads.
Stepkit.se is another solution, but the treads are delivered as large pieces with a stair nose on both ends and should be split in the middle, thus enough for two treads per piece, so there is no tongue/groove solution to connect a wooden floor even if they had it, but I have emailed them, so we'll see if they have a solution.
Then there's Kährs, which is a flooring brand. You buy solid wood flooring by the meter (one package contains six planks, each plank is enough for one tread) and they also sell stair noses in the same wood type.
But the question regarding Kährs is whether it's suitable to lay flooring on the stairs? It should obviously be glued just like stepkit/stairfix, but the question is if there's anything else I should consider, if it's inappropriate to lay flooring on the stairs?
I tore up the linoleum mat on the top two steps several years ago, but it was so difficult that I didn't continue, so it's looked pretty bad for quite a while. Since we are renovating the living room floor, we took the opportunity to order enough wood for the stairs as well. So today, I started making the stairs wooden again.
This is what it looks like when you pull away a small piece of the mat, a sticky mass with glue underneath that is a real nightmare to remove.
Just removing the mat can be quite fiddly.
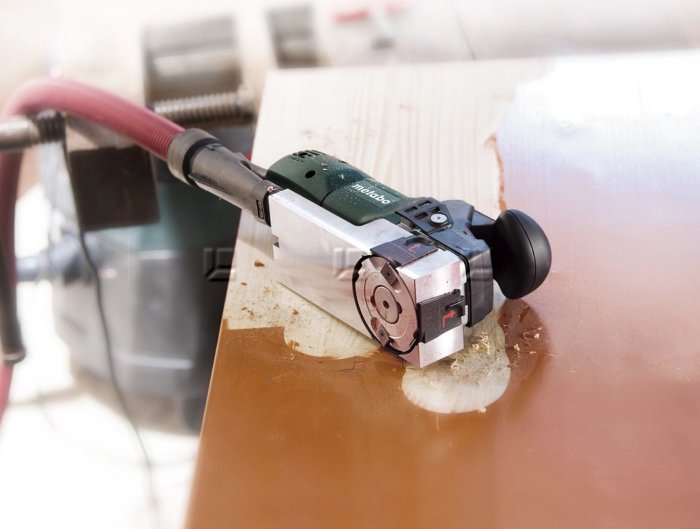
But I've acquired a machine specifically for this purpose! Yes, it's a paint stripper that is a machine whose sole task is to reveal the bare wood. With rotary cutters, you can set it to "plane" from 0-0.3 mm depth. If you set it to say 0.05 mm, it cleans off the glue residues, and as soon as you see the wood surface clearly, you set it to 0 mm, so it takes away everything sticking up over it.
And this is what it looks like when it's done. It took quite a while, and you get all sweaty, and the machine is extremely loud, but compared to doing it by hand with sanding, it was very easy.
A close-up of the bare wooden stairs. It's a bit ironic that they once put a linoleum mat that looked like pine… on a pine staircase.
Then it was just a matter of going over it with a small sander to smooth the surface.
A short film showing how effective the paint stripper is:
[video]http://www.youtube.com/embed/P8dRQBKJ4e4[/video]
Now the living room and kitchen are finished, so the next step is the stairs. We have already purchased everything we need, which is the same flooring we used in the living room (Brahehus from Kährs) and handmade stair noses from Khärs in the same material as the flooring. Here's how it's supposed to be laid.
Here's how the stairs are initially designed. This is only the lower part up to the landing, then it continues with eight more steps up to the upper floor.
The first step is to lay the flooring so it aligns at the back with the step.
Then we place the stair nose so it goes over the edge and covers the entire step.
Then we might need to add a cover board on the underside of the step, and we are considering building it up so it becomes a completely enclosed staircase, alternatively just adding a cover board underneath and at the back.
Well, one doesn't become less interested in a paint scraper right away... What kind of blades does it have and where can one get them?
We have something similar, a plastic mat on top of what I assume is a nice wooden staircase. The girl wants to paint it white and put a needle felt carpet, so I'd rather remove the old plastic and glue than put new wood on top of everything.
It is a Metabo paint remover, as far as I know, they are the only ones who make such tools. The blades are small rectangular metal blades with two mounted on a rotor disc. You can see better in this picture:
I was window shopping a bit on ebay.de and the blades weren't terribly expensive either. But for a single staircase, it will probably be more economical to rent for 200-250kr per day instead of 2500kr.
One should have started a rental company to buy all sorts of toys
It cost 170kr per day in Luleå. However, they were going to stop renting it out because customers always drove off with the hatches making it dangerous, and they keep wrecking it when driving over nails all the time
So in 14 days of rental, you'd have your own instead. The old man thought it sounded like a better idea, "and then you can sell it on when you're done."
The vacation is over and the stair project is complete! I have now installed all the steps as well as a new floor in the intermediate section and on the floor upstairs, so the same flooring now goes from the living room up the stairs and then up to the second floor!


")