8,385 views ·
50 replies
8k views
50 replies
Problem with carved ceiling moulding
Hello everyone,
I've been hanging around here for a while now, browsing various threads with much enjoyment, but now it's time to ask a question because I'm about to tear my hair out.
I recently moved into the house that my partner and I built in 2018. Or rather, I did the building while my partner took care of our 2 small children. I've finally gotten around to starting with the ceiling moldings. Since I particularly enjoy making things a bit more complicated than they need to be, I've chosen to, for lack of a better word, carve my inner corners.
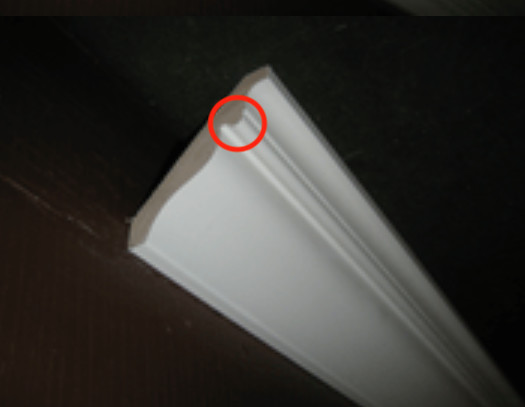
I did this with all the baseboards and like the result of a tight and neat joint. However, I'm having big problems achieving the same thing with the ceiling molding. No matter what I do, there's a specific part of the molding that doesn't want to cooperate. See the red marking on the attached image.
I don't know if it's me doing something wrong or if it's the profile of the molding causing the trouble. I'm not sure if it's distinguishable in this particular image, but the actual droplet/pearl or whatever you want to call it has an indentation behind it that "goes up behind" the lower edge of the droplet (if you know what I mean).
If the image doesn't suffice, I'll try to capture a picture of two pieces that don't fit together.
Grateful for any tips & advice you might offer. Or is it simply a matter of: practice more & redo right =D
I've been hanging around here for a while now, browsing various threads with much enjoyment, but now it's time to ask a question because I'm about to tear my hair out.
I recently moved into the house that my partner and I built in 2018. Or rather, I did the building while my partner took care of our 2 small children. I've finally gotten around to starting with the ceiling moldings. Since I particularly enjoy making things a bit more complicated than they need to be, I've chosen to, for lack of a better word, carve my inner corners.
I did this with all the baseboards and like the result of a tight and neat joint. However, I'm having big problems achieving the same thing with the ceiling molding. No matter what I do, there's a specific part of the molding that doesn't want to cooperate. See the red marking on the attached image.
I don't know if it's me doing something wrong or if it's the profile of the molding causing the trouble. I'm not sure if it's distinguishable in this particular image, but the actual droplet/pearl or whatever you want to call it has an indentation behind it that "goes up behind" the lower edge of the droplet (if you know what I mean).
If the image doesn't suffice, I'll try to capture a picture of two pieces that don't fit together.
Grateful for any tips & advice you might offer. Or is it simply a matter of: practice more & redo right =D
It is not quite clear what you mean by "snida'".
Could it be that you want to mount the moldings with a miter at the room's corners? Then you need a miter saw with a 45-degree angle (as precise as possible) and a lot of patience before you figure out the angle at which to place the molding in the saw. It's best to practice on a number of small pieces before you ruin long lengths.
However, if you want to place the first molding straight and then carve the meeting molding so that it fits into the profile of the first molding, it can be tricky with the drip nose. The carved molding needs a corresponding upward projection so that you mount it from underneath.

I can recommend corner blocks.
http://www.fresks.se/sortiment/tra/listvirke/taklist/162258
http://www.fresks.se/sortiment/tra/listvirke/taklist/162258
Exactly. That's what I'm not quite getting right.T Thomas_Blekinge said:
Maybe it's just more practice that's needed.
")
Yes exactly, that's the word I'm looking for and what I've done with all the baseboards.FreQa said:
As mentioned, I've encountered problems with this particular profile as I'm not able to make it work.
I usually score the list before cutting out the profile. I use a small Bahco handsaw to make it look nice. I finish by sanding with a round file or something similar that fits the profile. Youtube "coping crown mould" and you might get some new tips.
Most houses don't have 90-degree angles in the corners, especially if it's an old house. The angle against the ceiling isn't 90 degrees, and the angle between walls isn't 90 degrees. Coping of moldings is an established method to handle this and relatively simple compared to trying to compensate for the difference from 90 degrees when mitering.useless said:
Before I understood better, I tried to miter moldings in an old house, the result was awful, and I had to redo everything. Now I live in another older house where some clumsy person (craftsman!) has mitered the baseboards and then filled in the joints with enormous amounts of latex caulk. It looks terrible.
Exactly, I've been using the same technique until recently, when I attached a flap disc to the angle grinder and sanded off the excess instead. I found it easier and faster.J JSE said:
As mentioned, it's just this profile that I've encountered problems with, which is why I'm wondering if there might be something I'm missing or doing wrong, or if it's doomed to fail with this profile.
YouTube has run out of unwatched videos now
To scribe is the right way to do it if you want to be an interior carpenter and not a construction carpenter. With that molding, unfortunately, it is not possible. In your place, I would have chosen another molding rather than stooping to construction carpentry. A construction carpenter miters inside corners. Note that I am happy to complicate things and am documented to be quite smug.