8,385 views ·
50 replies
8k views
50 replies
Problem with carved ceiling moulding
M
Marcussjogren
Member
· Västra Götaland
· 3 081 posts
Marcussjogren
Member
- Västra Götaland
- 3,081 posts
M
Marcussjogren
Member
· Västra Götaland
· 3 081 posts
Marcussjogren
Member
- Västra Götaland
- 3,081 posts

After looking at another thread you've answered in, and factoring in the last sentence of your previous reply, I'm wondering if I might have to interpret that as you weren’t actually answering the question seriouslymattiasp said:
To cop is the right way to do it if you want to be an interior carpenter and not a construction carpenter. Unfortunately, with that molding, it's not possible. In your place, I would have chosen another molding rather than lowering myself to construction carpentry. A construction carpenter miters inside corners. Note that I happily complicate things and am documented as being rather dry.


I'm not quite sure why one wouldn't be able to use the method of scribing.
I've never tried it with such a "difficult list." But the method I learned via a link on byggahus many years ago involved first setting one piece cut at 90 degrees directly against the wall. Then you take the other piece and saw it at 45 degrees as if both were mitered. This leaves a lot of material that needs to be removed. You do this with a coping saw that follows the "point" of the mitered piece. You saw with the coping saw at approximately 45 degrees and usually help with a rasp at the end. But the point of the piece should be exactly as it was in the 45-degree cut.
I've never tried it with such a "difficult list." But the method I learned via a link on byggahus many years ago involved first setting one piece cut at 90 degrees directly against the wall. Then you take the other piece and saw it at 45 degrees as if both were mitered. This leaves a lot of material that needs to be removed. You do this with a coping saw that follows the "point" of the mitered piece. You saw with the coping saw at approximately 45 degrees and usually help with a rasp at the end. But the point of the piece should be exactly as it was in the 45-degree cut.
Yes, exactly, coping is the name of the technique I use in this case, which I've now learned from previous posts. I've used exactly the method you describe with perfect results on all other ceiling and floor trims.H hempularen said:I'm not quite sure why you wouldn't be able to use the method of coping.
I've never tried it with such a "difficult trim". But the method I learned via a link here on byggahus many years ago involved first setting one trim piece cut at 90 degrees directly against the wall. Then you take the other trim and cut it at 45 degrees as if both were mitered. Then there's a lot of material sticking out that needs to be removed. You do this with a coping saw that follows the "edge" of the mitered trim. You cut with the coping saw at roughly 45 degrees. And might need to help a bit with a rasp at the end. But the edge of the trim should be exactly as it was after the 45-degree cut.
It's just that at the actual drip edge/pearl/drop in the picture, I'm not getting it right.
Even if I remove everything all the way "down to the paint" on the backside, it doesn't fit. I might take a picture of what I have at home so it might be easier to understand what I mean.
It's absolutely possible I'm making some fundamental mistake and that's why it's going wrong.
Oh yes, I was completely serious. It is not possible to back-bend if the molding you are going to mount has a "back release." Let me explain what I mean: For example, if you are mounting a cove molding, the horizontal part of the cove nearest the ceiling will become almost infinitely thin when you back-bend it. If you imagine the molding in the mounting position, no part of the molding should pass the point where it is horizontal. Do you get it? I could illustrate with a picture, but not right now.T Tokfarbrorn said:
Edit, or yes, I have drawn an arrow where the problem is.
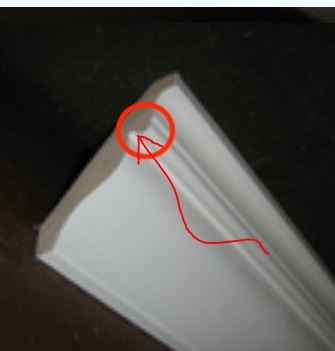
I apologize for the incorrect assumption, and I think I understand what you mean. That's where I'm having trouble too, where you've drawn the arrow.Sure, I was completely serious. It cannot be coped if the molding you are going to mount has a "reverse slope." Let me explain what I mean: If you, for example, mount a cove molding, the horizontal part of the cove closest to the ceiling will become nearly infinitely thin when you cope it. If you imagine the molding in the mounting position, no part of the molding can pass the point where it is horizontal. You follow? I could illustrate with a picture, but not right now. Edit, or, yes, I've drawn an arrow where the problem is.
I'll simply have to settle for the so-called "construction carpenter" method (
) or look for another molding that we like.What is the problem with coping on this molding, besides the fact that the curve you've highlighted isn't completely perfect right at the corner?
If you cope this molding, you can just press in a bit of sealant right behind that semicircular curve in the profile.
You probably won't see that from below anyway, considering the molding is on the ceiling.
You have this choice or to miter. Just choose between the lesser of two evils.
If it looks okay, I would still choose coping.
Can TS include a picture of how it looks when coped? Would be fun to see.
No, it does not. The TS list has a gap that goes up towards the ceiling. It is therefore impossible to fit perfectly.M Marcussjogren said:
However, I don't think it's a big issue, and it should be possible to fix with a little latex sealant right where the list doesn't fill up and there's a small hole.