
6,410 views ·
14 replies
6k views
14 replies
Press glue into existing joint without splitting?
I have identified that the stairs creak due to movement between the stringers and the treads, and I suspect the culprit is some old glue and weak risers. Unfortunately, I don't have the option to disassemble the stairs and clean them out, so I would need a way to press new glue between the stringers and the treads with proper pressure.
Can anyone suggest a good technique or tool? I spontaneously thought of a tool similar to a grease gun to generate high pressure and then some nozzle that can be drilled in place. It's not a problem to make visible interventions since it will be a stair renovation with a step kit or something similar afterward. However, I want to minimize the creaking before tackling that.
// Mats
Can anyone suggest a good technique or tool? I spontaneously thought of a tool similar to a grease gun to generate high pressure and then some nozzle that can be drilled in place. It's not a problem to make visible interventions since it will be a stair renovation with a step kit or something similar afterward. However, I want to minimize the creaking before tackling that.
// Mats

I've been considering a marinade injector, but the question is whether it can penetrate sufficiently? I would like to drill into the gap I assume exists between the carriage section and the tread, then fill the entire space with glue under high pressure. I also guess that lightweight/expanding glue will only reach a few centimeters to the sides. Hence my consideration to achieve really high pressure.
The tread is about 30 deep, and the seam that clicks is about 25 cm. I can obviously make multiple holes, but more than 2-3 holes feel tedious considering the number of steps.
// Mats
The tread is about 30 deep, and the seam that clicks is about 25 cm. I can obviously make multiple holes, but more than 2-3 holes feel tedious considering the number of steps.
// Mats
Are you really completely sure that it's between the vang and the tread that it's creaking?
Most stairs I've seen have had the creaking between the tread and the riser.
Most stairs I've seen have had the creaking between the tread and the riser.

I read about a furniture restorer who bought syringes at the pharmacy to inject glue into cracks.
"It feels a bit suspicious to buy syringes, and you have to justify what you are going to use them for in order to buy them."
"It feels a bit suspicious to buy syringes, and you have to justify what you are going to use them for in order to buy them."
Since it's an open staircase without risers, they can't be causing the creak. It's more likely a combination of old glue between the stringer and treads, and relatively weak treads (30x90x920mm) made of pine. If I had the opportunity to separate the staircase, I would gladly do so, but unfortunately, it’s not possible. I will reinforce the treads with a strip on the underside that hopefully makes it more child-safe, and hopefully reduces the creaking, though probably not entirely.anaitis said:
I've also considered replacing the risers in some way, but I'm not sure if it's possible between the existing stringers.
// Mats
Last edited:
How do you mean now? Replace something that doesn't exist? Or do you mean treads?myrstack said:
Of course, I mean the treads. Since there will be a renovation kit on top, it's really just a stable base that doesn't creak that I'm after.
But as I said, I don't know of any good method for replacing treads without dismantling the entire staircase.
// Mats
But as I said, I don't know of any good method for replacing treads without dismantling the entire staircase.
// Mats

This is not something I've tested myself, but wouldn't pocket holes and screws remove most of the creaking (an improved version of angled screwing, you could say)? You would then drill angled holes in the tread and screw into the stringer. You can also take the opportunity to press glue into the holes. The image below shows the principle:

A small jig like this one is very helpful when drilling the holes. I recall that Wolfcraft (available at various hardware stores) has something similar if you don't feel like ordering from the UK.
A small jig like this one is very helpful when drilling the holes. I recall that Wolfcraft (available at various hardware stores) has something similar if you don't feel like ordering from the UK.
Spontaneously, the jig above sounds like something to try, combined with plenty of glue it should take away quite a bit. I'll see if I can get hold of one and see what works. I'll report back to the forum about the results later.
Other tips are of course still interesting until the stair mess is quieter!
// Mats
Other tips are of course still interesting until the stair mess is quieter!
// Mats
A follow-up on the result:
Ordered a Kreg Mini Kit Pocket jig from Axminister along with a variety of screws, primarily 2.5 and 2-inch long with different coarse threads. So far, I've completed 7 out of a total of 28 steps, and each step has had 3 holes drilled on each side and a 2.5-inch screw screwed into each stringer. I skipped the glue as I screwed because I would need to drill a separate hole for it, so I left it for later. With 6 screws per step, the step became noticeably sturdier, and about 60-70% of the squeaking disappeared entirely. I would say this jig is really good for solutions like this, especially since I can then hide the screw holes under the renovation kit. Since we have children at home who will soon start crawling, I also took the opportunity to install moldings at the bottom of the steps to reduce the height of the opening and to make the step even sturdier, so I used 22x69 timber which was screwed and glued to the bottom edge of the steps. After the glue dried, that part of the stairs is now completely squeak-free, and the steps are incredibly much more rigid to walk on than before.
Regarding the jig from Kreg, it is a simple and relatively plastic construction. Some illustrative material that comes with it shows its use in, for example, furniture manufacturing, etc., and on that, I cannot comment, but I found it difficult to get really nice hole management when drilling. The jig has quick settings in inches for different material thicknesses, and it's reasonably simple to also adjust the drill stop for different thicknesses. The drill bit is noticeably dull after around 30 holes, so whether it will handle all my remaining 21 stair steps remains to be seen (around 65 holes). I understand it's a big strain to use the drill bit in this way, but I expected more. The bit that comes with it is also noticeably worn and probably won't last the whole journey. The square head and approximately 20 cm long bit mean you're quite locked into buying from Kreg again. The jig isn't extremely expensive, so for the money, I would still say it meets expectations, but it's not a product that will withstand long-term hard use without buying a stock of drills and bits from Kreg as consumables. Last but not least, I skipped buying any clamp that fits to instead use my quick clamps. However, you're then locked into mounting the jig within its grip length from the edge, which is pretty obvious. In my case, as I placed a hole roughly in the middle of the step, i.e., 15 cm from the edge, I really missed a quick clamp that handled this directly. Double quick clamps and a piece of wood obviously solve this, but it's cumbersome and takes time to finish the job.
If there is interest, I can provide pictures for anyone with a similar problem. I'll try to document a bit about the solution before the step kit installation begins, and the screw holes are concealed.
Ordered a Kreg Mini Kit Pocket jig from Axminister along with a variety of screws, primarily 2.5 and 2-inch long with different coarse threads. So far, I've completed 7 out of a total of 28 steps, and each step has had 3 holes drilled on each side and a 2.5-inch screw screwed into each stringer. I skipped the glue as I screwed because I would need to drill a separate hole for it, so I left it for later. With 6 screws per step, the step became noticeably sturdier, and about 60-70% of the squeaking disappeared entirely. I would say this jig is really good for solutions like this, especially since I can then hide the screw holes under the renovation kit. Since we have children at home who will soon start crawling, I also took the opportunity to install moldings at the bottom of the steps to reduce the height of the opening and to make the step even sturdier, so I used 22x69 timber which was screwed and glued to the bottom edge of the steps. After the glue dried, that part of the stairs is now completely squeak-free, and the steps are incredibly much more rigid to walk on than before.
Regarding the jig from Kreg, it is a simple and relatively plastic construction. Some illustrative material that comes with it shows its use in, for example, furniture manufacturing, etc., and on that, I cannot comment, but I found it difficult to get really nice hole management when drilling. The jig has quick settings in inches for different material thicknesses, and it's reasonably simple to also adjust the drill stop for different thicknesses. The drill bit is noticeably dull after around 30 holes, so whether it will handle all my remaining 21 stair steps remains to be seen (around 65 holes). I understand it's a big strain to use the drill bit in this way, but I expected more. The bit that comes with it is also noticeably worn and probably won't last the whole journey. The square head and approximately 20 cm long bit mean you're quite locked into buying from Kreg again. The jig isn't extremely expensive, so for the money, I would still say it meets expectations, but it's not a product that will withstand long-term hard use without buying a stock of drills and bits from Kreg as consumables. Last but not least, I skipped buying any clamp that fits to instead use my quick clamps. However, you're then locked into mounting the jig within its grip length from the edge, which is pretty obvious. In my case, as I placed a hole roughly in the middle of the step, i.e., 15 cm from the edge, I really missed a quick clamp that handled this directly. Double quick clamps and a piece of wood obviously solve this, but it's cumbersome and takes time to finish the job.
If there is interest, I can provide pictures for anyone with a similar problem. I'll try to document a bit about the solution before the step kit installation begins, and the screw holes are concealed.
Last edited:
Nice that you followed up with results and feedback on the jig - fun that it worked!
Regarding screws/bits, some forum members have turned to Biltema instead of buying Kreg's stuff. You can find some threads here: http://www.google.se/search?hl=sv&source=hp&q=kreg+skruv+biltema+site:byggahus.se
Regarding screws/bits, some forum members have turned to Biltema instead of buying Kreg's stuff. You can find some threads here: http://www.google.se/search?hl=sv&source=hp&q=kreg+skruv+biltema+site:byggahus.se
I will try to hunt down hopefully cheaper screws and bits at Biltema!
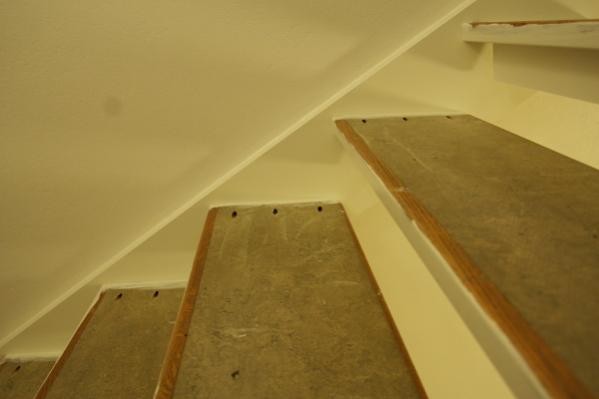
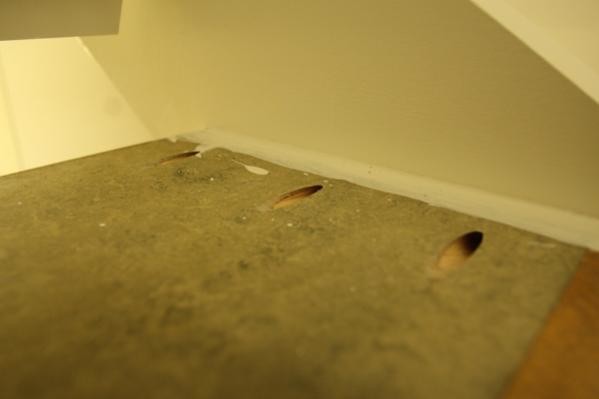
I am also attaching some pictures for archiving where you can see how I have chosen to place the screws. As you can see, I will attempt to leave the carpet (which is extremely well-fixed) in place on the step when I install the renovation kits. However, since I was a bit uncertain about how tightly the carpet was in all areas, I decided to set the screw so deep that I could remove the carpet without risking the screw head sticking up, so in the picture, you can see that the head of the screw is properly countersunk.
// Mats
EDIT: For those wondering, it's not a sticky handprint on the wall but dust on the sensor
I am also attaching some pictures for archiving where you can see how I have chosen to place the screws. As you can see, I will attempt to leave the carpet (which is extremely well-fixed) in place on the step when I install the renovation kits. However, since I was a bit uncertain about how tightly the carpet was in all areas, I decided to set the screw so deep that I could remove the carpet without risking the screw head sticking up, so in the picture, you can see that the head of the screw is properly countersunk.
// Mats
EDIT: For those wondering, it's not a sticky handprint on the wall but dust on the sensor
Click here to reply