We are in the process of a major renovation of the upstairs, where we will completely redo the bathroom and the surfaces in almost every room. In connection with this, I am thinking of installing underfloor heating upstairs. However, the condition is that it does not add any height since it's sensitive at our new staircase and because the ceiling height is low on half of the upstairs.
To solve this, I plan to mill down the tube into the joists, which consist of 20 cm thick reinforced light concrete beams. If I can go down 16 mm with the tube into these, I basically won't be adding any height compared to before since there were 6 mm subfloor boards on the beams. The plan is for heat distribution plates, the tube, and then 5 mm self-leveling compound to even out the floors. After that, vapor barrier plastic and a suitable floor, probably laminate.
So my plan is to mill 16-17 mm deep grooves, one per beam and one in the joint between two beams. I am not worried in the joint because there is already a fairly large notch in many places, but could I cause problems if I mill longitudinal grooves in the center of the beam? I have checked at one of the penetrations drilled in the beams, and it shows that there's more than 16 mm to the reinforcement, so it shouldn't be affected. There will also be some cross grooves for the turns.
It can be added that from the start there are indents of 2 cm along both long sides (thus across the beams) for the existing radiator pipes on one side of the house.
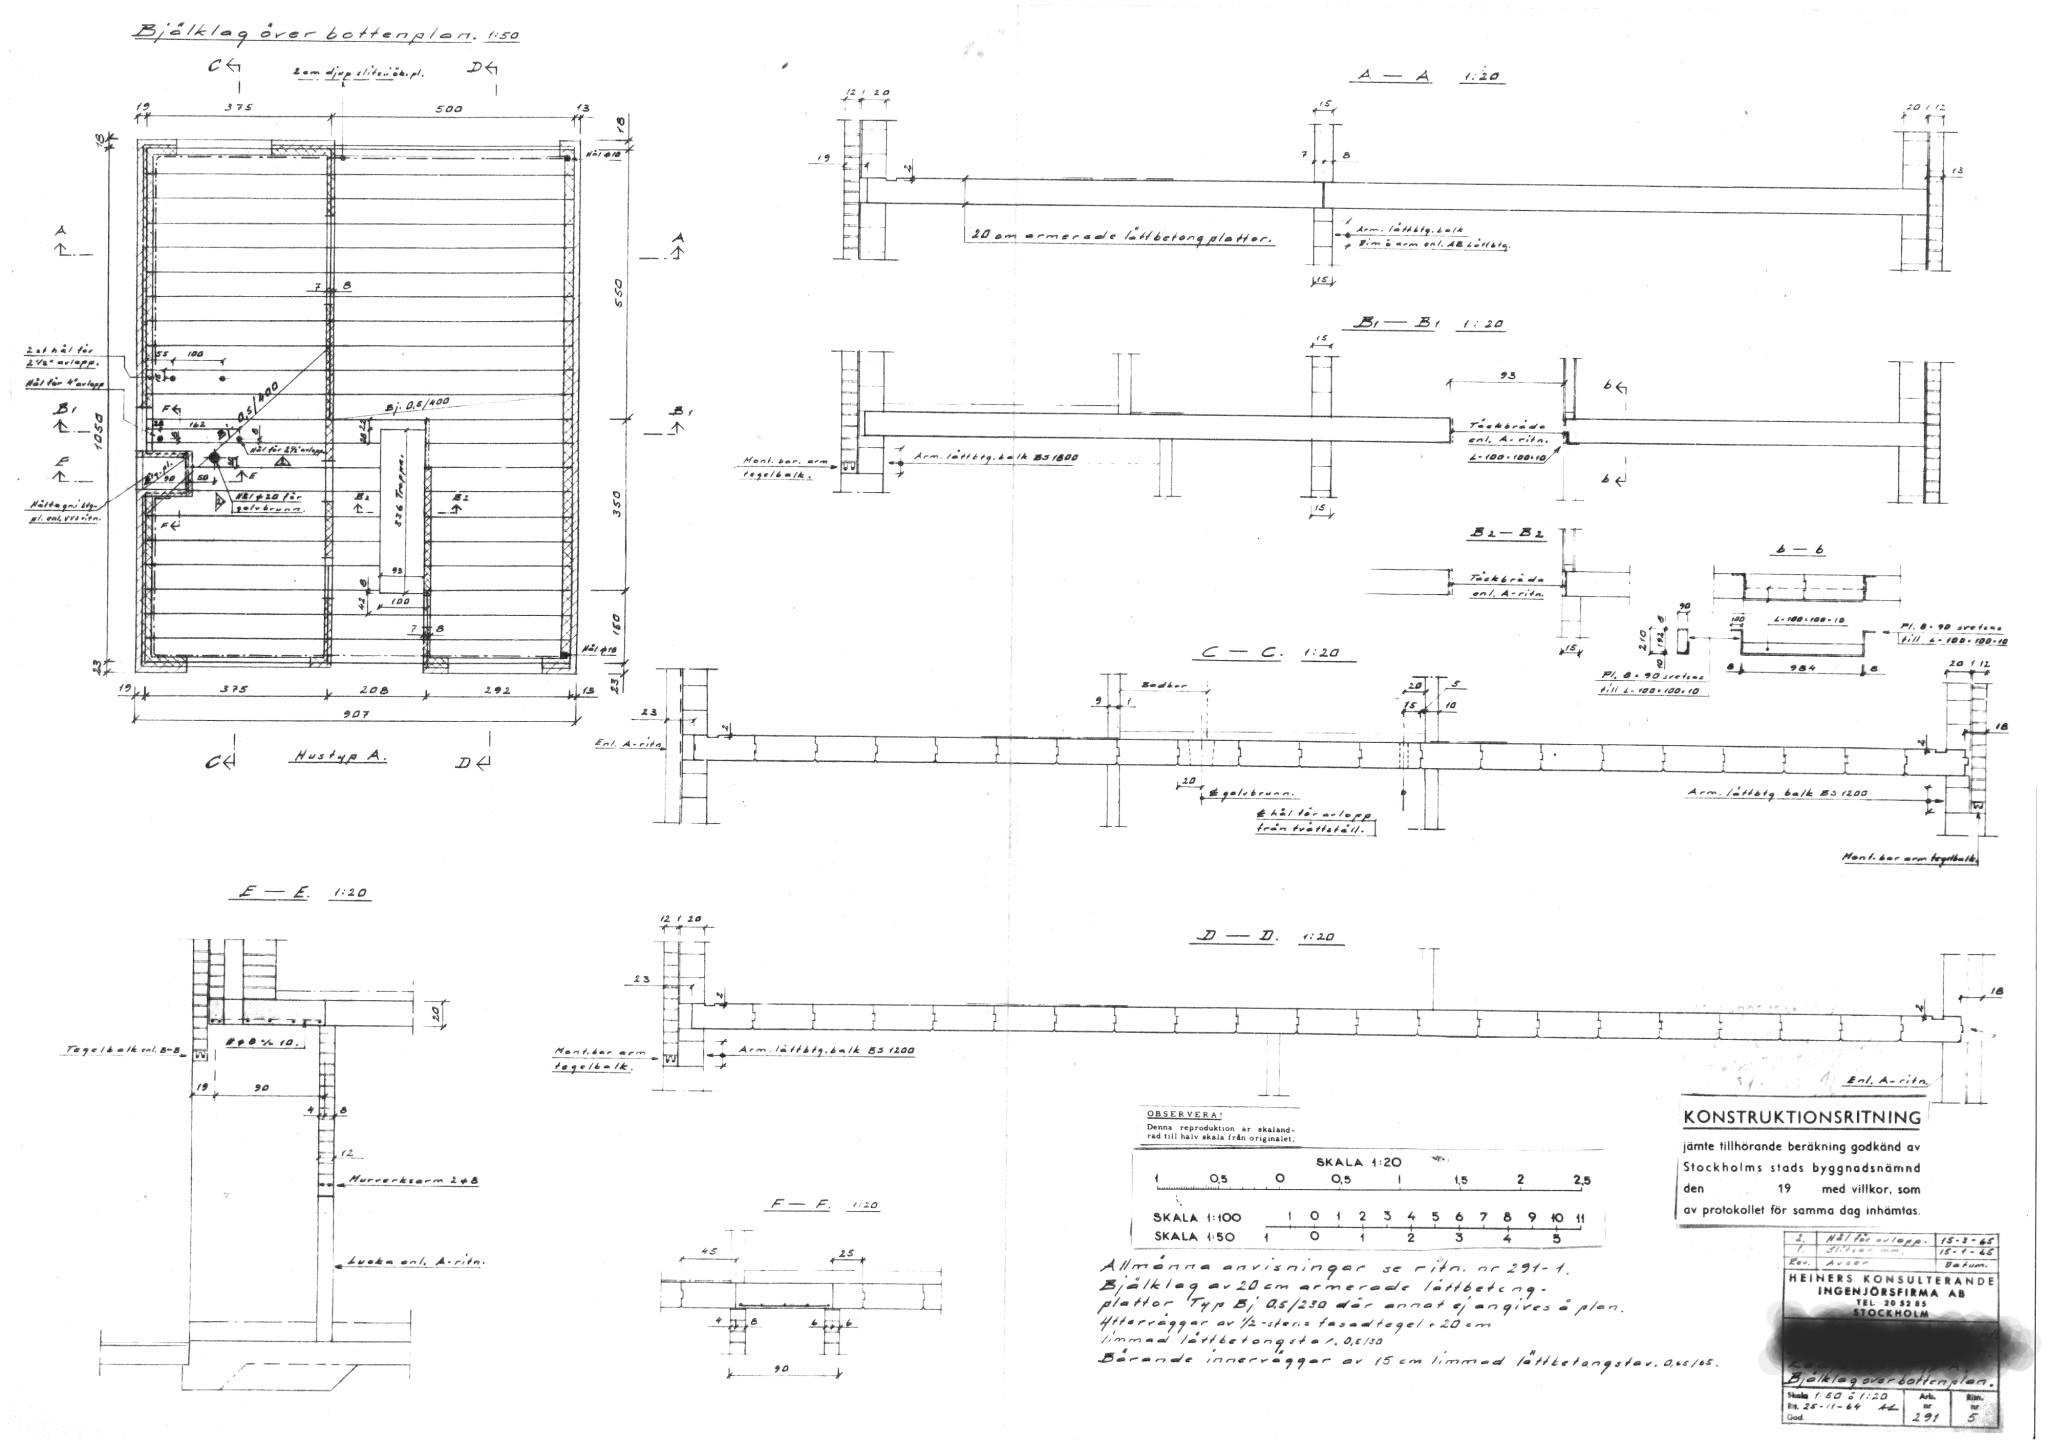
The construction drawing for the intermediate floor looks as follows:
If this is not possible, it will mean tearing out the old one-pipe system and installing a new two-pipe system in PEX since I have started to suspect there is a small leak somewhere in the system. I want to replace everything anyway.
Removing 16-17 mm tracks is fine, the reinforcement should, if properly installed, be in the lower part or in the middle, and the load-bearing capacity will not be affected.
The reinforcement is located both at the top and bottom, but I've understood that it's the bottom that takes most of the load. I've drilled some holes through the beams for 125 mm ventilation pipes, so it's possible to see where they are situated. I've also cut a few when I channeled in a pipe for the TV downstairs. Nowadays, I'm very cautious about what I cut and do no more than one larger hole per beam. Preferably none.
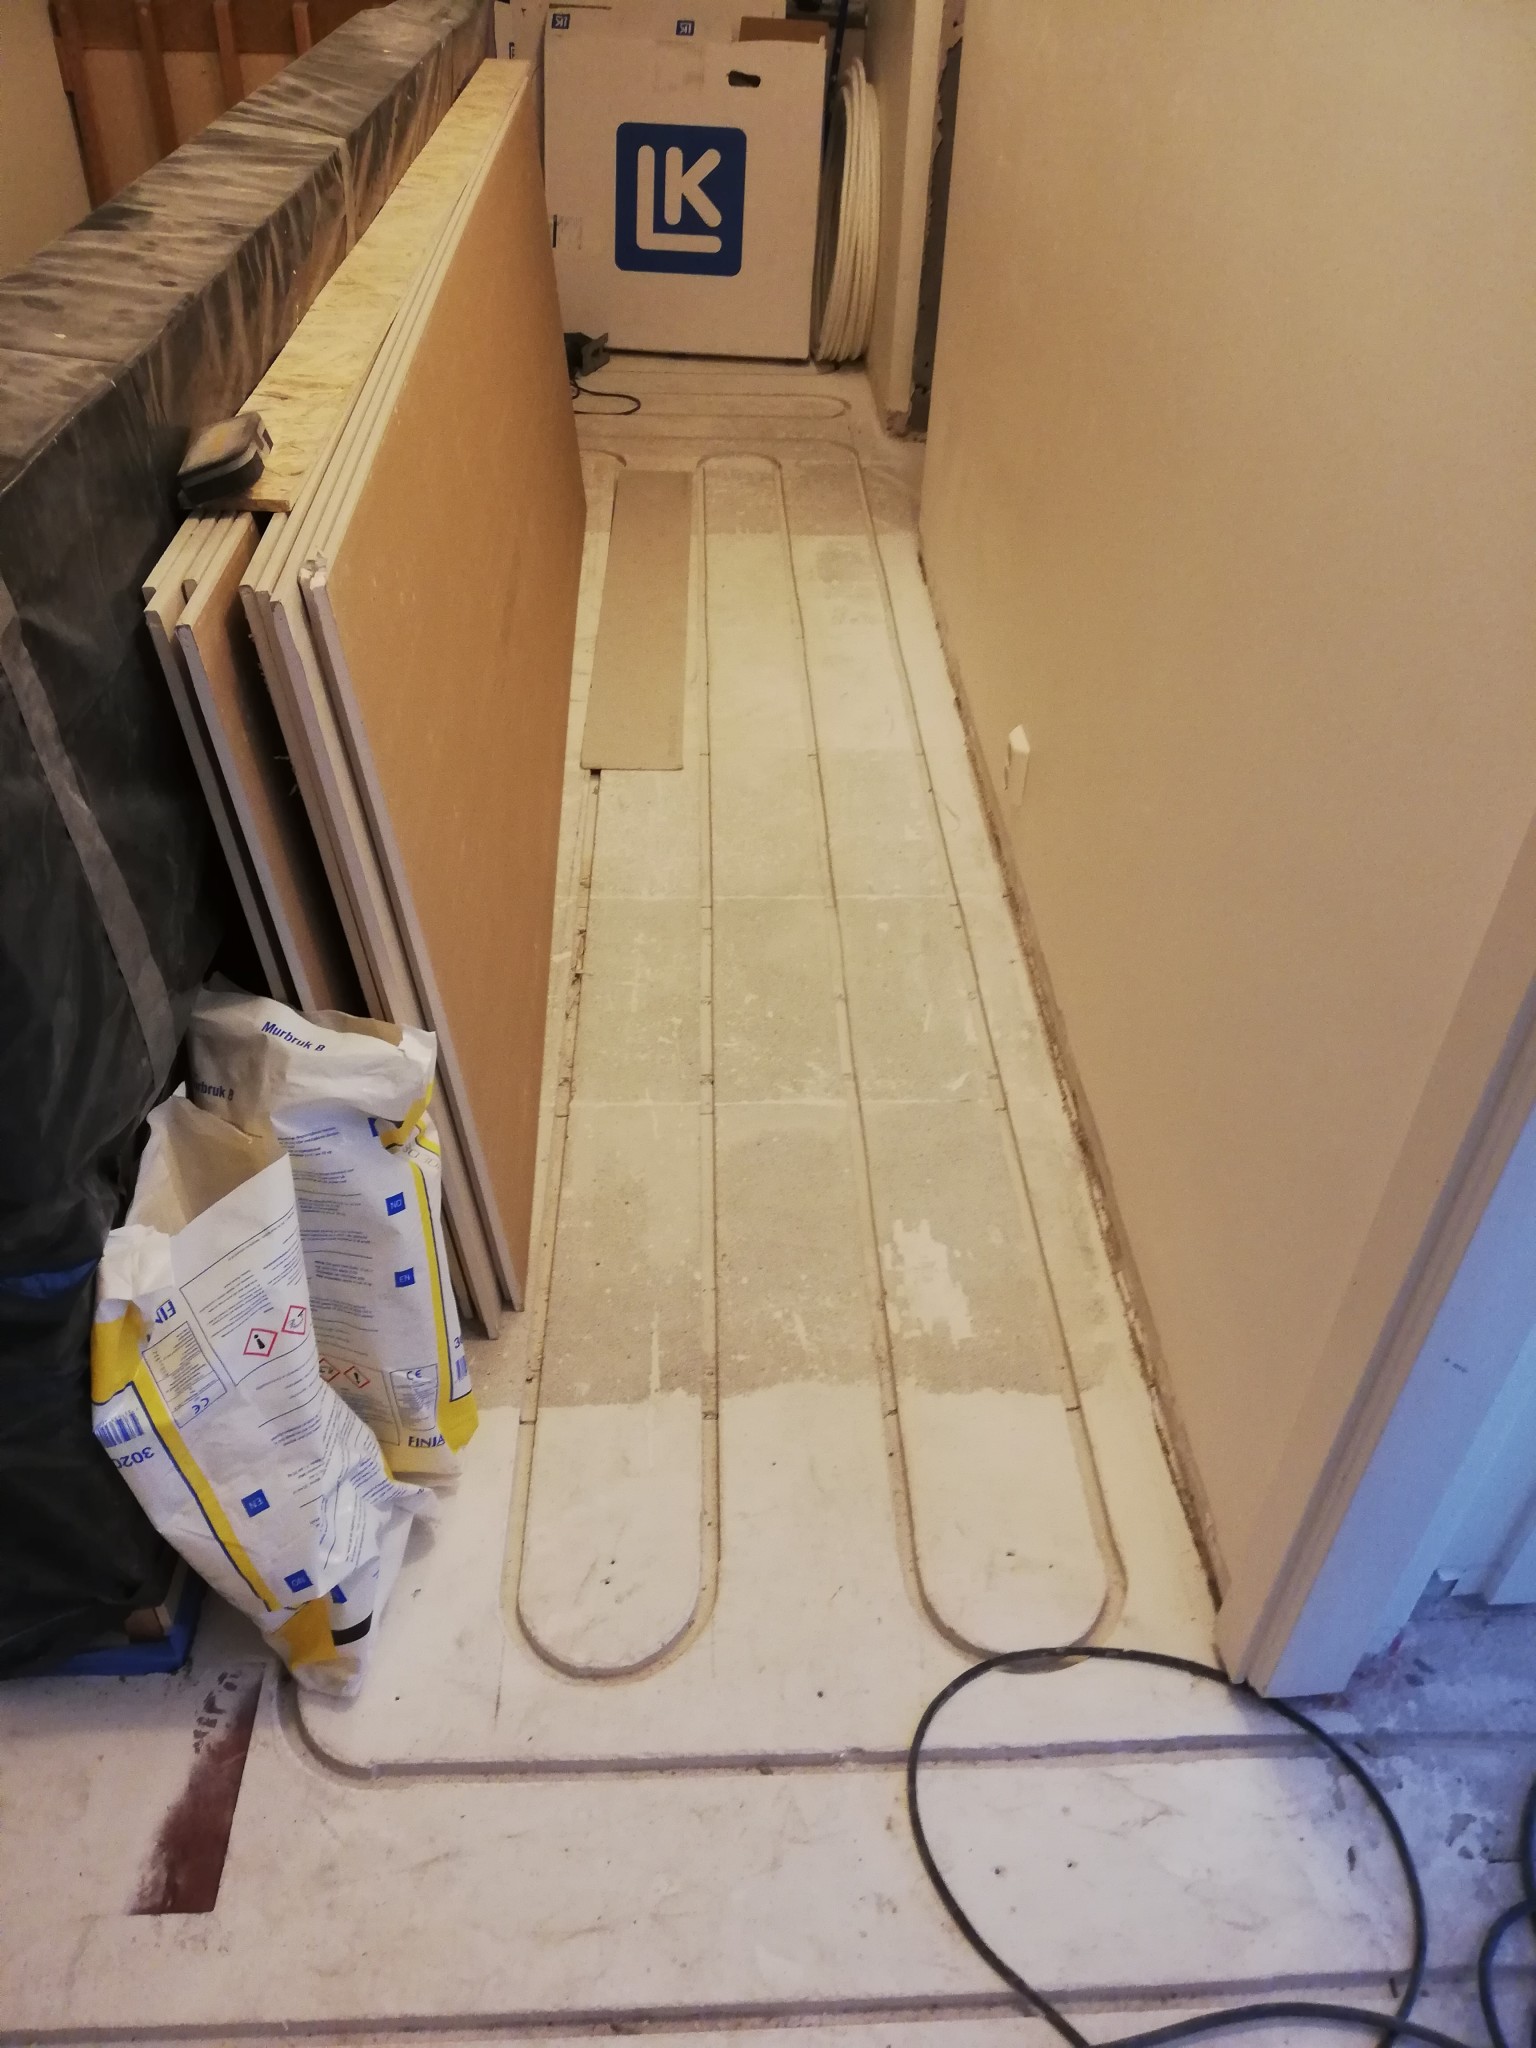
Anyhow, two channels have been test milled. I didn't get the depth setting right for some reason, so the grooves are a bit shallow. However, it's clear that they are a bit too narrow, the hose doesn't sit properly. I'll try again next week when I've bought an 18 mm router bit, the carpenter will also come by with the right type of sheet metal.
It also creates an infernal amount of dust, despite the vacuum cleaner being connected...
Cut with a jigsaw in two parallel tracks. Break off the piece in between with an old chisel.
Surprisingly little dust.
I have installed some electricity and heating in the floor, wall, and ceiling that way.
A little update, as I dislike unfinished threads...
It worked excellently to mill grooves in the aerated concrete. If it falls on our heads remains to be seen, but I hardly think that will happen. In one place we reached the reinforcement bars, but instead of cutting them, we are making a small break in the heat plates right there and a small hole in the plaster to be laid before the floor to accommodate the little bump that will form in the hose. The first two rooms are laid and pressure-tested, planning to pressure-test the bathroom tonight so they can pour the first layer tomorrow. There, we did not mill but laid an 8 mm reinforcement mesh at the bottom instead because it was so uneven, and we had to build up for the floor drain. There were so many holes through the joists that it felt good to have a cohesive layer that distributes the weight over all the beams.
Looks great.
Can you tell me a bit more about the milling process itself?
How did you do it?
What machine did you use for milling?
Was it connected to a vacuum cleaner?
What would you have done differently with hindsight?
Any good tips and tricks you learned along the way?
Time required?
I learned that the milling job is best done by someone you pay to do it
It ended up that I didn't have time, so the craftsmen did it after I approved the pipe plan.
Biltema's overhand router, 19 mm flute cutter from Jula (2 pieces, one broke). Vacuum cleaner, model fat pro Karcher connected, still dusted massively. They made a milling template out of OSB, just like I thought, and screwed it to the floor. It took quite a long time to make the grooves, but they turned out very nice, significantly better than with a jigsaw and chisel. The plates fit perfectly, and the build height is 0.5 mm.
I probably wouldn't do much differently if I were to do it again, as it seems good to me.
The plan now is 6 mm renovation gypsum on the plates and then step plastic and flooring. The reason for the gypsum is that we need to build up a bit in height and also preferably dampen some impact sound to the ground floor. My thought is that gypsum conducts heat better than floorboards, which would otherwise be the alternative. The original plan was to self-level, but the craftsman said it wouldn't be good with such a thin layer. If it turns out that the gypsum crumbles, which I assess as unlikely, then we'll switch to floorboards.
The router seems to have survived, by the way. I was fully prepared for it to break from all the dust, or because it's a cheap Biltema product. So now I have an overhand router too


")