32,181 views ·
56 replies
32k views
56 replies
Install staircase or lay floor first?
Usually, when possible, the entire staircase is assembled on the floor, so to speak. Then it's lifted into place. This is the best way! Unfortunately, this is not always possible, so I usually assemble the second flight first and put it in place before assembling the first flight and setting it in its place.
Yes, I promised pictures!!! :x
Would you like a lot of pictures and the detailed version?
I started framing the wall with cc30, but since I needed some 45x70 for another place, I ended up as the picture shows, cc30 at the beginning and end of the stairs.")
Then I hung up the long stringer provisionally and measured and pondered and pondered and measured.
I calculated the existing step heights and checked that the steps were level as the stringer was hung, etc., etc.
It's a used staircase, not custom-made, so I wanted to determine the length of the stair opening and whether I needed to trim a few mm somewhere due to the height, etc.
But the stated length of 3000mm and width of 900mm seemed to fit well.
And as far as I could assess, the height would be just perfect. d^_^b
Would you like a lot of pictures and the detailed version?
I started framing the wall with cc30, but since I needed some 45x70 for another place, I ended up as the picture shows, cc30 at the beginning and end of the stairs.
Then I hung up the long stringer provisionally and measured and pondered and pondered and measured.
I calculated the existing step heights and checked that the steps were level as the stringer was hung, etc., etc.
It's a used staircase, not custom-made, so I wanted to determine the length of the stair opening and whether I needed to trim a few mm somewhere due to the height, etc.
But the stated length of 3000mm and width of 900mm seemed to fit well.
And as far as I could assess, the height would be just perfect. d^_^b
Then I cut the beam between the rafters to the correct length. That is 3000mm + 45mm + 20mm from the opposite wall. 3000mm = staircase, 45mm = support rule, 20mm = adjustment allowance. Adjustment allowance considering that it is much easier to fill a 20mm unwanted hole than to cut away 5mm from the side of the support rule if things don’t align in the end.
Support installed with angle brackets.
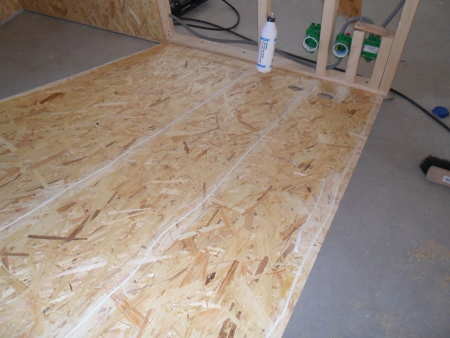
Then I covered the wall with sheet material. I glued and screwed the OSB to the studs. The white glue adhered somewhat poorly to the smooth OSB surface (I tested gluing a piece), so I made a quick pass with the sander to get a better surface. The gluing is probably total overkill, but I'd rather spend this half an hour now than stand there afterward wondering if any squeak is due to skipping the gluing. After OSB, it was gypsum.
Support installed with angle brackets.
Then I covered the wall with sheet material. I glued and screwed the OSB to the studs. The white glue adhered somewhat poorly to the smooth OSB surface (I tested gluing a piece), so I made a quick pass with the sander to get a better surface. The gluing is probably total overkill, but I'd rather spend this half an hour now than stand there afterward wondering if any squeak is due to skipping the gluing. After OSB, it was gypsum.


Now I'm hijacking the thread and informing you that I have a better second-hand staircase similar to Mikael's for sale at a cheap price.
Edit: By popular demand, I should add that the staircase is approximately 303 cm from floor to floor and has 16 steps. Roughly.
Edit: By popular demand, I should add that the staircase is approximately 303 cm from floor to floor and has 16 steps. Roughly.
Last edited:
never surface floor under stairs or other "fixed" installations. it becomes so troublesome if you change flooring and you need to ensure the same thickness under the stairs.
especially important if you have click flooring as they move more at the joint than glued joints
especially important if you have click flooring as they move more at the joint than glued joints
Then when I was going to attach the staircase according to option 1 (in posts #28 & #29), I couldn't figure out any reasonable way to attach the staircase that way. And there were no holes whatsoever that revealed how it was attached in the previous house. Maybe it only lay down against some beam that they attached under the end of the inner stringer?
Anyway, I decided to attach it according to option 2 instead. The stairwell wouldn't be wider than the staircase anyway.
1. So first I measured 916mm from the surface of the gypsum. The idea was 16mm extra clearance so I would wedge in a piece of 16mm MDF between (and glue it).
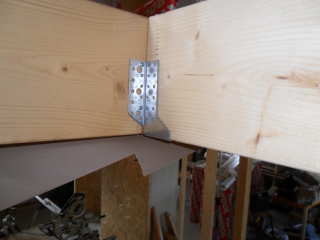
2. Mark where the beam should be. (My Hultafors angle is exactly 45mm wide across the blade, place it and draw a line on each side. How smart they are at Hultafors.)
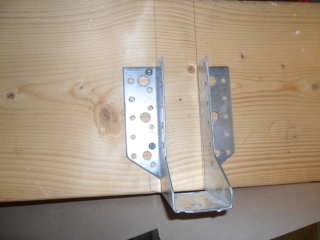
3,4. A joist hanger.
5. A piece of sparse panel as temporary support for the other side of the beam.
6. I also drove in two 6x100mm screws into the end grain, nothing should wobble here.
7. A glued and screwed block holding the other side works well. Additionally, there is a strong beam as part of a deflection-stabilizing structure prescribed by the truss supplier. So I could also attach this to the sturdy beam using an angle iron.
Now there are many pictures, i.e., the looong version.
The last part will probably be on Sunday... Remind me if I forget.
Anyway, I decided to attach it according to option 2 instead. The stairwell wouldn't be wider than the staircase anyway.
1. So first I measured 916mm from the surface of the gypsum. The idea was 16mm extra clearance so I would wedge in a piece of 16mm MDF between (and glue it).
2. Mark where the beam should be. (My Hultafors angle is exactly 45mm wide across the blade, place it and draw a line on each side
. How smart they are at Hultafors.)3,4. A joist hanger.
5. A piece of sparse panel as temporary support for the other side of the beam.
6. I also drove in two 6x100mm screws into the end grain, nothing should wobble here.
7. A glued and screwed block holding the other side works well. Additionally, there is a strong beam as part of a deflection-stabilizing structure prescribed by the truss supplier. So I could also attach this to the sturdy beam using an angle iron.
Now there are many pictures, i.e., the looong version.
The last part will probably be on Sunday... Remind me if I forget.


Now we want to see the last pictures, it is Tuesday after all, or do you have a different calendar than we do?Mikael_L said:When I was trying to fix the staircase according to option 1 (in posts #28 & #29), I couldn't find any sensible way to attach the staircase in that manner. And there were no holes at all to indicate how it was attached in the previous house. Maybe it was just placed down against some beam they attached under the inner side of the staircase?
Anyway, I decided to go with the attachment according to option 2 instead. The stair opening wouldn't be wider than the staircase anyway.
1. So first I measured 916mm from the surface of the gypsum. 16mm extra margin was the idea, so I would wedge in a piece of 16mm MDF between (and glue this).
2. Mark where the beam should be. (My Hultafors angle is exactly 45mm wide across the blade, place it and draw a line on each side
3,4. A joist hanger.
5. A piece of sparse panel as temporary support for the other side of the beam.
6. I also drove in two 6x100mm screws into the end grain, nothing should be loose here.
7. A screwed and glued piece of short timber holding the other side works fine.
In addition, there is a strong beam as part of a deflection-stabilizing framework that the truss supplier has recommended. So I could also attach to this solid beam with the help of an angle iron.
Now there are many pictures, i.e., the loooong version.
The last bit will probably be on Sunday... Remind me if I forget.
But it's not Sunday yet...
(not the Sunday I was thinking of... I didn't say which one...)
OK ok, I'll get to it, any day now. :blushing:
Yesterday I worked on a few more pictures, but tonight I might be away all evening. We'll see...
(not the Sunday I was thinking of... I didn't say which one...
)OK ok, I'll get to it, any day now. :blushing:
Yesterday I worked on a few more pictures, but tonight I might be away all evening. We'll see...
mycke_nu said:
Does it have 16 steps approximately??? :S
Member
· Stockholm
· 1 397 posts
In my projects, we always place the stairs on concrete/framework, and raise it corresponding to the floor thickness. Then, the floor is laid against the stairs and finished with some type of trim, e.g., quarter round.
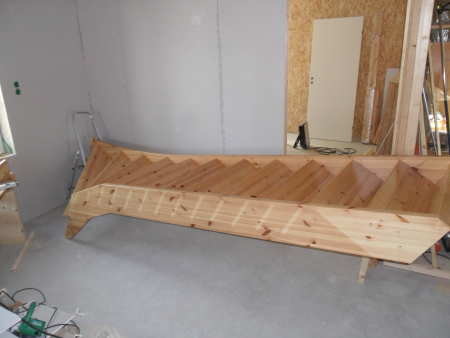
Now with the stairwell opening completed, it was time to assemble the staircase. The short piece with three steps was quick and easy to handle. The long part was a bit trickier, but it went really well. I inserted a few steps at the beginning and the end but didn't fully tighten the screws on the short carriage; they were just slightly inserted to hold things together. Then I added all the other steps one by one and finally tightened all the screws while continuously checking that the steps fit into their grooves.
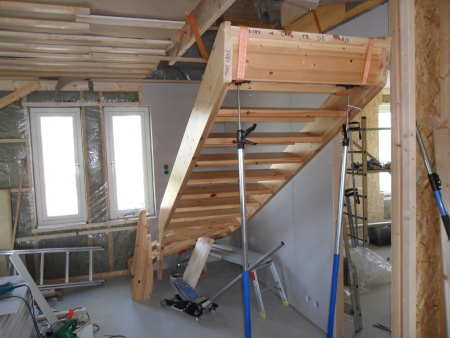
Image #3. Here, I began lifting the large part into place and planned to join it with the short section once I had lifted it sufficiently. I'm not sure if this was the best method. In hindsight, I might have assembled the two parts with the staircase on the floor. Any thoughts on this?
Image #4, here I've joined both sections, but I managed to drop the staircase while it was supported by a ladder, causing the ladder to wedge between two steps and leaving decent marks in the wood. :S After this mishap, I used binding straps, which I attached to the roof trusses, instead. I also couldn't connect the lower stair section to the upper until I removed step #4, which I later had to squeeze back in place.
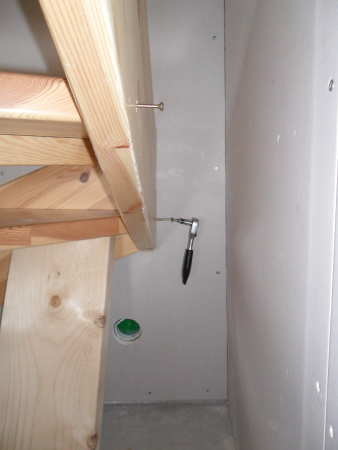
Image #5 I couldn't then twist the staircase out enough to reach and screw in step #4, as well as the screws that join the short outer carriage with the long outer carriage, and a screw for step #3. So, I used a ratchet with a bit holder. OK, that works well too.
If anyone thinks I've placed an outlet oddly, I'd like to point out that it's quite smart instead. There's a conduit there up to the device box for the staircase switch. So if I decide to install some lighting effects in the staircase (LEDs to illuminate the steps or something), I'm prepared for it. I've also placed two device boxes at the switch spot, considering using a motion sensor on one. It'll likely detect those heading down the stairs as well as those going up.
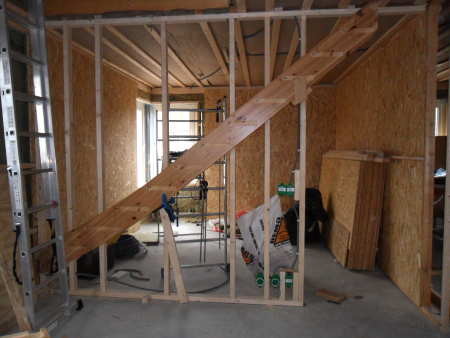
Image #6 Now the staircase is finally almost in place. Just a bit of measuring and adjusting to get the exact right position and then screwing it in place.
Image #3. Here, I began lifting the large part into place and planned to join it with the short section once I had lifted it sufficiently. I'm not sure if this was the best method. In hindsight, I might have assembled the two parts with the staircase on the floor. Any thoughts on this?
Image #4, here I've joined both sections, but I managed to drop the staircase while it was supported by a ladder, causing the ladder to wedge between two steps and leaving decent marks in the wood. :S After this mishap, I used binding straps, which I attached to the roof trusses, instead. I also couldn't connect the lower stair section to the upper until I removed step #4, which I later had to squeeze back in place.
Image #5 I couldn't then twist the staircase out enough to reach and screw in step #4, as well as the screws that join the short outer carriage with the long outer carriage, and a screw for step #3. So, I used a ratchet with a bit holder. OK, that works well too.
If anyone thinks I've placed an outlet oddly, I'd like to point out that it's quite smart instead.
There's a conduit there up to the device box for the staircase switch. So if I decide to install some lighting effects in the staircase (LEDs to illuminate the steps or something), I'm prepared for it. I've also placed two device boxes at the switch spot, considering using a motion sensor on one. It'll likely detect those heading down the stairs as well as those going up.Image #6 Now the staircase is finally almost in place. Just a bit of measuring and adjusting to get the exact right position and then screwing it in place.