32,184 views ·
56 replies
32k views
56 replies
Install staircase or lay floor first?
Now my large 3-dimensional wooden puzzle has ended up on the floor under the staircase.

Then it's just a matter of rolling up the sleeves and getting started.
If the OP doesn't mind, I'll take any questions here as well as provide a brief account of the workflow and results.
Then it's just a matter of rolling up the sleeves and getting started.
If the OP doesn't mind, I'll take any questions here as well as provide a brief account of the workflow and results.
Now I have started to test a little how the stairs look. It looks good so far. The door that needs to fit underneath manages fairly well, it is exactly 2.10 where the stringer passes the beam at the door hole, meaning the frame will fit properly, but the door trim will need to be cut at an angle where it meets the stringer.

The staircase was, as mentioned, bought second-hand, so it was a bit amusing to see how well it fits our house. 
Now it's standing on the concrete floor downstairs, and without the 22mm flooring upstairs, there's a 25mm gap between the top step and the joist (but I think it ended up about 2-4 mm too low, so it's probably actually 27-29mm).
In other words, the top short step (whatever it's called) will be 4-7mm above the flooring.
What it ends up being depends on what floor coverings we choose (it's not decided yet, but downstairs it's mostly leaning towards 2-3mm foam + 6-8mm click flooring).
For those of you who are staircase experts, is this something you would be concerned about, for example, shortening the staircase a few mm at the bottom, or is it better to just go ahead and adjust a little later when the upper floor is completed?
Then I wonder how it should be attached in the upper floor.
Apparently, the long stringer was attached with 2 screws to the joist in the previous location (see image 2 under step 14).
But on the other stringer and the top step, I can't find any indication of old screw holes, it seems like the staircase was only attached on the long stringer against the wall in the previous house? :x
That doesn't seem reasonable to me! :O
Tips?


And if the innervange is to be screwed at the top, I see two possible ways.
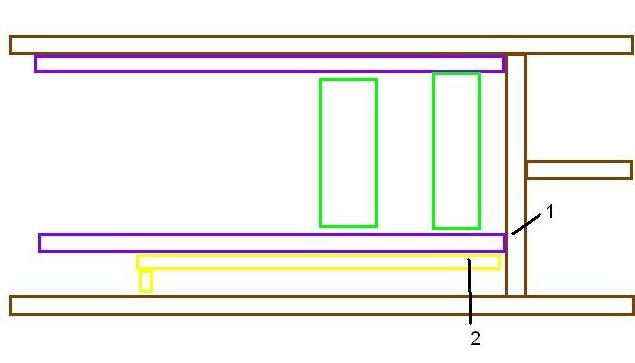
See attached figure:
Brown is the floor joists cc600, offset where the stairwell begins, so the stairwell is 1155 wide, but the stairs are 900 wide.
Purple corresponds to the vangars, the upper one in the picture is the outer vange which is easily screwed to the wall and floor joists in suitable places.
Green is a roughly sketched stair step.
Yellow is a possibility for me to build laterally on the floor joists, but not easy to make it completely stable.
So how can the innervange be attached, can I screw it at 1, that is, the end grain of the vange against the offset in the floor joists?
Or should I frame according to the yellow and screw the vange on the side (2) to the extended floor joists?
OK, great. I'm not quite sure how to screw it right now, but I'll probably figure it out
I have one more question.
I saw that the factory has prepared for joining the lower outer stringer with the upper outer stringer.
Check the pictures where I show what I mean, and a picture where the prepared screw holes are marked. But the holes probably don't show in the picture.
I think you probably know exactly what it looks like anyway.
The previous owner apparently didn't screw it together here.
The advantage could be seen as the short part can be screwed together first and attached to the wall, then you can place the long stair section and set everything up.
But are there perhaps some disadvantages too? Creaking, and such?

