Hello everyone.
I am going to install an accumulator tank in the house, which will be connected to a kitchen stove. The only place I can put it is in a small closet in the hallway on the ground floor. I don't want to build a boiler room and I don't have a basement as there is a crawl space under the entire house. The size of the tank will be either 750l or 500l, I haven't bought it yet.
Now to the problem. Since the tank will weigh quite a bit, I assume it's not smart to just place it directly on the floor. I will be able to distribute the weight on two beams and since the house is from around 1850, the beams are quite sturdy, but the tank may weigh almost a ton.
Does anyone have a smart way to reinforce the flooring without having to lift up the beams? In my eagerness, I've just laid an old rift-sawn floor in the hallway around the closet where the tank is to be placed, with furring strips, planing, and all that it entails with different thicknesses of boards and a sloping house. So it would be nice to avoid tearing it up again. However, I can open up down to the foundation in the closet and reinforce from there, if there's a good way to do that.
If anyone has a piece of advice or two to give me, I’d be very grateful!
/Johan
I have now decided to create a foundation for the tank. I have cast a concrete slab on which I will lay a layer of leca blocks and then make a form to cast through the trossbotten. The problem is that in the middle of the foundation there is a floor beam going in one direction and two heating pipes in the other. The tip I received was to wrap the beam in tar paper and heavily insulate around the pipes and then cast everything in. Does anyone have any opinions on this? I'm not completely sure it's the best approach, and it would be unfortunate to have to break it up and redo it...
Grateful for answers!!
/Johan
Grateful for answers!!
/Johan
The concrete will probably last longer than the ridge and pipes.... make sure there is room for margins so one can repair the ridge and pipes if things go wrong. We cast a foundation through the floor structure for our "panna" (ground heat) to avoid structural noise in the log frame and to manage the weight against the floor structure.
Can't you post a picture of how it looks?
I don't know if I have the right image in my mind, but regarding the ridge, can't you cut it at the foundation and then attach it with joist hangers to the foundation?
I would route the heating pipes around the foundation, seems silly to embed things.
I don't know if I have the right image in my mind, but regarding the ridge, can't you cut it at the foundation and then attach it with joist hangers to the foundation?
I would route the heating pipes around the foundation, seems silly to embed things.
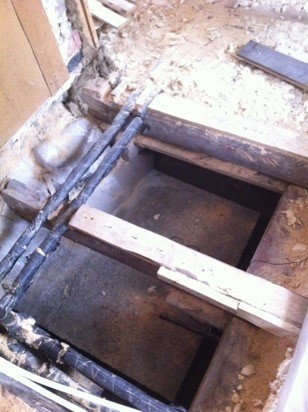
So this is how they look.
I'm thinking that if there should be any problems with the heating pipes in the future, you could just saw them off and pull them out of the casting, and if you build around the ridge with, for example, bricks, you could do the same thing. That is, saw off and pull out.
The reason I don't want to divert the ridge is that I've just laid a floor in the hallway and therefore I'm not very keen on tearing it up and redoing it. With the heating pipes, it's pretty much the same situation. I've had the plumber here who removed the refill for the heating system, so if I need to empty the system, I can't refill it again.
Do you think my way will work, or do I just have to bite the bullet..?
By the way. I won't be embedding the heating pipes on the left that go in the same direction as the ridge. I’ll be building the form on the outside of them.
/Johan

Last edited:
Good with a picture ")
Now, I'm no expert, but I just thought I'd shoot some ideas.
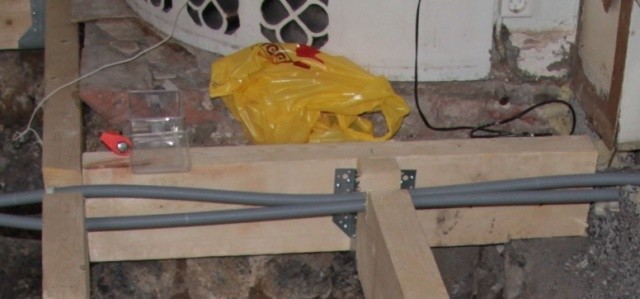
What I thought with the ridge was that you lift it a bit from below with a jack, approximately at the bottom of your picture, and place something under the ridge for it to rest on, e.g., "lecablock". Then you cut the ridge roughly where I made the red line and attach a joist hanger there, which is then fastened to the foundation. The block can remain as extra support.
As for the heating pipes, it would have been best if they went outside the foundation, but the day you need to replace them, you'll have to cut them and go around the foundation. The most important thing, I think, is not to cast in wood so that it doesn't rot or, in the worst case, get some fungus growing there.
Now, I'm no expert, but I just thought I'd shoot some ideas.
What I thought with the ridge was that you lift it a bit from below with a jack, approximately at the bottom of your picture, and place something under the ridge for it to rest on, e.g., "lecablock". Then you cut the ridge roughly where I made the red line and attach a joist hanger there, which is then fastened to the foundation. The block can remain as extra support.
As for the heating pipes, it would have been best if they went outside the foundation, but the day you need to replace them, you'll have to cut them and go around the foundation. The most important thing, I think, is not to cast in wood so that it doesn't rot or, in the worst case, get some fungus growing there.

Oops, there has been some ruthless cutting into the beams/floor joists here. If you are close to or through the core of the floor joist, there isn't much load-bearing capacity left. Is it the support beam next to the red line? Otherwise, I agree with svebbe on the measures.
It looks like that in the picture gafsan, but it's the battens on the rafters that make it look like someone has been sawing while drunk..
I've decided to cut the middle rafter and attach it to the foundation instead.
How should I insulate around the foundation then? I don't want a storm blowing from the foundation..
Is it enough to put foam boards around and then let the sawdust from the subfloor rest against it?
Thank you so much for all the help so far!
/johan
I recognize the salningar from my house, wonder if they used the same standard
Sitting here at work and came up with another idea. Can't you place a beam across that you attach the middle åsen to?
The question is just if you have somewhere to attach a balksko where the arrow points. There were some pipes, but if they don't sit too far down, maybe you can cut out for them in the beam. Can't use fine carpenter words, but I hope you understand what I mean
Uploading a picture with arrows and lines like they usually do in hockey. Red is the beam, green is where I thought the balkskos would sit. Sending a picture of how I did it by my foundation for the fireplace. There is an air gap of about a centimeter between the beam and the foundation.

Hi!
I have to agree with Smurfen 72.
Why start cutting and modifying when you already have a foundation under the ridge.
Place two beams under the ridges that are supported by your foundation and you're all set.
//
I have to agree with Smurfen 72.
Why start cutting and modifying when you already have a foundation under the ridge.
Place two beams under the ridges that are supported by your foundation and you're all set.
//
Click here to reply