Classic toilet under stairs (in staircase) 1.5-story house.
I'm thinking about installing a small window 40x40 or 50x50. The wall is standing planks with a thickness of 120 mm. I will hire a craftsman but it would be interesting to have some knowledge beforehand.
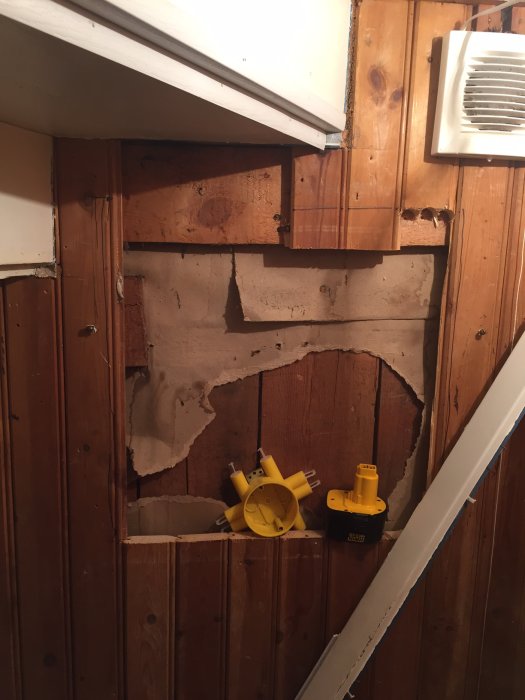
My thought is to notch and support before making an opening. The issue is that there is barely enough ceiling height, so I want the "lowest" possible support. See picture.
It might be best to support from the outside, but then I would have to redo the paneling, which I'd rather avoid.
The tongue and groove will be removed.
Should a steel beam be used, or is laminated timber sufficient? It’s a relatively small opening, and the staircase bears more on other areas than just this space.
Anyone have an idea? Material dimensions and how much needs to extend beyond the opening.
Appreciated for any advice.
/Jojje
For such a small hole, no actual reinforcement is needed. Just saw the hole 10 cm larger than the window. Nail an outer frame together with regular 45 timber and nail it in place.
For such a small hole, no actual lintel is needed. Just saw the hole 10 cm larger than the window. Nail together an exterior frame with regular 45 lumber and nail it in place.
Thanks for the reply. That's what my neighbor said too, but I was a bit hesitant after seeing his project...
A follow-up question. Looking at the picture, you can see paper nailed to the log wall and then paneling over that. Should I put up a similar paper before I set up a new interior wall on studs directly on the log wall? I guess you shouldn't use any airtight materials but allow for ventilation between the log wall and the interior wall.
For such a small hole, no real reinforcement is needed. Just saw the hole 10 cm larger than the window. Nail together an outer frame with regular 45 lumber and nail it in place.
This is not always true, if you're unlucky there might be a beam or rafter directly above.
Thanks for the response. That's what my neighbor said too, but I was a bit hesitant after seeing his project...
A follow-up question. If you look at the picture, they have nailed paper onto the log wall and then paneling on top of that. Should I put up a similar paper before I put up a new interior wall with studs directly on the log wall? I guess you shouldn't use any airtight materials but rather allow ventilation between the log wall and the interior wall.
Yes, a diffusion-open paper is not wrong on a plank wall. Then it might not be so important if you are building a toilet/bathroom since it will probably be completely sealed anyway. But the basic rule is a paper on the inside of the plank wall. Partly to prevent drafts. Partly because these walls are often insulated with sawdust.
This is not always true, if you're unlucky, there's a beam or rafter directly above.
Of course, it's not always possible to cut a hole. But if there's a beam or rafter above, that's actually good, as it provides support. It's worse if there's a beam or pillar where the opening should be. Then, reinforcement is needed. However, you'll quickly notice if it's empty or if there's a beam/pillar/stud behind the planks.
In plank walls, the load was typically relieved by notching a piece of horizontal plank as a lintel into the plank on either side of the opening and allowing the planks above to rest directly on the lintel. To prevent it all from sliding apart before the wall material was applied inside and outside, a few nails were driven in at an angle.
Here's how I would do it:
1. Temporarily brace by screwing a piece of timber, about half a meter wider than the hole, onto the wall a bit above the intended hole. Screw so you securely hit each plank with sturdy screws. Of course, also screw into some planks you won’t disturb outside the hole.
2. Cut out the hole to the desired size. When cutting the top edge, cut about 3cm extra out into the planks outside the hole on the right and left sides.
3. Take a plank you’ve cut out, have left over from somewhere else, or bought new and measure its width. This will become the lintel in the hole. Cut the same amount extra upwards. About 100mm wide (high) should do, but for your small hole, you can probably go down to say 70mm if you want to save some height.
4. Now saw or chop from the new upper corners in the hole down to where your extra cuts to the right and left ended in step 2. This means downwards at an angle.
5. Trim your lintel so it fits above the hole. It should now rest in the notches you cut into the planks on the sides of the hole. Trim the ends at the same angle as the notches.
6. Toe-nail the lintel into the planks on the sides and toe-nail the planks that now stand on the lintel into the lintel.
7. Remove the temporary bracing.
You have now created a support using the same method as when this type of house was built.
Rafters or not, it doesn't matter for this type of wall. All the planks in the wall are more or less load-bearing, and the top plate distributes the load between the planks right at the top. How much load each plank bears depends more on how well the carpenter managed to cut their length than on what's directly above, since the planks are tightly packed against each other and fixed between the sill and the top plate.
If you then switch as I suggested, you've done exactly as was done when this construction method was used.
Followed your instructions and it turned out very well. So it's boards in multiple layers, which more or less locks it in place. But now there's a good variation nonetheless.
One more question. I'm going to add 22 battens, then OSB and gypsum. Can you, and is there any point in insulating with 20 mm Styrofoam? Or would that lead to moisture issues? The house is, as mentioned, completely uninsulated with facade and tar paper.
/jojje
Click here to reply
Vi vill skicka notiser för ämnen du bevakar och händelser som berör dig.