
4,666 views ·
3 replies
5k views
3 replies
Vapor barrier, vapor retarder, leave it as is? (Hultsfred house)
I'm in the process of renovating a room at home, which is a Hultsfred house from 1965. I'm a complete novice when it comes to building, but there's always a first time, and what better way to start than in a room you don't currently need.
The walls had Tretex with old renovation wallpaper, fiberglass fabric, and several layers of wallpaper. After trying to remove most of it, everything was uneven, and we decided to tear out the Tretex. We're also taking the opportunity to add some new wall outlets and ground the room while the walls are open, then install OSB and gypsum on most of the walls.
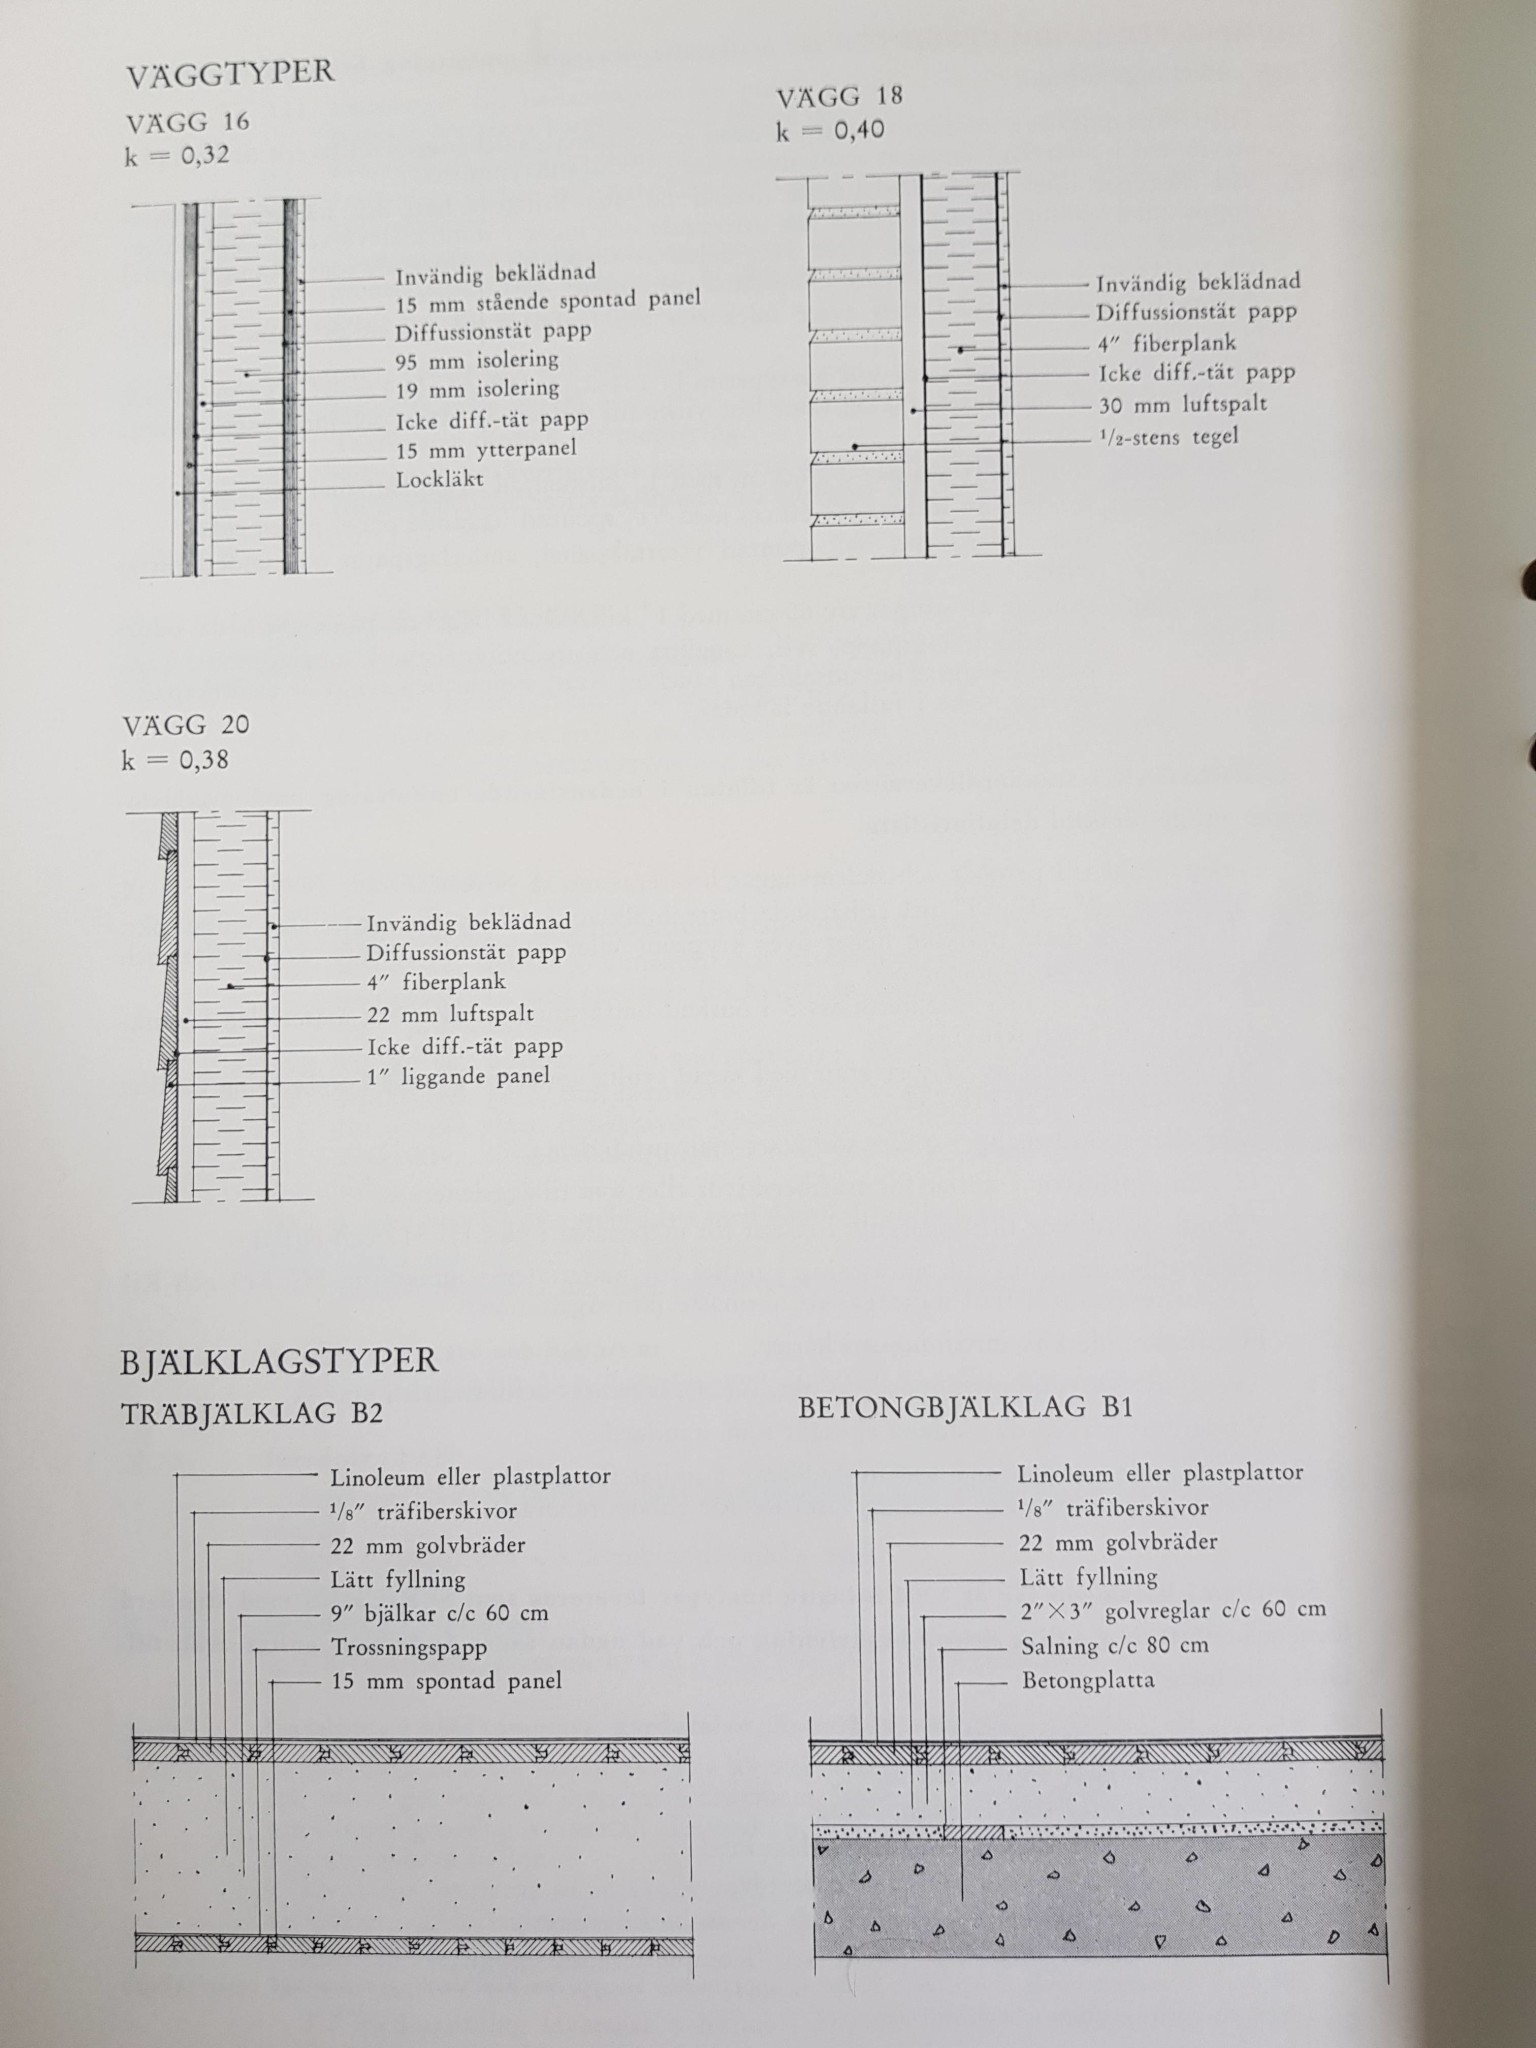
The house comes with the original binder from Hultsfredshus, and we have wall type 18 according to the picture below. This means the exterior wall consists of: brick facade -> 30 mm air gap -> wind barrier (not diffusion-tight, AC 150/200) -> 4" fiberboard -> Diffusion-tight paper YAC 400/150 -> Tretex.
Against the attic, there was: tension paper -> 15 mm rough sheathing -> Diffusion-tight paper YAC 400/150 -> 25 cm wood shavings.
Now, the tension paper has been removed, and a new ceiling will be screwed onto battens. The attic is in very good condition, with no indications of moisture problems or mold growth.
As you can see in the picture, the old vapor barrier, which was nailed with a handful of nails, is now broken for the installation of new electrical boxes. Initially, I had only planned to nail and tape it back together with age-resistant construction foil tape.
I will not add extra insulation in this room since this wall has a radiator with pipes running in the concrete floor towards the basement, so I don't want to move it. However, it will be removed during the renovation so you can reach behind the radiator. The plan is to add extra insulation in future rooms against the exterior walls that do not have a radiator, and in those cases, you would need to remove this paper and put up something else.
From what I understand, this paper would not be called diffusion-tight paper today. I've considered replacing it with a vapor barrier, but I'm concerned the house won't "breathe" as well as before, potentially causing follow-up problems such as more moisture in the attic. As some would say, "If it ain't broke, don't fix it." Now that it's damaged, I'm wondering if it might be better to replace it with a vapor retarder instead of just taping it back together, or is a vapor barrier necessary regardless?
The walls had Tretex with old renovation wallpaper, fiberglass fabric, and several layers of wallpaper. After trying to remove most of it, everything was uneven, and we decided to tear out the Tretex. We're also taking the opportunity to add some new wall outlets and ground the room while the walls are open, then install OSB and gypsum on most of the walls.
The house comes with the original binder from Hultsfredshus, and we have wall type 18 according to the picture below. This means the exterior wall consists of: brick facade -> 30 mm air gap -> wind barrier (not diffusion-tight, AC 150/200) -> 4" fiberboard -> Diffusion-tight paper YAC 400/150 -> Tretex.
Against the attic, there was: tension paper -> 15 mm rough sheathing -> Diffusion-tight paper YAC 400/150 -> 25 cm wood shavings.
Now, the tension paper has been removed, and a new ceiling will be screwed onto battens. The attic is in very good condition, with no indications of moisture problems or mold growth.
As you can see in the picture, the old vapor barrier, which was nailed with a handful of nails, is now broken for the installation of new electrical boxes. Initially, I had only planned to nail and tape it back together with age-resistant construction foil tape.
I will not add extra insulation in this room since this wall has a radiator with pipes running in the concrete floor towards the basement, so I don't want to move it. However, it will be removed during the renovation so you can reach behind the radiator. The plan is to add extra insulation in future rooms against the exterior walls that do not have a radiator, and in those cases, you would need to remove this paper and put up something else.
From what I understand, this paper would not be called diffusion-tight paper today. I've considered replacing it with a vapor barrier, but I'm concerned the house won't "breathe" as well as before, potentially causing follow-up problems such as more moisture in the attic. As some would say, "If it ain't broke, don't fix it." Now that it's damaged, I'm wondering if it might be better to replace it with a vapor retarder instead of just taping it back together, or is a vapor barrier necessary regardless?

How did you do in the end? I'm facing a similar situation with the same papp interior.
In the end, I just taped it together with age-resistant sealing tape. In hindsight, I would have torn it down and installed a vapor barrier if I were to do it again. I would probably have excluded plastic, though, as I could never have gotten it tight enough.Friskt kopplat said:
The reason to tear it down would have been to inspect the studs and properly reinforce where needed, for example, at the top and bottom.

Click here to reply