Hello! I have an old ytpapp roof that has started to leak. It's a low-sloped roof with curbs on the sides. I've been thinking about doing it myself with some self-adhesive paper. But I've found very few instructions on how to lay it. When reading the manufacturers' descriptions, they only cover "regular roofs." I'm wondering which direction I should lay them, and how to do the uprights against the curb on the edges? I'm attaching a picture of the roof. Today, the sheets are laid lengthwise. I think they should be laid widthwise and started from the lowest point so that you overlap the seams in the right direction all the time. I think the rolls are 7 meters long, my garage is 5 meters wide, it feels like 2 meters of waste is quite a lot. https://www.byggmax.se/ytpapp-glaciär-3-kristallsvart
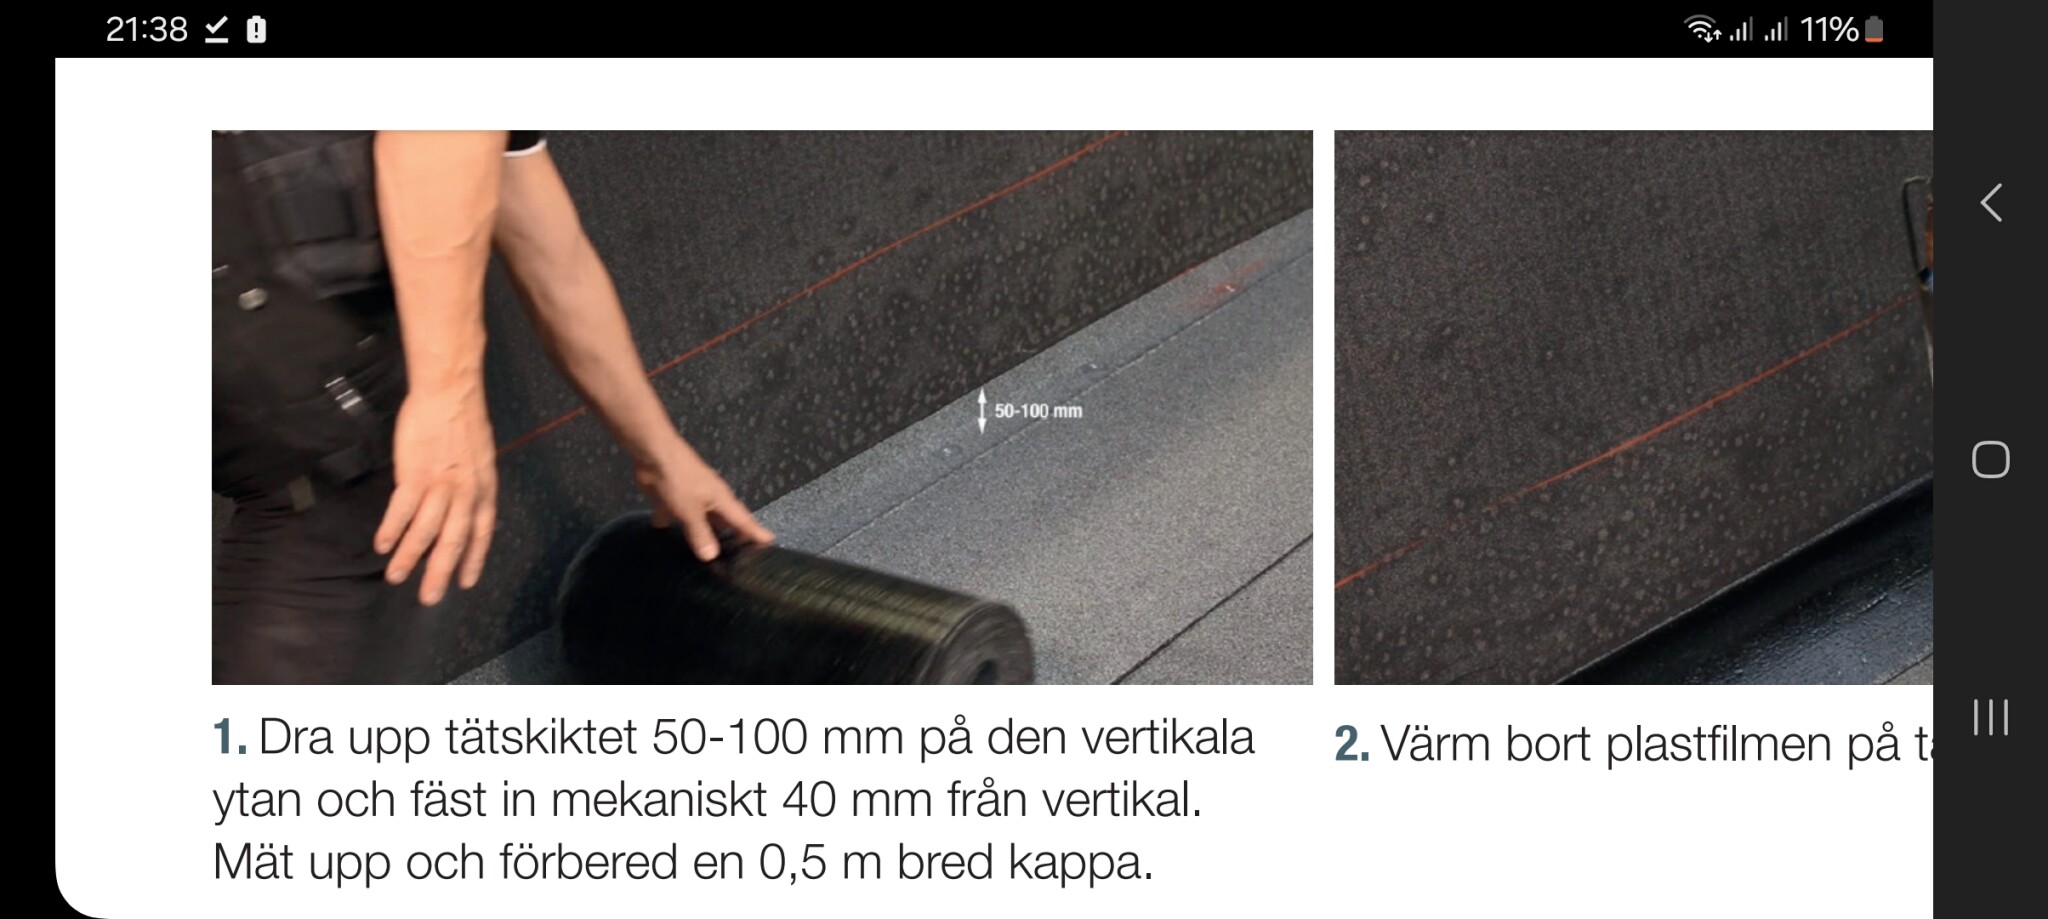
Trebolit has an excellent installation guide and helpful but far from comprehensive videos more like "tips and tricks". You make the edgings somewhat like a combination of eaves strips and turn-ups against the wall, start with the roof with a small turn-up, and then do the verticals and the top (the latter you can do with the 2m pieces left over), it takes a lot of glue!
Or you could start by getting a few quotes on a seam-welded felt roof from a professional, it's actually quite expensive to do this yourself. Or at least not so cost-effective if I put it that way.
Trebolit has an excellent installation guide and helpful but far from comprehensive videos more like "tips and tricks." You do the flashings somewhat like a combination of gable trim and a wall lift, do the roof first with a small lift and then do the vertical and top (the latter you can do with the 2m pieces left over), lots of glue will be needed!
Alternatively, you could start by getting a few quotes for a seam-welded felt roof from a professional; it's actually quite expensive to do this yourself. Or at least not that cost-effective if I put it that way.
Could it take more than a day to re-roof a felt roof on a 50 m2 garage? Then, of course, there will be additional tasks like fixing any damaged råspont underneath.
When I look at trebolit's installation instructions, I find it difficult to see how I should work with the edge strips on the sides. Should they be folded up or not, or is it just the strips that are folded against the edge?
They seem, as you say, not to fold it up but just close it against the wall. You're not supposed to do that with welded papp and I don't know why they choose not to suggest it when they advocate 2-layers at the gable board which is an "easier" detail, but maybe because it's harder to do
Experiment and choose how you want to proceed.
They seem, as you say, not to fold it up but just end it against the wall. You can't do that with welded felt and I don't know why they choose not to suggest it when they advocate 2-layer at the gable board, which is a more "forgiving" detail, but maybe because it's harder to do
Test it out and choose how you want to do it yourself.
Since it's a flat roof, it would feel better to pull it up on the wall, that's how it's done today. Then I interpret it as folding a strip 90 degrees up against the wall.
The question is, why don't they do it, there must be some reason?
I don't really like their description.
I can imagine a couple of different reasons, but it's not really a big deal and it's pointless to speculate. No matter how you look at it, it's up to you to make the best roof you can.
Självtäck is a simple DIY product for homeowners and this is, of course, reflected in the installation instructions as well. They can't show all possible different steps and explain everything, only the general aspects that show a common simple roof and some typical details.
If you look at elastolit, which is the "professional felt," they show it with the fold.
As it is today, it's easier if you just fold up a strip and do not add any extra strips. On a low-slope roof, water also runs off more easily as each seam on the other cross becomes high enough to hold a little water. It may also have resulted in less waste with the length of the rolls used.
However, that doesn't affect how you should do it today; follow the instructions.
Manufacturers are sometimes so clueless that the best instructions you'll find are on the inside of the protective paper around the roll.. my suggestion is therefore to ask the manufacturer directly if they have more instructions for their specific product. Or, my suggestion is rather to get a quote for the entire job, but my roofing replacement didn't quite go as planned.
I have applied the equivalent of roofing felt on my garage. About 40m2 of roof surface. No problem to do in a day and then a little sheet metal work on another day.
Flat roof with triangular list on 3 sides. Pulled up the felt over the triangular list and then glued a strip/flap on the two gable sides according to step 7 in the installation instructions.
The flaps were smeared with asphalt adhesive. I used asphalt adhesive from a can and at about 15 degrees outside temperature, it became really difficult to work with. Like trying to brush hardened toffee. Later, I did the same operation on the shed and then chose asphalt adhesive in a tube/cartridge which was much smoother.
I recommend doing this on a really warm summer day. It will be sweaty, but both the felt and glue become very easy to work with. The ready-made adhesive strips also work better then. Drink plenty of water during the process and don't forget to celebrate with a beer afterwards.
As it is laid today, it is easier if you just fold up one sheet and don't lay any extra strips. On a low-sloped roof, water also drains off more easily since each seam on the other side becomes high enough to hold back a little water. It might also have resulted in less waste with the length of the rolls used.
But it doesn't affect how you should do it today; just follow the instructions.
Manufacturers are sometimes so stupid that the best instructions you find are on the inside of the protective paper around the roll.. my suggestion is therefore to ask the manufacturer directly if they have more instructions for just their product. Or my suggestion is rather to get a quote for the whole job, but then my roofing replacement didn't go entirely according to plan.
I'm considering that, laying it across with folds along the wall high enough so that the flashing covers the end of the roofing.
Then the question is whether you need to lay a strip between the roof and the wall. There will be leftover anyway since the width is 5 m and the roll is 7 m.
You probably shouldn't splice across the width?
It's probably because of the waste that it was laid lengthwise before, as there is quite a lot of waste.
Laying it across here is according to the manufacturer's recommendations, and laying it the other way with such felt is only recommended at high inclines. Professionals don’t have such constraints, so most prefer the other direction when it fits. A lot of knowledge can be transferred between the different types, but not everything.
Raising the roofing felt that lies on the slab more than 10cm on the wall doesn’t make much sense since the longitudinal flap plays such an important role in keeping it tight right at the angle, and skipping it entirely I think would be a big mistake. Avoiding seams along the length is also something for steeper roofs, and I think you're doing the right thing.
Vi vill skicka notiser för ämnen du bevakar och händelser som berör dig.


Rickard. said:
Trebolit has an excellent installation guide and helpful but far from comprehensive videos more like "tips and tricks." You do the flashings somewhat like a combination of gable trim and a wall lift, do the roof first with a small lift and then do the vertical and top (the latter you can do with the 2m pieces left over), lots of glue will be needed!