
13,764 views ·
17 replies
14k views
17 replies
Stylish solution for concealing pipes in the middle of a plastered wall.
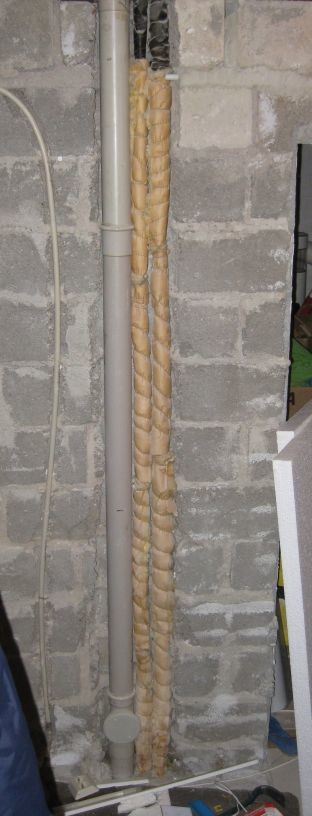
We are going to plaster a wall where drainpipes from the upper floor come down; these lie in a recess in the wall (concrete hollow blocks). There is also a screw cap on one of the pipes for cleaning access. How do we cover the pipes most neatly and easily:
1. Install some type of board (which one? and how is it attached?) over them that we then plaster on, and add a small metal/hardboard hatch to access the cleaning opening.
2. Attach a board from floor to ceiling that hides the pipes, which we attach somehow (how?) and paint in the same color as the wall using a textured roller.
3. Order a sheet metal in the right color that is screwed in and conceals the entire pipe bundle, which can be unscrewed for cleaning. Since it is so thin, it could be placed over the plaster without it looking bad, I imagine.
There are some pros and cons with these. I think option 1 is the most visually appealing if done well, but if we ever have issues with the plumbing and need to replace pipes or water lines, we would need to tear out a lot. Option 2 seems difficult to make look nice, but maybe that's because I can't see a neat way to attach the board material to the plastered wall and create a clean edge and transition. I'm leaning toward option 3 as it is simple and probably just as good as option 2.
It's in a hallway on the entrance level, so it might be hidden by a coat shelf, but we don't want to use organic materials since it is in direct contact with the slab.
1. Install some type of board (which one? and how is it attached?) over them that we then plaster on, and add a small metal/hardboard hatch to access the cleaning opening.
2. Attach a board from floor to ceiling that hides the pipes, which we attach somehow (how?) and paint in the same color as the wall using a textured roller.
3. Order a sheet metal in the right color that is screwed in and conceals the entire pipe bundle, which can be unscrewed for cleaning. Since it is so thin, it could be placed over the plaster without it looking bad, I imagine.
There are some pros and cons with these. I think option 1 is the most visually appealing if done well, but if we ever have issues with the plumbing and need to replace pipes or water lines, we would need to tear out a lot. Option 2 seems difficult to make look nice, but maybe that's because I can't see a neat way to attach the board material to the plastered wall and create a clean edge and transition. I'm leaning toward option 3 as it is simple and probably just as good as option 2.
It's in a hallway on the entrance level, so it might be hidden by a coat shelf, but we don't want to use organic materials since it is in direct contact with the slab.

Picture of the problem?


I had spontaneously bricked up in front of the pipe and then plastered. For the cleaning hatch, I had left a metal hatch as you are already considering. If you encounter problems with the pipes in the future, it will be due to age, and then you'll have to break up a lot anyway.
What do you mean by a drum of plasterboard?Matti_75 said:
Do you mean building it from three pieces of plasterboard (in the shape of an LJ from above) and fitting it "around the pipes"? How do I get an invisible seam between the plasterboard and the concrete?
Or how do I build the drum?
Last edited:
It becomes difficult as the pipes are edge to edge with the concrete hole stone, and there's airiness between the pipes. What should one use for brickwork that also aligns edge to edge before plastering?PASwe said:
I thought it was more recessed than that. It's a bit difficult to give advice without knowing which style the space should adopt. The idea of the lamp with frosted glass was fun =) depending on what type of space it is, maybe a mirror would also work or a custom-made coat rack that happens to go from floor to ceiling.
Possibly a styrofoam sheet that is netted and then plastered all at once.....
Yes, that's exactly what I mean. You build it with steel studs and gips and plaster it afterwards. This way, the seam will be plastered in and become invisible. Don't forget the hatch for the cleaning hatch.Lane said:

In our house, there are similar "shafts," but here there is only a small hatch by the cleaning hole, and the rest is plastered solid. I accidentally drilled a hole in a drainpipe and had to break it open to add joints, and then I saw that it was exactly like in your pictures with water pipes beside it.
So, plaster it up again with a small inspection hatch?
//Anders
So, plaster it up again with a small inspection hatch?
//Anders
It will have white plastered walls with a two-row wide "border" of recessed black mosaic a little bit down from the ceiling. The floor will have a black and white checkered pattern and the ceiling will be whitewashed pine panel.PASwe said:Thought it was more recessed than that. A bit difficult to give advice without knowing the style the space should go for. The idea about the lamp with frosted glass was fun =)
Depending on what type of space it is, perhaps a mirror could work or a custom-made coat rack that happens to go from floor to ceiling.
