Hello.
I'm in the process of replacing the interior wall; everything inside the brick needs to be removed, and a new wooden frame put in. It's my first time, so I'm fishing for others' much larger experience here for a bit .
It involves 2 rooms sharing the same straight outer wall. The wall between the rooms is also going to be replaced at the same time, so tearing it down isn't a problem. The new wall will be:
[inside]
Gypsum
Particleboard
45x45 horizontal frame
Vapor barrier
120x45 vertical frame
Wind protection paper
Air gap
Brick
[outside]
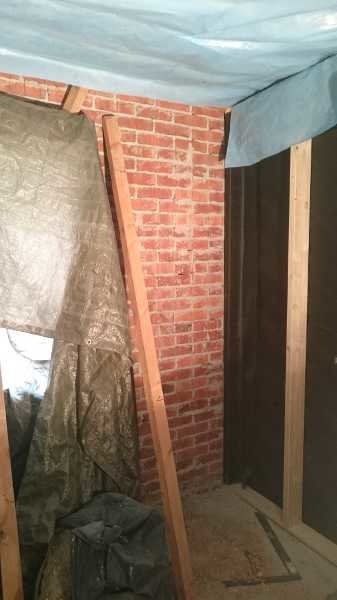
The big task, of course, will be to build the frame and raise it. The wall between the rooms is closets all the way, but they have been torn down in Room 1.
- Room 1 with 2 closets is completely torn down, with brick and concrete floor remaining there.
- Room 2 hasn't been torn down yet, but it will be in the near future.
It’s about ~8 m of framing altogether. The question is, can I split it into one frame per room to make it more manageable? Or is it better to make the frame in one piece (For stability? Insulation maybe? But there won’t be large gaps between the frames then, just 2 frames side by side)?
Anyone have any thoughts? How would you do it? I don't know if I'm overthinking.. But it's a bit of an unusual situation, and none of the homeowners I know have done anything like this, and I'm new to it. All viewpoints are interesting.
Hmm.... how were you planning to install an air gap and windbreak from the inside?
I hope you are aware that brick walls are often attached with so-called anchors to the underlying material for stability. Do you know how your brick wall is constructed? Is it just simple stones for weather protection? In that case, the wall isn't particularly stable when you remove what's behind...
I also perceive it as an exterior wall, considering TS's very clear description.
As mentioned, I am very curious about how TS plans to construct the wall.
It's probably difficult to create a set of rules and then set it up on site. It's more appropriate to lay a sill and something on top, then drive in vertical studs with a press-fit.
Thank you for the answers! Although quite a few were phrased as questions .
This is about the outer wall (upstairs) of a split-level house with a brick façade, built in '67.
Room 1, into the closet space.
Room 1, the same outer wall on the other side of the window, rest frame with black wind paper towards the adjoining outer wall.
The old wall was:
[inside]
9 mm gypsum
75x45 standing stud
"air gap" - but I doubt there was really a gap between the unprotected insulation and the brick
brick
[outside]
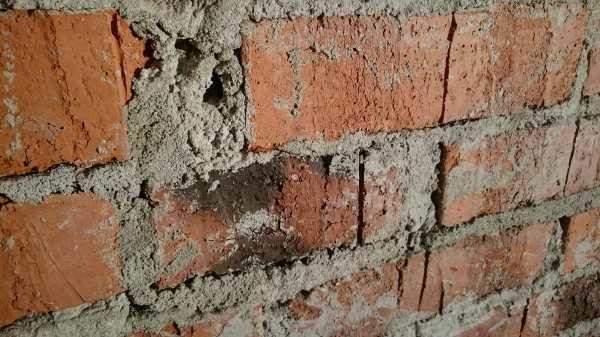
The brick is a single row. (Or do you say layer?) Also not impressive work, if I can say so as a beginner. The joint thicknesses vary between at least 0.5-1.5 cm, sometimes there's no mortar at all, daylight shines in between the stones, lumps of mortar hang out from the wall (on the inside, the outside looks normal so I can't help but think "window dressing"). The lumps must have "hooked into" the old insulation, when I removed it, there was a layer of insulation left on the brick wall. I've gone over the wall with a mason's hammer now to smooth out the worst, feels better then considering the air gap even though wind paper is added in between.
I've raised the frame in room 1 against the wall that adjoins the outer wall (it is also an outer wall). Because the room was stripped, I could assemble 120x45, sill, sill paper, and top plate while lying down. Then I stapled on the wind paper and raised the frame, with markings on the floor I could push it in just close enough to the brick. But it's true, it's probably not the most space-efficient method. I'm trying to learn as much as possible as I go along .
..and nailing in the studs sounds much more convenient and space-efficient, but then I don't really know what to do with the wind paper . If the air gap is an inch and the frame is up, you can still reach to pull the paper, but to staple it to the frame?? (My bad probably, there was some info missing in the first post)
The reason for the wall change is among other things rodents in the walls. When I removed the outer wall in room 1, there was a "cave" in the insulation (completely gone) that was 3-4 dm across (thermal bridge ?). With just gypsum in the walls, it was also difficult to use the walls for anything (children in the family). And so I'm trying to improve the insulation in the house in general, it's thin everywhere. The roof was:
[cold attic]
100 mm wood shavings
100 mm insulation
slats
gypsum board
[room]
..and the floor was.. well..
oak parquet
boards
wood shavings with joists "raised" a few cm from the concrete floor using some kind of cast "lumps" (seems like they poured a blob of mortar and pressed the joist into it) So the wood shavings were between and under the joists.
The floor creaked quite a bit, and it was incredibly neglected. I could see how the parquet looked originally when I removed the floor in the closets where it had been a bit protected, but out in the room, it was totally destroyed. And that's about the reasons for redoing the room.
It's the trusses in the cold attic above that's the weight from above. The cold attic is unused there because there were only 100 mm of insulation +100 mm of wood shavings on top between the trusses, there's no floor to put things on (which I want to change). But absolutely, it's foolish to take a chance, so I've removed all the old studs but kept some of them to support the roof until the new wall is in place. And as I said, I'm no expert on brick, maybe it's sturdier than I thought, but it makes me even less inclined to skimp on supports.
I hope this provided a bit more comprehensive information.
Still don't understand why you removed the old framework. Was it rotten?
No, it wasn't rotten, the wood was pretty okay. But:
- Firstly, there were (are) rodents all over the house, which made me wonder about the state of things.
- Secondly, we want to install more cables (concealed) for various purposes.
- Primarily, I want better insulation -> thicker wall. This is probably the main reason I didn't keep the old frame, I do live in the Mälaren Valley, but still... It can't get much thinner than 75 mm, and the material for the wall isn't too costly. The energy declaration does talk about additional insulation, mainly in the roof, but all things considered, it felt right to take care of the walls too.
- Also, the previous owner was a smoker, which is still noticeable. I initially tried steaming off the wallpaper, but what's causing the smell isn't going away with that, and the odor made me feel sick. I know there are products to cover such things up, but then you have to trust they'll work, and when you combine this with the other points, it felt like it wouldn't be a bad idea to start fresh and get it both clean and better.
I admit that some of these points don't specifically relate to the framework but are more reasons for starting to tear down the wall at all.
tommib said:
What is supporting the roof trusses now?
First and foremost, the room (1) doesn't extend halfway across the house, and together with the shape of the roof (it isn't symmetrical, the ridge is over the room), means that the center of gravity isn't over the room I'm working in, but where there's still support underneath. But where I have removed the frame, I have temporarily wedged some of the old studs back into place until the new wall is up.
It would have sufficed to tear down insulation and wall covering and then attach to the studs to get more insulation. How are you now going to attach the bricks to the studs? A cavity wall must be anchored with ties (as mentioned earlier).
It would have sufficed to tear down the insulation and wall covering and then extend the studs to add more insulation.
Very good observation. If it hadn't been for the wind barrier, I would have done it without hesitation. But now... I imagine it won't be good for the insulation capacity of the wall to skip it. Especially since there are "ventilation holes" in the mortar (#8 for details), so the air in the air gap is not too different from the outdoor air.
sinuslinus said:
How are you going to attach the brick to the studs? A cavity wall must be anchored with wall ties (as mentioned earlier).
Horror scenario:
[link]
Oops. Okay, I want to avoid that. But wall ties were new to me. You really should consider that brick walls can also fall. I haven’t checked carefully, but my built-in visual inspector says that the brick wall I'm working on is hardly completely vertical. Maybe as a whole, but it certainly feels like it bulges here and there.
There were no wall ties in the old wall. And the horror scenario was about a several-story-high wall while mine is one story. The stud frame is secured at the top, it won't tip over, but on the other hand, that's not the same as wall ties.
Is it generally recommended to use wall ties even if the wall is only one story high? But how on earth would you attach them, how do you manage to integrate them with the wind barrier?? It feels like a brutal fiddly task to make holes in the wind barrier for them?
The kramlor are attached from the outside. When you have erected the timber frame and are working on the skalmuren. That's one of the reasons I and others wondered why you dismantled the entire framework.
There are some kind of renoveringskramlor but I have no idea how to use them. In the skalmuren, ventilation holes should be present. Most often, this is done by leaving every fourth vertical joint open in the lowest course of bricks. Otherwise, the construction has trouble drying out and you get mold.
It's a shame you tore down the studs. But you just have to grit your teeth.
Set up new studs, get some flanged screws and drill and plug into the brick and screw in the flanged screws and fasten the flanged screws into the stud.
Then there are metal angles, included in the steel stud assortment, that you nail to the edge of the stud.
Between the studs in the metal angle, you can now fasten exterior gypsum board, and you will have the wind protection.
Insulate and apply plastic and cross-beam insulate OSB and gypsum.
(I did it this way when I insulated a cold garage)
What is actually supporting the house at present? Are the roof trusses kind of balancing on the inner wall?
I would have done as described in #11. Isn't it just as good to staple windproof fabric on the long sides of the studs? You would have to cut a piece of fabric per section, but it can't take too much time.
Vi vill skicka notiser för ämnen du bevakar och händelser som berör dig.
") .
.