Hello!
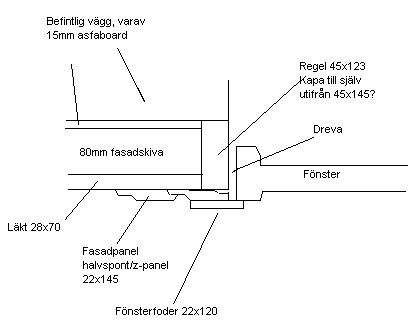
I am going to install new windows in connection with the facade renovation. I will have vertical Z-panel/half-spont with exposed trim around the window. The current windows are flush with the facade, and I would like to install the new windows the same way.
How does the construction below look to you? Please feel free to share any opinions if it's good or if there are better ways.
Do I really need a stud with special measurements?
Take a 45*120 the three millimeters might not matter? Or prop up with a masonite piece of 3mm.
Thank you for the answers. It's probably leaning towards the tools expert's answer. You're right, it's only 3mm and it might not even be that since I've noticed the spacers for the facade board are 75mm. That means 28x70 will be 5mm further in than I initially thought.
If I go with 45x95 and 28x70 outside, then part of the frame ends up in the air gap. Could that be good? Feels like the window might get colder because of it?
If I go with 45x95 and 28x70 outside, then part of the frame ends up in the air gap. Could that be good? Feels like the window might get colder because of it?
Last edited:
This is how I would have done it:
I would have used 45x95 as upright with intermediate MU.
Then a diff barrier inward to the room + horizontal nailing rule 45x45 with intermediate MU.
Outside the upright studs, a windproof board of some kind. Then 28x70 nail batten and vertical paneling outside them (this way the air sneaks past the horizontal nail batten in every other board).
As for the windows, I would have sawed strips of 15 K-ply, as wide as needed with regard to where the window frame should be in relation to the façade level (usually you place the window frame 50 mm in from the outside to protect them a bit) and measured to the inside of the finished wall (possibly 5 or 10 mm more to avoid trim around the window reveal on the inside) and glued and screwed these plywood strips on the outside frame (this way you get an absolute seal between frame and plywood). Then insert the entire package into the window opening and screw it in place considering the inside and outside.
Then bring the drywall forward on the inside against the plywood. If the plywood forms an edge 5-10 mm inside the drywall, no trim is needed on the inside.
On the outside, reveal and trim in relation to the facade panel.
Through the plywood reveal around the window, you can ignore where the air gap ends up in relation to the frame. The window frame is attached to the plywood, and it in turn is attached to the upright wall studs. You may need to foam the gap between the upright studs and the back of the reveal.
The downside to this mounting method is that you will have more work the day the windows need to be replaced. There is no gap between the frame and the reveal to saw off any fasteners. It is behind the reveal.
The solution is to measure where the attachment points for the interior screws in the reveal are located and keep the notes with the other house documents. This way, it will be easy to find the screws in the reveal under the filler and paint.
___________________
The Builder
Magnet or a stud finder with a metal detection function should work well too.imported_Byggaren said:
")
But a cut edge on plywood won't look very nice facing into the room?
The problem with the plywood solution is that the window might not sit level if the walls lean a bit, which isn't necessarily a big issue, but it gets worse if the wall on one side of the window leans and the other doesn't, which isn't uncommon in old houses. The original poster hasn't mentioned that they'll be renovating the interior, installing new drywall, and re-wallpapering. I would have used trim as usual and nailed the casing.
The problem with the plywood solution is that the window might not sit level if the walls lean a bit, which isn't necessarily a big issue, but it gets worse if the wall on one side of the window leans and the other doesn't, which isn't uncommon in old houses. The original poster hasn't mentioned that they'll be renovating the interior, installing new drywall, and re-wallpapering. I would have used trim as usual and nailed the casing.
verktygsgurun said:But a cut edge on plywood won't look so nice facing into the room, right?
The problem with the plywood solution is that the window might not be level if the walls are slightly slanted; it's not a big issue, but it becomes worse if one wall side of the window is slanted and the other isn't, which isn't uncommon in old houses. TS hasn't mentioned if he plans to renovate inside and screw up new drywall and re-wallpaper. I would have done the usual reveal and nailed the trim.
You can easily fix the cut edge with wood filler and paint. The reveal's inside should also be painted, right?
If the walls are slanted and slanted differently, the 'package' must still be level and plumb so that the window frame is too. Otherwise, the window sash will either open or close by itself when the sash is unlatched.
If you find after installation that the overhang inside is not evenly spread, take a suitable piece of wood and match the thickness to where the reveal protrudes the least. Using that and a pencil, along with the piece of wood, draw a line on all sides from the wall with that measurement. The rest is trivial with an electric hand planer to fix. The cut edge should get a coat of filler before painting.
__________________________
Byggaren
Click here to reply