
I thought I would share our experiences with radon in the basement, as I myself lacked concrete practical examples when we were in the middle of it.
Already immediately after taking possession, we noticed something was wrong. The radon levels in the basement were high. I then bought an Airthings Wave+ (about 2000 SEK), which is my first and perhaps most important tip. Being able to measure continuously and see trends over time is invaluable.
In hindsight, I can conclude that this analysis was perhaps unnecessarily detailed. The only thing it really provided was a stronger conviction that it was about ground radon – not building materials.
Cost: about 3000 SEK.
In our case, this made no measurable difference at all. With an old house and a thin basement floor, it likely leaked in everywhere, not just in cracks and penetrations. The sealing measure was practically meaningless.
Cost: about 25,000 SEK.
Radon levels dropped somewhat – but far from as much as we had hoped. Still clearly too high values.
I measured at about 10 different points in the basement and saw clearly that:
- At some places, the pressure difference was 0, regardless of whether the fan was on or off.
It then became clear:
👉 The radon fan did not affect the entire basement.
I took this to the installer, and we agreed on the conclusion:
more suction points were needed.
The difference from the standard solution was that:
The motivation was:
Total cost for materials: about 6000 SEK
Work time: about 30 hours (own work)
Now, as I am writing this:
👉 The solution worked excellently.
As you might see, I've also taken help from ChatGPT to write this post
Background
We bought our house about 5 years ago. It's an older house from 1933 with a basement and about 5 cm thick basement floor.Already immediately after taking possession, we noticed something was wrong. The radon levels in the basement were high. I then bought an Airthings Wave+ (about 2000 SEK), which is my first and perhaps most important tip. Being able to measure continuously and see trends over time is invaluable.
Understanding the problem
Over quite a long period, I tried to understand the relationship between radon levels and different external factors:- temperature
- solar radiation
- wind
- air pressure
In hindsight, I can conclude that this analysis was perhaps unnecessarily detailed. The only thing it really provided was a stronger conviction that it was about ground radon – not building materials.
Seal first? (spoiler: didn't work)
The next step was to contact a radon expert. The recommendation was to seal where radon could leak in.Cost: about 3000 SEK.
In our case, this made no measurable difference at all. With an old house and a thin basement floor, it likely leaked in everywhere, not just in cracks and penetrations. The sealing measure was practically meaningless.
Installation of a radon fan
The year after, we installed a radon fan with two suction points, placed centrally in the basement.Cost: about 25,000 SEK.
Radon levels dropped somewhat – but far from as much as we had hoped. Still clearly too high values.
Why isn't the fan working?
To understand why the radon fan didn't have the desired effect, I bought an air pressure meter (about 500 SEK). With it, I could measure the pressure difference above and below the basement floor.I measured at about 10 different points in the basement and saw clearly that:
- At some places, the pressure difference was 0, regardless of whether the fan was on or off.
It then became clear:
👉 The radon fan did not affect the entire basement.
I took this to the installer, and we agreed on the conclusion:
more suction points were needed.
The solution – more suction points, but in a different way
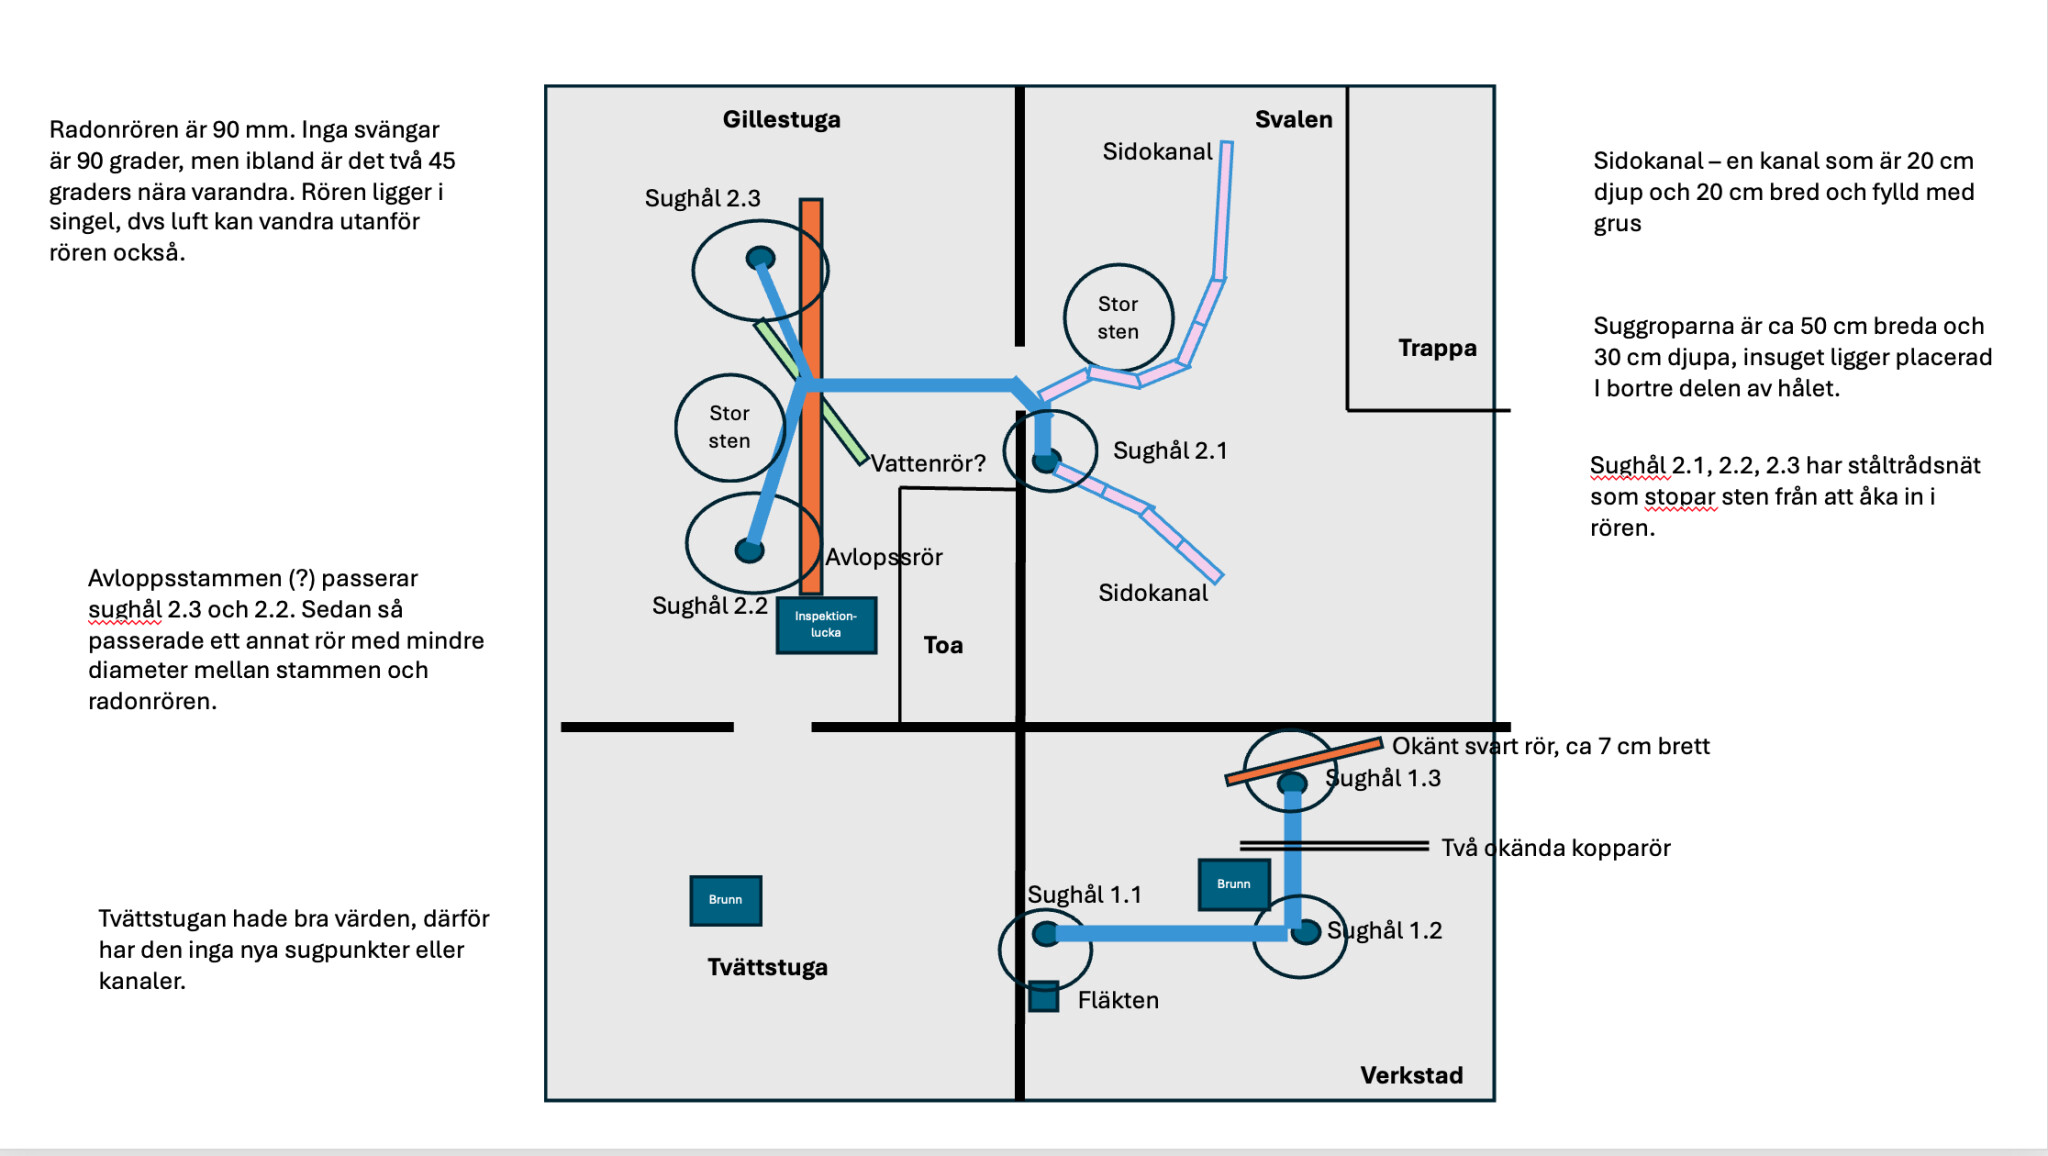
Here, I also started discussing the solution with ChatGPT – mainly about how to do this as efficiently as possible.The difference from the standard solution was that:
- instead of spiral pipes in the ceiling
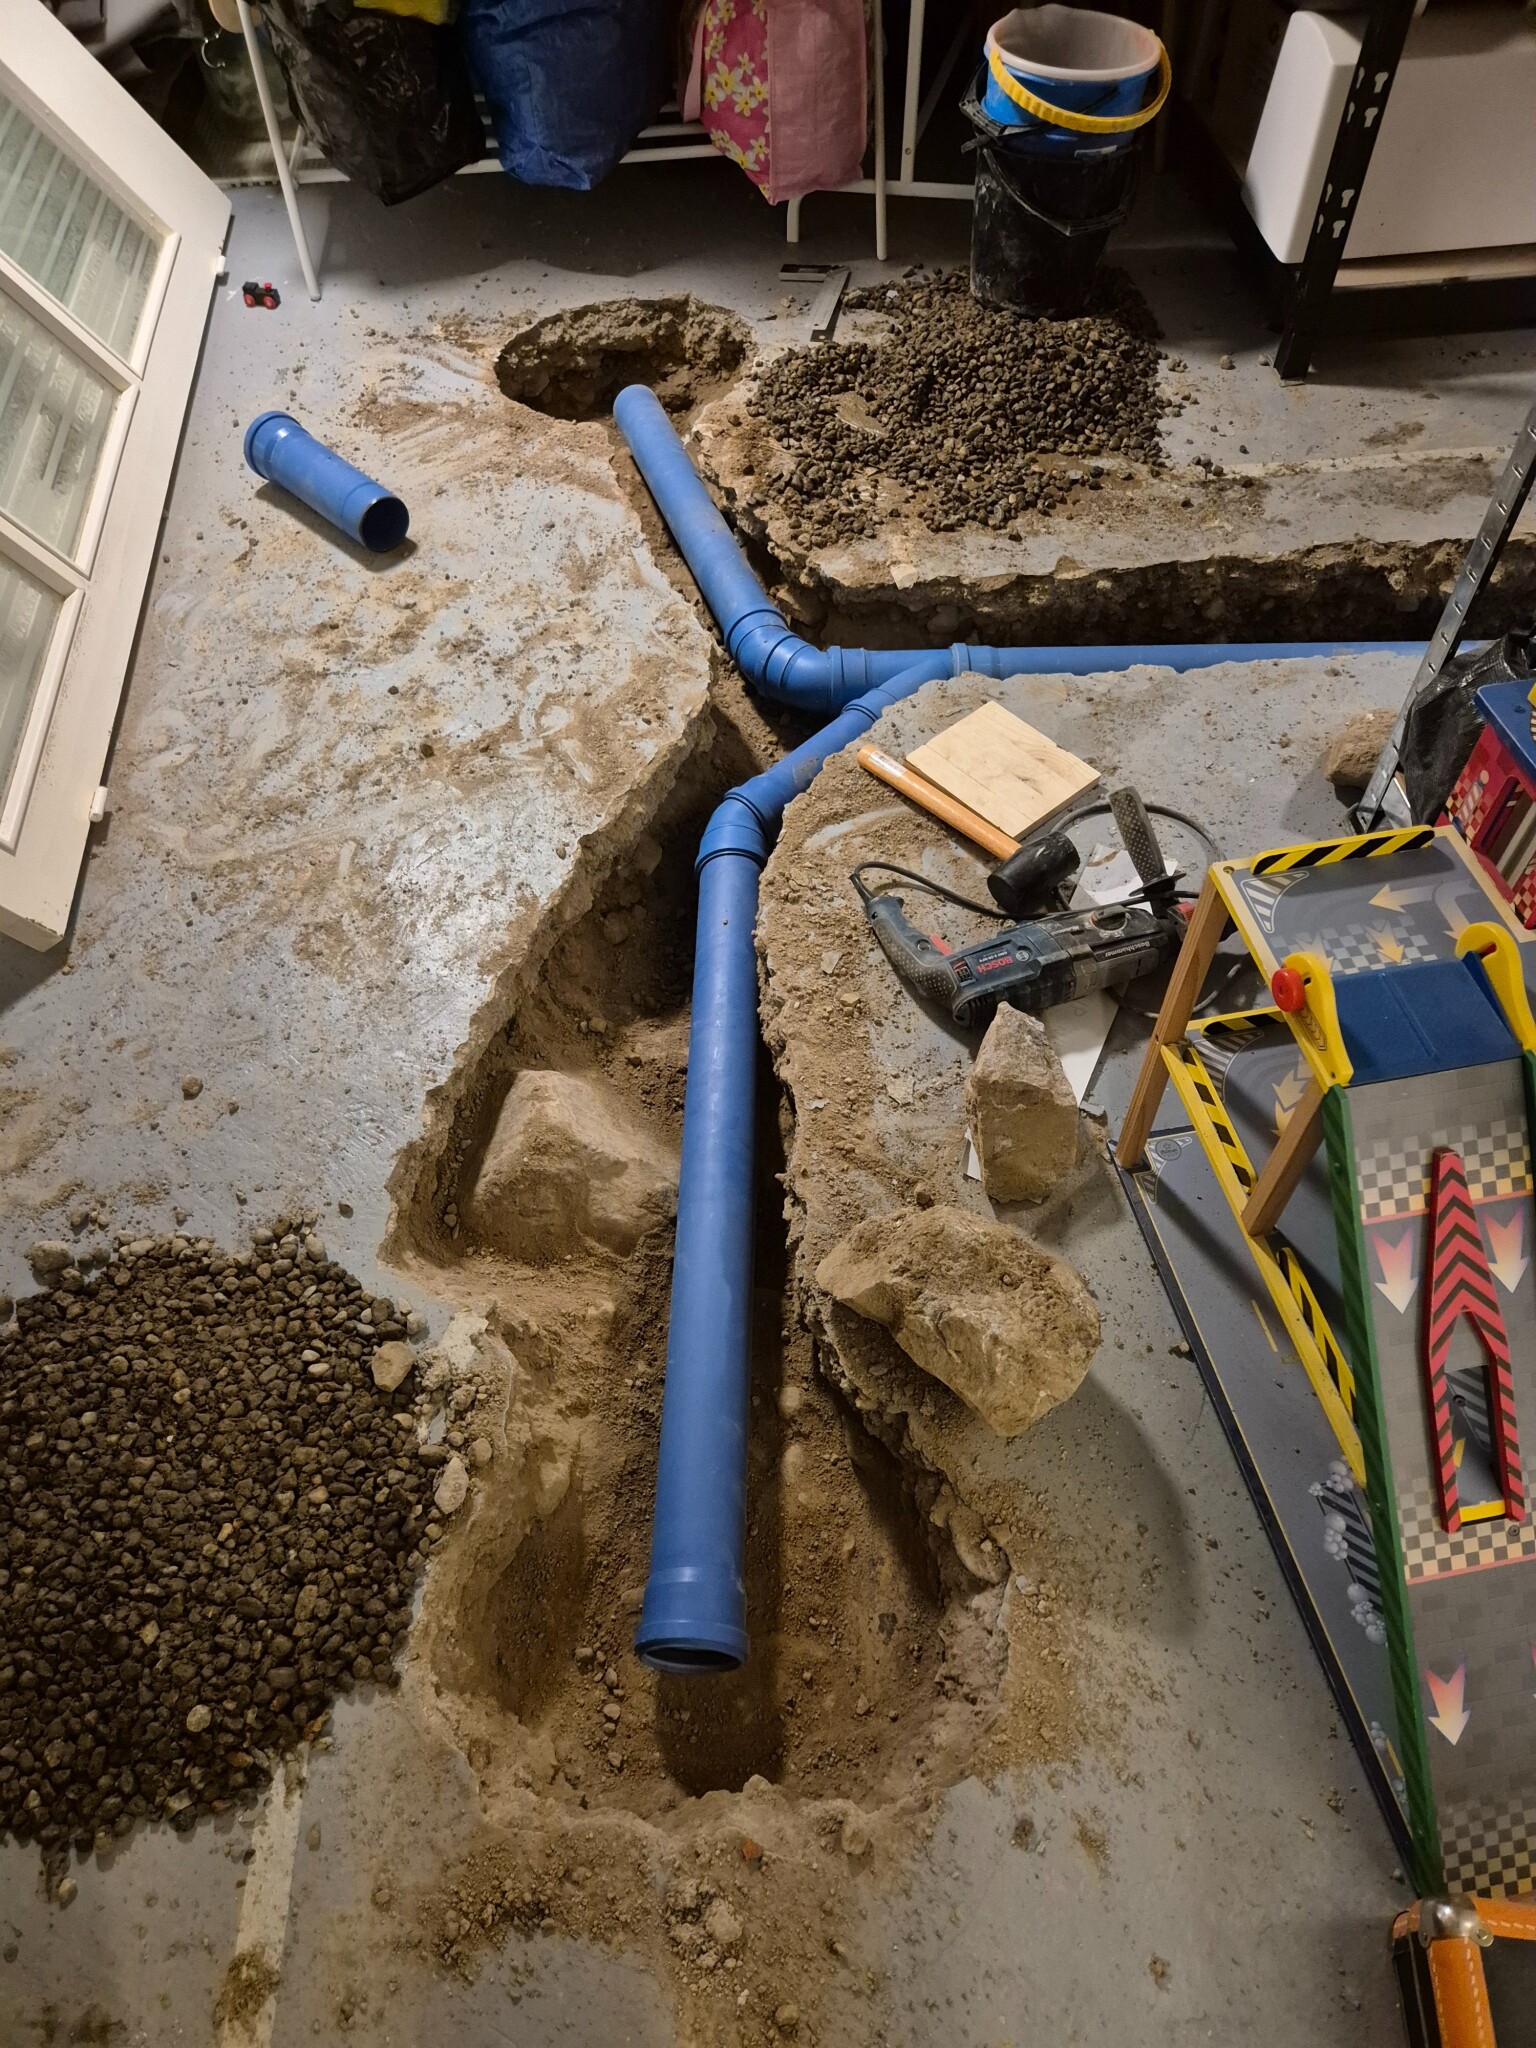
- I chose to dig down the pipes under the basement floor
The motivation was:
- avoid more pipes in the ceiling
- create airy channels under the floor, filled with gravel instead of the hard-packed soil that was there before
- achieve better distribution of negative pressure under the entire slab
- optimal distance between suction points
- length, width, and depth of the channels
- how the suction pits should be designed
- which material to use (gravel 8/16)
- how everything should be built before casting
- calculation of number of concrete bags
- when the radon fan could be restarted after casting
Total cost for materials: about 6000 SEK
Work time: about 30 hours (own work)
The result
Now, as I am writing this:
- Radon levels are below 134 Bq/m³
- It's also “unfavorable” weather (high pressure, winterlike conditions)
👉 The solution worked excellently.
Summary & tips
- Buy a continuous radon meter early
- Sealing can help – but in older houses, it is often insufficient
- A radon fan must actually affect the whole slab
- Measure pressure difference to verify function
- More suction points may be necessary (but side channels (i.e., a trench filled with gravel under the basement floor) might suffice)
- Digging down pipes under the floor and creating airy gravel channels can have a significant effect
- Consult ChatGPT – even though some things need to be double-checked, there is a vast amount of gathered knowledge that otherwise takes a very long time to find
As you might see, I've also taken help from ChatGPT to write this post

good post, by the way, a Radon technician suggested painting the floor as a good measure as wellSandbergsand said:
I thought I would share our experiences with radon in the basement since I myself lacked concrete practical examples when we were in the midst of it.
Background
We bought our house about 5 years ago. It's an older house from 1933 with a basement and approximately 5 cm thick basement floor.
Already immediately after moving in we noticed something was not right. Radon levels in the basement were high. I then bought an Airthings Wave+ (about 2000 SEK), which is my first and perhaps most important tip. Being able to measure continuously and see trends over time is invaluable.
Understanding the problem
Over quite a long period, I tried to understand the connection between radon levels and different external factors:
The worst levels occurred when it was really cold and sunny in winter, i.e., high pressure. Then the negative pressure in the house was the greatest, and radon was sucked in from the ground.
- temperature
- solar radiation
- wind
- air pressure
In hindsight, I can conclude that this analysis was perhaps unnecessarily detailed. The only thing it really provided was a stronger conviction that it was about ground radon - not building material.
Sealing first? (spoiler: didn't work)
The next step was to contact a radon expert. The recommendation was to seal where radon could leak in.
Cost: about 3000 SEK.
In our case, this made no measurable difference at all. With an old house and a thin basement floor, it likely leaked in everywhere, not just in cracks and penetrations. The sealing measure was practically meaningless.
Installation of radon sump
The following year we installed a radon sump with two collection points, placed centrally in the basement.
Cost: about 25,000 SEK.
Radon levels dropped somewhat – but far from as much as we had hoped. Still clearly too high values.
Why isn't the sump working?
To understand why the radon sump didn't have the desired effect, I bought an air pressure meter (about 500 SEK). With it, I could measure the pressure difference above and below the basement floor.
I measured at about 10 different points in the basement and saw clearly that:
- At certain places, the pressure difference was 0, regardless of whether the sump was on or off.
It then became clear:
👉 The radon sump did not affect the entire basement.
I took this to the installer, and we agreed on the conclusion:
more collection points were needed.
The solution – more collection points, but in a different way
Here I also began discussing the solution with ChatGPT – primarily about how to do this as effectively as possible.
The difference from the standard solution was:
- instead of spiral ducts in the ceiling
- I chose to dig down the pipes under the basement floor
The motivation was:
ChatGPT helped with:
- avoid more pipes in the ceiling
- be able to create airy channels under the floor, filled with gravel instead of the hard-packed soil that was there before
- get better distribution of negative pressure under the entire slab
- optimal distance between collection points
- length, width, and depth of the channels
- how collection pits should be designed
- which material should be used (gravel 8/16)
- how everything should be built before casting
- calculation of number of concrete bags
- when the radon sump could be restarted after casting
Total cost for materials: about 6000 SEK
Working time: about 30 hours (own work)
The result
Now, as I write this:
Exactly the conditions that previously gave highest values.
- Radon levels are below 134 Bq/m³
- It is also "unfavorable" weather (high pressure, winter-like conditions)
👉 The solution worked excellently.
Summary & tips
I hope this can help someone else who has the same problem.
- Buy a continuous radon monitor early
- Sealing can help – but in older homes, it is often insufficient
- A radon sump must actually affect the entire slab
- Measure pressure difference to verify functionality
- More collection points may be necessary (but it may suffice with side channels (i.e., a trench filled with gravel under the basement floor)
- Digging down the pipes under the floor and creating airy gravel channels can have a big effect
- Brainstorm with ChatGPT – even though some things need to be double-checked, there is a vast amount of accumulated knowledge that would otherwise take a very long time to find
As you may see, I also used ChatGpt to help write this post
👍That's right.S stenna said:
Since radon is a gas, it passes through the smallest cracks. Therefore, painting is a very effective way to stop its spread. For example, painting the floor and walls in a room can make a big difference. One should, of course, use an elastic paint that doesn't crack, such as acrylic.
It's a good idea to combine different methods like radon suction and painting for better effect.
I got that tip too, and epoxy paint was mentioned as a good option. Then I think there are two strategies: either sealing with paint and radon sealant to try to make it completely airtight, or ensuring a negative pressure with a radon fan and using my measures above. I'm convinced that the negative pressure solution is much more robust (and of course more expensive). But if you're "lucky," sealing might be enough, though you should measure continuously to ensure no new cracks appear.O said:
👍That's right.
Since radon is a gas, it penetrates through the smallest of cracks. Painting is therefore a very effective way to stop its spread. For example, painting the floor and walls in a room can make a big difference. Naturally, one should use an elastic paint that doesn't crack, such as acrylate.
You can gladly combine different methods like a radon fan and painting for better effect.
I want to add again that I'm an amateur, so take my advice and truths with a grain of salt
You may have misunderstood me.
It's not a matter of two alternatives but of two individually (very) effective methods that can be combined to achieve even better results.
Click here to reply