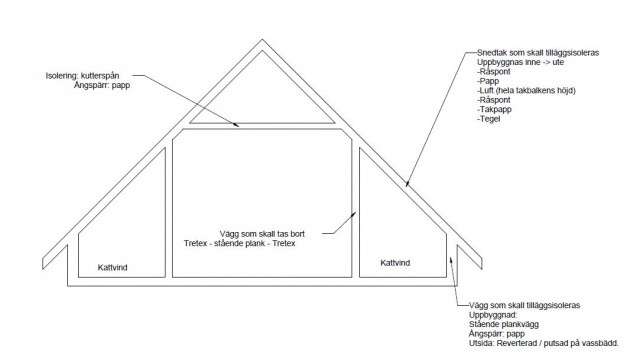
Planning to open up the walls to the "kattvnden" in a 1 1/2 story house. The house was built in '49 with vertical planks in outer walls and inner walls. Are these walls typically load-bearing? See attached image. Any tips/ideas on how to execute this work? Is it possible to make this support above the attic to "avoid a visible beam in the ceiling? The room that will be widened is currently about 3m long, meaning the planned opening (on both sides) spans about 3 rafters. /Hebbe
The short answer is that, Yes, the knee walls are typically load-bearing, or rather, the roof trusses are often part of the knee walls. The walls between the roof trusses can be removed, but that hardly solves your problem.
I have the same opinion, that is, that the walls are load-bearing. How do you best support them? The room is about 3m long, I could imagine opening about 1.5m of the wall at the minimum. If I make the opening directly over a rafter, it's just this one that needs to be relieved. I have an idea to reinforce the existing wall with glulam + posts before I make the "hole." Does anyone have any other clever solutions?
/Hebbe.
/Hebbe.
Hebbe: Just wanted to say that I've recently done (or rather am in the process of doing) a similar project in a 1930s house where, among other things, the kattvindsväggarna were to be removed. I chose the following solution.
I demolished/removed the kattvindsväggarna except for the supporting legs in the kattvindsväggen that were under the rafters.
Then reinforced the existing rafters by screw-gluing 195x45 together with the existing rafters (which were about 50 x 170). Did the same with the hanbjälkarna on the rafters.
Made a new "kattvindsvägg" almost at the outer walls (about 40 cm from the outer wall) by installing new support legs under the rafter. This 40 cm space is now filled with iso.
Supported the rafters in the middle by tightening up standing studs.
Then removed the support legs from the old kattvindsvägg.
Simsallabim, it sank 2-3 mm.
New interior walls were then built to support the whole thing.
Wind barrier, slats, ecowool, double gypsum (200 sheets or so...).
And some other small stuff (four skylights, all electrical, heating, water, sewage, new bathroom etc.).
Despite the help of skilled carpenters, I have yet to recover physically and mentally from this horse job (which by the way is not finished and "moved in" yet). Floor space increased from 50 to 85 square meters, lots of pitched roof but okay as a children's room. It's going to be great but damn what a job it's been, shoveled 85 bags of sawdust, filled a 30 cubic container with demolition material and so on.
What wouldn't you do for a little extra floor spacesynpunkter said:Hebbe: Just wanted to say that I recently did (or rather am in the process of doing) a similar project in a 1930s house where, among other things, the knee wall was to be removed. I chose the following solution.
I tore down/removed the knee wall except for the support posts in the knee wall that were under the rafters.
Then reinforced the existing rafters by screwing and gluing 195x45 to the existing rafters (which were about 50 x 170). Did the same with the tie beams on the rafters.
Made a new "knee wall almost near the exterior walls (about 40 cm from the exterior wall) by putting new support posts under the rafters. This 40 cm space is now filled with insulation.
Supported the rafters in the middle by tensioning upright studs.
Then removed the support posts from the old knee wall.
Abracadabra, it sank 2-3 mm.
Thereafter, new interior walls were built to support the whole structure.
Wind barrier fabric, battens, eco-fiber, double plasterboard (about 200 sheets...).
And a few other small tasks (four roof windows, all electricity, heating, water, sewage, new bathroom, etc.)
Despite the help of skilled carpenters, I have not yet recovered physically and mentally from this massive job (which, by the way, is not finished and "moved in" yet). Floor space increased from 50 to 85 sqm, lots of sloping ceilings but okay as children's rooms. It's going to be great, but man has it been a job, shoveled 85 bags of sawdust, filled a 30 cubic meter container with demolition material, etc. etc.

Did you have someone calculate it, or did you go by "feel"? Does it really work to just reinforce?
Well, what won't you do for it. Joking aside, it became a bit more than just extra floor space: a total upgrade from 1930s standards, two rooms became four, four skylights of which two are 180 cm high, proper insulation in the roof (I've now had a winter with snow on the roof for the first time), and so on.
All old houses are different. I didn't bring in any engineer to calculate the whole thing, instead I opted for the version of common sense, caution, and the amateur carpenter's best trick: over-dimensioning. The thing is that there are now interior walls across the rafters that support most of it, but in my case, it probably would have worked even without them. Some parts of the attic have no such interior walls, and it works excellently. So the newly reinforced rafters are actually really sturdy. In my case, it was also so that it wasn't really possible to see how the construction was until you started tearing down. Standing there guessing and calculating how it looks behind a lot of treetex and board walls and treetex and board ceilings doesn't work. I tore down cautiously, supported, and continuously considered how I should proceed. My skilled carpenters were also part of the discussion and thought I was overly cautious for wanting supports (they were in the way for the carpenters), but I made it clear that I was the one in charge unless they wanted to take full responsibility.
All old houses are different. I didn't bring in any engineer to calculate the whole thing, instead I opted for the version of common sense, caution, and the amateur carpenter's best trick: over-dimensioning. The thing is that there are now interior walls across the rafters that support most of it, but in my case, it probably would have worked even without them. Some parts of the attic have no such interior walls, and it works excellently. So the newly reinforced rafters are actually really sturdy. In my case, it was also so that it wasn't really possible to see how the construction was until you started tearing down. Standing there guessing and calculating how it looks behind a lot of treetex and board walls and treetex and board ceilings doesn't work. I tore down cautiously, supported, and continuously considered how I should proceed. My skilled carpenters were also part of the discussion and thought I was overly cautious for wanting supports (they were in the way for the carpenters), but I made it clear that I was the one in charge unless they wanted to take full responsibility.

Click here to reply