Hello!
I have taken down and set up an old tiled stove in our extension. The man who is rebuilding it is not easy to communicate with or get any reasoning/explanations or similar from.
(the old type of introverted craftsman who knows one thing - his job -.- )
Above the tiled stove, the carpenters have prepared a shaft for the chimney with the right dimensions and placement, so the idea is to mount the chimney from above. BUT! How do I make the connection tight?
There is also not much space left to work from, just enough to barely fit your hand and a bit more between the ceiling and the top crown.
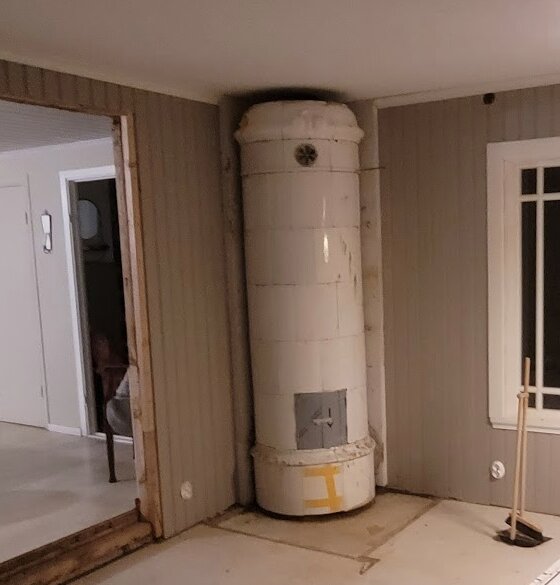
See attached image of the top of the rebuilt tiled stove.
Most chimney sets I have seen have a round connection for e.g. stoves, while the one we have is rectangular.
I would gladly appreciate help on how to take the next step before winter makes itself too known
(the tiled stove was rebuilt in autumn -23, so it is dry and ready to go otherwise!)
Old tiled stoves may have the smoke channel built against the chimney stack, but usually, there is a metal connection that allows for some movement. The stove maker completes the job by connecting the stove to the chimney, correct? The chimney is connected at the back, not upwards. Open the round soot door at the top and look inside with a flashlight to see the damper and where the smoke should go into the chimney stack.
Old tiled stoves might have the flue built against the chimney, but normally there's a metal coupling as a connection so it can have some movement. The stove maker finishes the job, i.e., connects the stove to the chimney, right?
The chimney connects backward not upward.
Open the round soot hatch at the top and peek in with a flashlight, then you’ll see the damper and where the smoke goes into the chimney.
Hi!
The stove maker seems moderately interested in completing the job with the connection unfortunately. As I said, a rather peculiar gentleman...
I don't really understand the "chimney connects backward and not upward," is there a good reason for this?
Currently, we have a channel (box) first chimney that is placed directly above our stove, shouldn't that matter? We don't have a chimney base (just there) since the stove is placed in a modern extension of the house. It will be a separate chimney.
But setting a coupling that is then bricked around to seal it, which is then connected to a "chimney kit" sounds like the plan going forward?
I built this myself when I set up a tiled stove. Here are some pictures:
[link]
Very nicely done and a pleasant thread!
I saw that your metal plate protrudes through the wall but I just missed the part about how it connects to the actual masonry. Do you build around it so it's completely "solid" and tight? I'm wondering how it works with thermal expansion/cracks, etc.
I saw that your sheet metal was sticking out through the wall but missed the part about how it's connected to the actual masonry.
Do you build around it so it's completely "rigid" and tight? Wondering about the thermal expansion/cracks, etc.
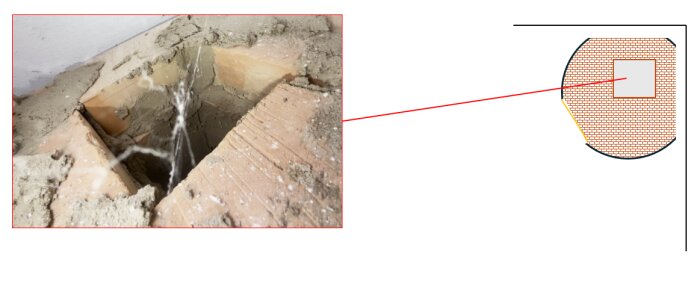
You apply clay mortar between the fitting and the brick that covers it. That's as tight as it gets, so to speak. Tradition says at least 3 inches of brick between the flue channel and the outside and clay mortar on at least one side for tightness. Here's how it looked in 2015 when I had just bricked the connection of the tiled stove. We are looking in through the soot hatch and see the damper to the lower right and the fitting going straight into the chimney stack:
The truth is that all tile stoves leak a little after firing due to the cracks that occur from the heating and cooling cycles. It's part of it, so to speak. But the tradition is that they should be tight before you light them for the first time; this is what is usually tested during the installation inspection.
The stove maker seems moderately interested in completing the job with the connection, unfortunately. As I said, a somewhat peculiar gentleman...
I don't really understand "the chimney connects backward and not upward," is there any good reason for this?
Currently, we have a channel (box) chimney placed directly above our stove, it shouldn't matter, right? We don't have a mortar (just there) since the stove is in a modern extension of the house. It will be a separate chimney.
But placing a "Stos" and then mortaring around it to make it tight, which will then connect to a "chimney kit," sounds like the plan going forward?
I think I understand if it's a traditional stove maker who only makes connections to a mortar, i.e., backward. Connecting upward without a "real" chimney is not "the usual way."
Traditional stoves stand in front of a mortar, with a certain gap, and then the smoke channel goes backward, into the mortar.
It should be noted that often the connection occurs backward at an upward angle. Ideally, one should not have a completely horizontal connection as I built because soot and ash can settle there. Now, this hasn't been a problem in my case (I can say after daily fires since the fall of 2015), but an experienced stove maker would probably wrinkle their nose at my amateurism, I guess.
To allow movement without cracking around a stos, fire-resistant yarn or equivalent is usually used as a seal. However, the chimney sweep should be consulted here as they need to approve the installation before you can start a fire.
I saw that your sheet metal protruded through the wall but missed the part about how it connects to the masonry itself.
Do you build around it so that it's completely "solid" and tight? I'm wondering about how it will be affected by thermal expansion/cracks, etc.
You can have stone wool around the stovepipe. That is, between the stovepipe and the brick or masonry. 1 cm, for example.
But the stovepipe is metal, it can move a little, i.e., bend. And a little "leakage" can be allowed.
An oven 2 m from fire to damper increases about 2 mm in height at 100°C.
I saw that your sheet metal sticks out through the wall but missed the part about how it connects to the actual masonry.
Do you build around it so that it's completely "solid" and tight? I'm wondering about how it will be regarding thermal expansion/cracks etc.
You can have stone wool around the flange. That is, between the Stod and the brick or masonry. 1 cm for example.
But the flange is metal, so it can move a bit, that is, bend. And a little "leakage" can be allowed.
An oven 2 m from fire to damper increases in height by about 2 mm at 100°.
Claes Sörmland said:
It should be mentioned that often the connection is made with a backward angle upwards. You shouldn't really have a completely horizontal connection like I built because soot and ashes deposit there. Now, this hasn't been a problem in my case (I can say after daily use since the fall of 2015), but an experienced masonry stove-maker would probably frown a bit at my amateurism, I guess.
Yes, an upward angle is good. At the same time, you want to get as much hot height as possible. This leads to a high outlet, that is, horizontal.
Thank you for all the advice, tips, and information so far.
So if I try to summarize it a bit:
1. Usually, one connects diagonally upward/backward into the chimney.
In my case, the chimney is missing as the tiled stove is set up freely in a new extension.
Is it then wrong to connect a chimney directly above, vertically out from the house?
2. Sealing between the stove/chimney and consequently going from the rectangular cross-section to a round cross-section is done with a so-called stos (suitable metal construction) which is then covered with clay mortar for sealing and fastening (?).
Here, a piece of stone wool approximately 1cm thick can also be used to seal/level the surface from the masonry.
I read a bit further and became a bit scared/surprised that many seem to recommend dismantling the top part of the stove before interventions like this are made during renovations on older stoves. Will I manage to mount the stos and chimney with the given space I have today?
Attaching an image to try to clarify my summary above
Thank you for all the advice, tips, and information so far.
So if I try to summarize it a bit:
1. Typically, you connect at an upward/backward angle into the chimney.
In my case, the chimney is missing as the tile stove is freely set up in a new extension.
Is it then wrong to connect a chimney directly above, vertically out from the house?
2. Sealing between the tile stove/chimney and thus transitioning from the rectangular cross-section to a round cross-section is done with a so-called stos (suitable sheet metal construction) which is then covered with clay mortar for sealing and fastening (?).
Here, a roughly 1cm thick piece of mineral wool can also be used to seal/even out the surface from the masonry?
I read a little further and am a bit scared/surprised that many seem to recommend dismantling the top portion of the stove before making an intervention like this during renovation on older stoves. Will I be able to install the stos and chimney with the given space I have today?
Attaching an image to try and clarify my summary above
[image]
Now, almost a year later: How did it go? I'm pondering a connection at the top of a tile stove myself, so tips and others' experiences are gratefully welcomed.
The tile stove maker seems moderately interested in completing the job with the connection, unfortunately. As I said, a somewhat special gentleman...
I don't quite understand why "the chimney is connected backward and not upward." Is there a good reason for this?
Currently, we have a channel (box) first chimney that is located directly above our tile stove; shouldn't make a difference, right? We don't have a masonry chimney (right there) since the tile stove is installed in a modern extension of the house. It will be a separate chimney.
But putting a Stos that is then bricked around to make it sealed, which is then to be connected to a "chimney kit," sounds like the plan moving forward?
Traditionally, a chimney has been bricked that stands on ground/rock. Heavy pieces. Then tile stoves must be connected horizontally.
A tile stove never carries the chimney above, but with modern modules, it can be above. But not on. That is, the chimney is supported by something other than the stove.
This way, you can conveniently renovate the stove without the entire chimney coming crashing down.
The installer will know that.
Vi vill skicka notiser för ämnen du bevakar och händelser som berör dig.
")


imported_Benno said:
Old tiled stoves might have the flue built against the chimney, but normally there's a metal coupling as a connection so it can have some movement. The stove maker finishes the job, i.e., connects the stove to the chimney, right?Claes Sörmland said:
hamph1337 said:


