7,674 views ·
21 replies
8k views
21 replies
Installing noggings in floor joists afterwards
Hello
I am in the process of moving a wall in connection with a bathroom renovation where the existing floor will be replaced all the way down to the floor joists, which also need to be lowered somewhat to achieve the same level for the wet room floor and the floor outside.
The existing joists are about 21.5cm in height, 6cm in width. (possibly 22cm but I haven't reached the bottom yet)
The existing walls are on joists in all directions, some over noggings and others over floor joists.
The noggings appear to be measuring 4.5 x 4.5cm. Under the walls, there are joists of approximately the same thickness.
Where the new wall will go, there are neither noggings nor joists. About 1m.
It will be placed between two joists so I need to build a new joist there.
Some of the noggings are nailed through the floor joists from the opposite side of the joist.
Other noggings rest on joists that are nailed along the floor joists.
I need advice on how to create a new joist for the new wall section and tips on how to attach new noggings.
Also suggestions on which dimensions I should use to get a stable floor.
One thought is to place joists on the sides of the floor joists and place a nogging transversely between two joists and on that place a new floor joist for the wall. That would mean three joists in height, which limits the dimension somewhat.
Joist hangers that are screwed in? How stable will that be in this context?
Grateful for answers and tips.
I think that a couple of pictures where you have drawn would be appropriate. At least I have a hard time following the text.
But a general thought. Don't cut anything! Adding nogging or reinforcing with a parallel splice is rarely dangerous. But don't cut anything off to make room for the reinforcements.
But a general thought. Don't cut anything! Adding nogging or reinforcing with a parallel splice is rarely dangerous. But don't cut anything off to make room for the reinforcements.
How will you access to lower the joists? If you're able to lower the joists, can't you also place a new joist just under the new wall?Tååmten said:
Hello
I am in the process of moving a wall in connection with bathroom renovations where the existing floor will be replaced all the way down to the floor joists, which will also be lowered somewhat to achieve the same level on the wet room floor and the floor outside.
The existing joists are about 21.5cm in height, 6cm in width. (possibly 22cm but I haven't reached the bottom yet)
Existing walls are on joists all around, some over noggings and others over floor joists.
The noggings seem to measure 4.5 x 4.5cm. Under the walls, there are joists of roughly the same thickness.
Where the new wall will go, there are neither noggings nor joists. About 1m.
It ends up between two joists, so I need to build up a new joist there.
Some of the noggings are nailed through the floor joists from the opposite side of the joist.
Other noggings rest on joists that are nailed along the floor joists.
I need tips on how to create a new joist for the new wall section and tips on how to attach new noggings.
Also, suggestions on which dimensions I should use to achieve a stable floor.
One thought is to place joists alongside the floor joists and place a nogging crosswise between two joists and on that, lay a new floor joist for the wall. That would result in three joists on height, which limits the dimension somewhat.
Joist hangers that are screwed in? How stable would that be in this context?
Grateful for answers and tips.
Noggings of 4.5x4.5 surely mean minimal for vertical loads and are hardly suitable to place a wall on.
Lowering might be the wrong term, I'm lowering the floor, not the studs. It was the floor installer who gave some tips on how to do it.D Dr Jumping Jack said:
Apparently, you can place the chipboards between the floor studs on studs you attach along the floor studs, but then you need leveling compound, which adds a bit of height, so in the end, you won't lower it much.
The alternative he suggested, which is mentioned in https://www.sakervatten.se/download...B05FC4C2265405C1/Bygg-Badrummet-Ratt-2014.pdf, is to cut the top of the studs so they become 195mm instead of the approximately 220mm they are today.
I'm leaning towards that method, but to ensure the top side is completely even, I will place a stud parallel anyway, making it easier to ensure the floor is completely flat if you happen to lower the beam a bit too much somewhere.
Quite a lot of work to lower the floor by 2.5 cm, but it can be done.Lowering might be the wrong term, I'm lowering the floor, not the joists. The floorer gave some tips on how.
Apparently, you can lay chipboards between the floor joists on joists that you attach alongside the floor joists but then you have to use leveling compound which adds a bit to the height, so in the end, you don't get down much.
The alternative he suggested, which is mentioned in [link], is to cut the tops of the joists so they become 195mm instead of the current approximately 220mm.
I'm leaning towards that method but to ensure the top becomes completely level, I will lay a joist parallel anyway, it will make it easier to ensure the floor becomes completely flat if you happen to take down the beam a little too much somewhere.
Maybe so, but on the other hand, it provides better accessibility to the bathroom with a lower height difference in the floors. And it’s probably easier to take down the beams without needing to be meticulously exact if you solve it with a beam next to it. Just a thought. I'll see when the whole floor is open how much work I can handle, but better to do it well than quickly.D Dr Jumping Jack said:

One must know more about the geometry of the bathroom to seriously discuss your problem. It's obviously an old house. This is evident from the dimensions of the beams, which could be 21/2x9 inches. Always inch measurements in houses before 1970. Generally speaking, the height of floor beams is never reduced. That could only have been suggested by someone without knowledge in structural engineering. There are many alternative solutions, but one must know the conditions first.
Viktor.J said:

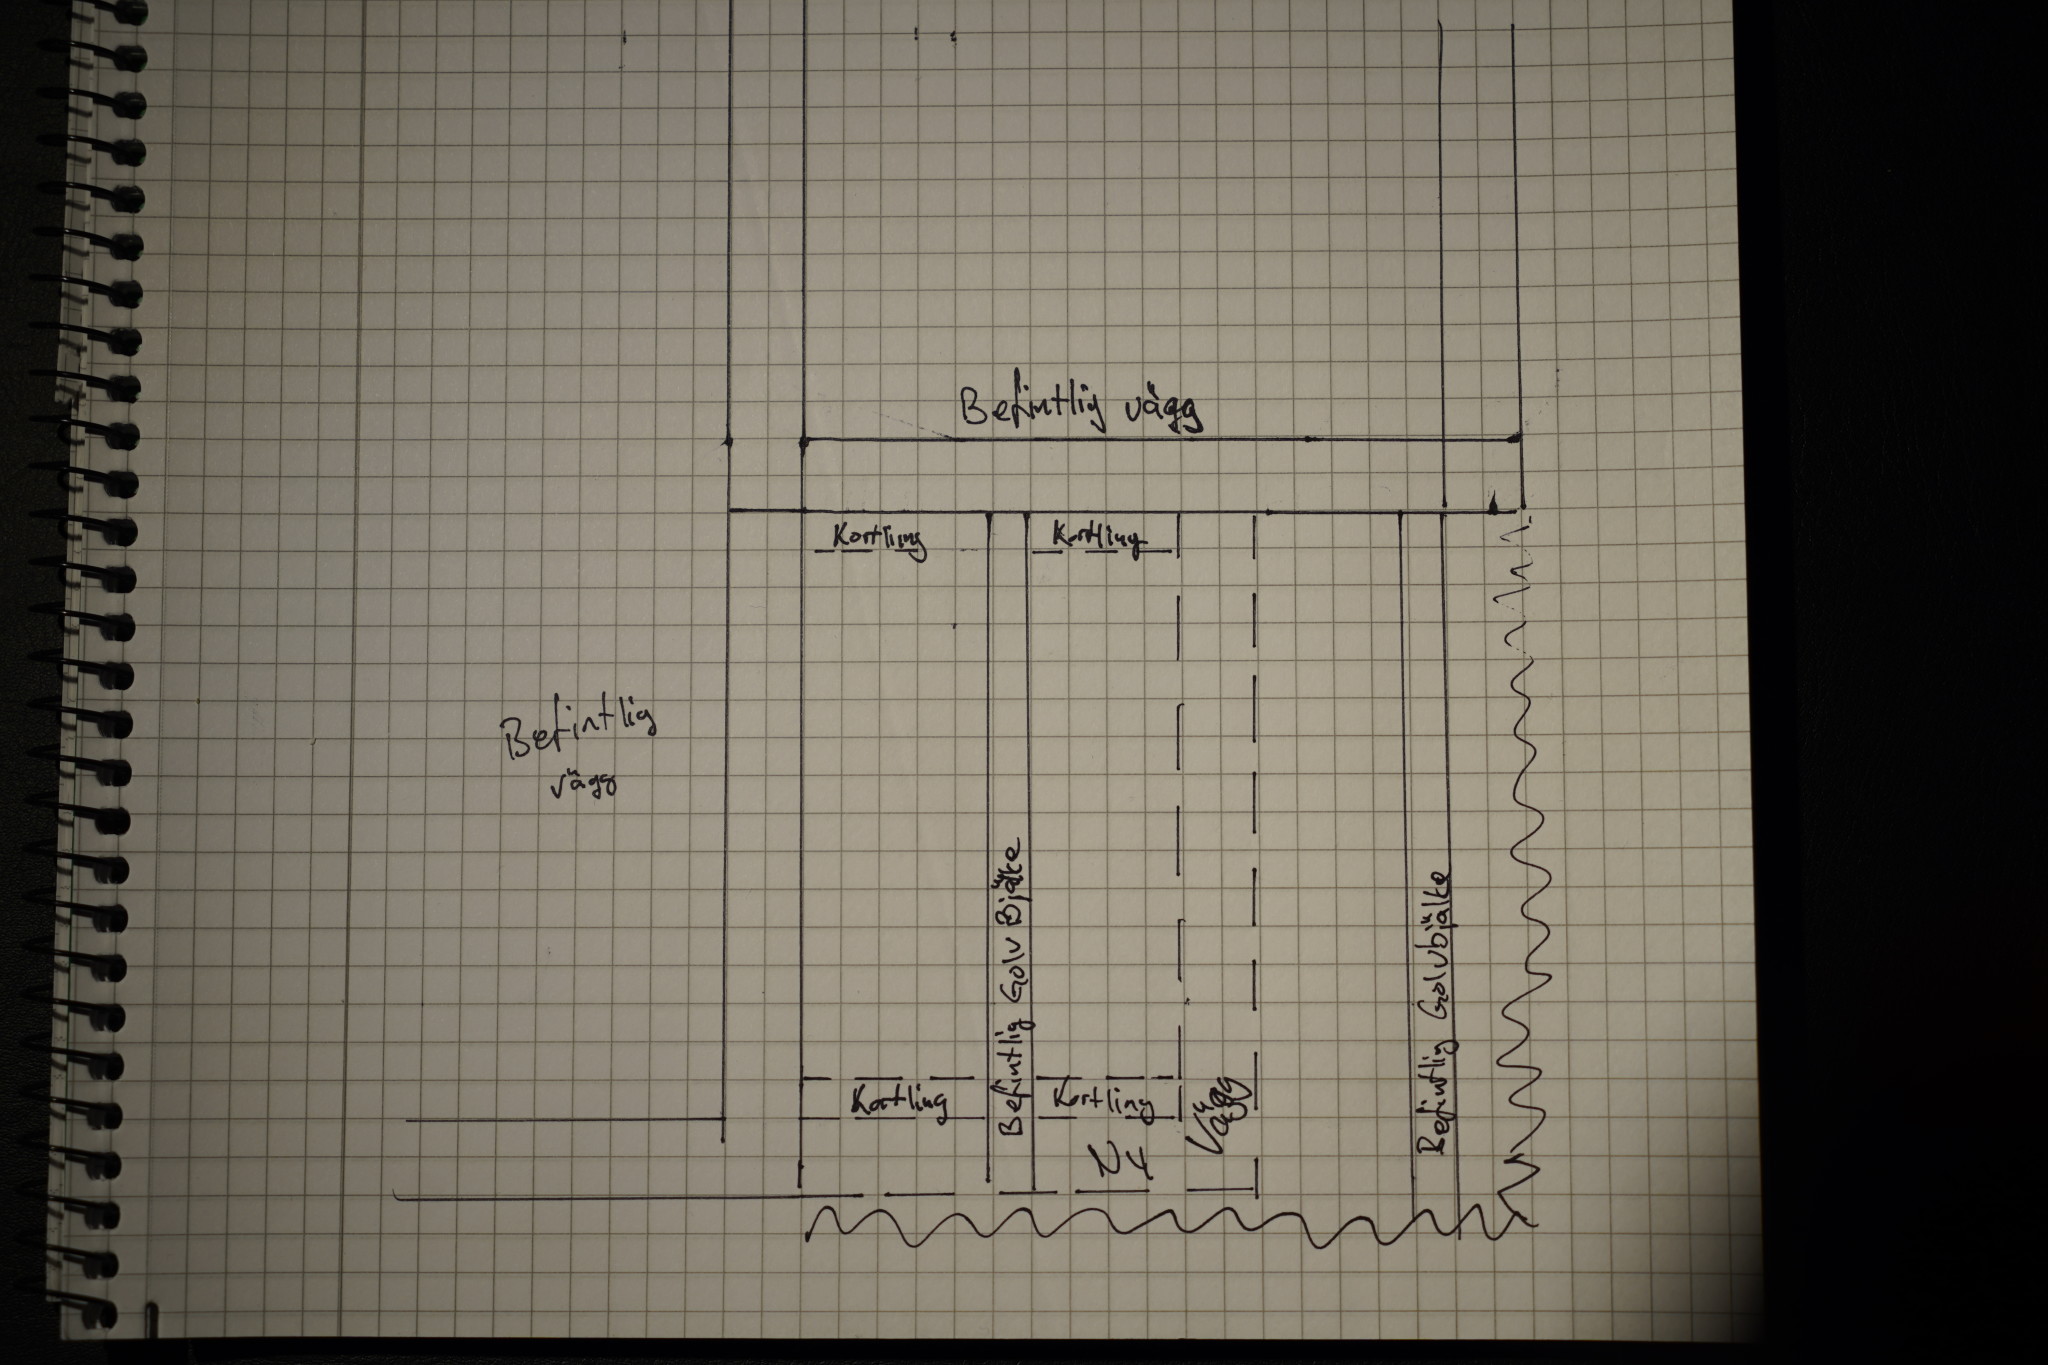
A rough sketch of part of the project, not entirely accurate measurements. The question of how to best attach the braces is more general.
But some explanations for the sketch.
The beams run from top to bottom in the sketch but not under the existing walls. These instead rest on studs that either lie across the floor joists, horizontal wall in the sketch, or across braces between the studs, vertical in the sketch. Additionally, there is no stud at all where the wall is to be placed. The studs under the walls are approximately 45mm high and maybe 90mm wide, difficult to measure as there is flooring on the other side of the walls. The braces are 45x45mm.
Under the new wall that is vertical in the sketch, I need to have a stud that lies on braces and it needs to be stable. I think 45x45 feels a bit flimsy for braces that a wall is going to stand on and also carry the outer edge of the floor.
Where I've written brace in the sketch, there is currently nothing at all but they are needed to support the outer edge of the floor. I will also need to place studs along the vertical, in the sketch, walls to support the floor's outer edge at the wall, but in some places, they will cut across the braces that hold the wall. The technical aspect of that will resolve itself.
Some of the floor joists I can only access from one side, the side where the brace is to sit. One option is to place a stud parallel to and fasten along a floor joist so that you can lay the brace on it, but then you have to go deep into sawdust and glass wool. A joist hanger might work, but there are corners where I can neither reach the far side of the floor joist nor the brace if it is to lie along the wall to support the floor.
So the question was, how do I attach the braces in the best way so they are stable and what dimensions are needed to make it sturdy for braces, studs, floor, and walls?
Hope the question became clearer.
The house was built in '66. The lowering of the floor was suggested by a floor installer, but I had already gotten the idea from Säker Vatten's website and documents where this was suggested. I haven't been able to find any alternative solutions to this, other than laying the floorboards between the joists, which didn't really give much in the end.J justusandersson said:One needs to know more about the bathroom's geometry to seriously discuss your problem. It's obviously an old house. This is evident from the dimensions of the beams, which could be 21/2x9 inches. Always inch measurements in houses before 1970. Generally speaking, you never lower the height of floor joists. That can only have been suggested by someone without knowledge in construction statics. There are many alternative solutions, but one must know the conditions.
I find it hard to believe that Säker Vatten would give amateur advice.
The geometry of the bathroom is quite simple, currently rectangular 2.6x1.6m, and the extension will be about 1x0.5m, so the room will become slightly L-shaped. See the sketch I uploaded.
But again,
The question was not how to lower the floor, but how to attach the noggings and what dimensions I should use for the joists, noggings, etc.
The house was built in '66. The leveling of the floor was suggested by a flooring installer, but I had already gotten the idea from the Säker Vatten website and documents where this was suggested. I haven't been able to find any alternative solutions to this except for laying the floorboards between joists, which didn't result in much in the end. I find it hard to believe that Säker Vatten would give bad advice. The geometry of the bathroom is quite simple, currently rectangular at 2.6x1.6m, and the extension will be about 1x0.5m, making the room a bit L-shaped. See the sketch I uploaded. But again, The question wasn't how to lower the floor but how to attach the noggings and what dimensions I should use for joists, noggings, etc.
The new wall you place on noggings 195x4.5 which you attach to existing joists with joist hangers.[bild]
A rough sketch of part of the project, not entirely accurate measurements. However, the question of how best to attach the noggings is more general.
But a few explanations for the sketch. The beams go from top to bottom in the sketch but not under the existing walls. These stand instead on joists that either lie across the floor joists, horizontal wall in the sketch, or across noggings between the joists, vertical in the sketch. There is also no joist at all where the wall is supposed to be. The joists under the walls are about 45mm high and perhaps 90mm wide, hard to measure as there is flooring on the other side of the walls. The noggings are 45x45mm.
Under the new wall that is vertical in the sketch, I must have a joist that lies on noggings and it needs to be stable. I think 45x45 feels a bit flimsy for noggings that will hold a wall and also support the outer edge of the floor.
Where I have written nogging in the sketch, there is currently nothing at all, but they are needed to support the floor's outer edge. I will also need to place joists along the vertical, in the sketch, walls to support the floor's outer edge by the wall, but in some places, it will intersect the noggings that hold the wall. The technical aspect there will resolve itself.
Some of the floor joists can only be accessed from one side, where the nogging will sit. One option is to place a joist parallel to and attached along a floor joist so you can lay the nogging on this, but then you have to go deep into sawdust or fiberglass. A joist hanger might work, but there are corners where I can't reach the far side of the floor joist or the nogging if it is to run along the wall to support the floor.
So the question was, how do I best attach the noggings so they are stable, and what dimensions are needed to make it steady for noggings, joists, floors, and walls?
Hope the question became clearer.
Thank you,D Dr Jumping Jack said:
The challenge will be attaching some of the joist hangers where the noggin blocks access to the other side of it
") . I'll figure it out.
. I'll figure it out.With that dimension, the joist hanger is probably the only option.
Lowering the height by recessing the subfloor so that it aligns with the floor joists is OK, but planing down the joists in height is not. You must always start from the span and c/c distance of the floor joists. The joist dimensions were quite substantial, so if the span isn't too large, there shouldn't be any problems. New walls resting on noggins also affect deflection, which needs to be considered. A 45x95 noggin with a span of only 600 mm bends 1.5 mm under a load of 1000 kg. So, no heavy dimensions are required. However, the noggin will transfer the load to two floor joists, which might be more affected. The whole picture must be considered.
There are ways to reinforce floor joists that don't involve height. There are also alternatives to chipboard with higher stiffness (and lower height). Säker vatten cannot be relied upon 100%. The advice is designed by tile sellers who do not always present the basis for their suggestions.
There are ways to reinforce floor joists that don't involve height. There are also alternatives to chipboard with higher stiffness (and lower height). Säker vatten cannot be relied upon 100%. The advice is designed by tile sellers who do not always present the basis for their suggestions.
I don't know if the floor can support a wall without support underneath. And then there's the question of having a lower floor in the bathroom, which would give me different levels on the floor under the wall or a joint, without support. Better to make sure there's support under the wall.raveper said:
Now I'm not really following.J justusandersson said:Lowering the height by embedding the subfloor so it aligns with the floor joists is OK, planing down the joists in height is not. You must always start from the span and center-to-center distance of the floor joists. Those were quite substantial joist dimensions, so if the span is not too large there should not be any problems. New walls resting on noggings also affect deflection, you must consider that. A 45x95 nogging with a span of only 600 mm deflects 1.5 mm under a load of 1000 kg. So it doesn't require thick dimensions. However, the nogging will transfer the load to two floor joists that may be affected more. You have to look at the whole picture.
There are ways to reinforce floor joists that don't add to the height. There are also alternatives to chipboard with higher stiffness (and lower height). You can't rely on Säker Vatten 100%. The advice is crafted by tile sellers who don't always disclose the basis for their suggestions.
All the info about laying the floor between the joists says that I must reinforce the floor with a 13mm reinforced mass of some kind. This lowers the floor by 22mm but builds up 13mm. Not much gain when the goal is to align the wet room floor with the floor outside.
Even GVK mentions lowering the studs to 195mm but says load calculation must be present. The idea is also to attach a stud parallel to the existing one and screw-glue these to the existing stud. Shouldn't that reinforce the floor more than enough?
What alternative methods are there otherwise?