
12,659 views ·
43 replies
13k views
43 replies
How to pour a small footing for a low wall?



We work on the wall a little every day, today we had to knock out 7-8 stones from the bottom layer as we thought they were hanging down a bit too much (3 cm). The alternative would have been to use fix instead of gluing the next layer, but we found that it wouldn't look good at all.

It's not very visible in the photo, but in reality, it is quite noticeable.
You have to say that the fix adheres well! Took a hefty sledgehammer and hit the stone from the back, but they didn't move at all. Had to bring out the hammer drill and chip away some fix, then the sledgehammer could do its job. Luckily, the fix remained on the ledge.
The reason we wanted the fix to stay was because we had already built up quite a lot with fix, so building up almost double would be very tedious.
Yes, one should probably cast instead here, but that's not how it turned out.
We mixed the new fix very thick so that it could be shaped without flowing out too much when the stone was in place.
This time we used mason's line and a straightedge (3m) to get it straight, and now we are satisfied with the section Just need to go out and adjust it a little in an hour as the stones tend to tip forward (front-heavy).
The photos are from a couple of days ago.

http://i.imgur.com/gsw3hr9.jpg

http://i.imgur.com/GEuiAn5.jpg

http://i.imgur.com/t3uxpzv.jpg

http://i.imgur.com/gMTo6J5.jpg

http://i.imgur.com/3WalXLq.jpg
We haven't even considered that it might smear or that the fix might be the wrong color, but you're probably right We won't paint the ledge, it just means more work as you often have to maintain it.
It's not very visible in the photo, but in reality, it is quite noticeable.
You have to say that the fix adheres well! Took a hefty sledgehammer and hit the stone from the back, but they didn't move at all. Had to bring out the hammer drill and chip away some fix, then the sledgehammer could do its job. Luckily, the fix remained on the ledge.
The reason we wanted the fix to stay was because we had already built up quite a lot with fix, so building up almost double would be very tedious.
Yes, one should probably cast instead here, but that's not how it turned out.
We mixed the new fix very thick so that it could be shaped without flowing out too much when the stone was in place.
This time we used mason's line and a straightedge (3m) to get it straight, and now we are satisfied with the section
Just need to go out and adjust it a little in an hour as the stones tend to tip forward (front-heavy).The photos are from a couple of days ago.
http://i.imgur.com/gsw3hr9.jpg
http://i.imgur.com/GEuiAn5.jpg
http://i.imgur.com/t3uxpzv.jpg
http://i.imgur.com/gMTo6J5.jpg
http://i.imgur.com/3WalXLq.jpg
We haven't even considered that it might smear or that the fix might be the wrong color, but you're probably right
We won't paint the ledge, it just means more work as you often have to maintain it.
Then the wall is nearly finished, just the top stone and possibly some lighting missing.
It became much straighter when using mason's string and a 3m spirit level.

http://i.imgur.com/Ltcfy0q.jpg

http://i.imgur.com/ZOK9rTP.jpg
The pillars are also in place now. Unfortunately, the border stones were everything but straight, so we had to go by feel and use a level to make it acceptable.

http://i.imgur.com/2OaL5eq.jpg
http://i.imgur.com/2OaL5eq.jpg

http://i.imgur.com/Btc4Qk9.jpg
After some adjustments, we got fairly large joints on the pillars, this is intended to be fixed with adhesive or soft joint(have another thread about this).

http://i.imgur.com/CceGvHC.jpg
It became much straighter when using mason's string and a 3m spirit level.
http://i.imgur.com/Ltcfy0q.jpg
http://i.imgur.com/ZOK9rTP.jpg
The pillars are also in place now. Unfortunately, the border stones were everything but straight, so we had to go by feel and use a level to make it acceptable.
http://i.imgur.com/2OaL5eq.jpg
http://i.imgur.com/2OaL5eq.jpg
http://i.imgur.com/Btc4Qk9.jpg
After some adjustments, we got fairly large joints on the pillars, this is intended to be fixed with adhesive or soft joint(have another thread about this).
http://i.imgur.com/CceGvHC.jpg
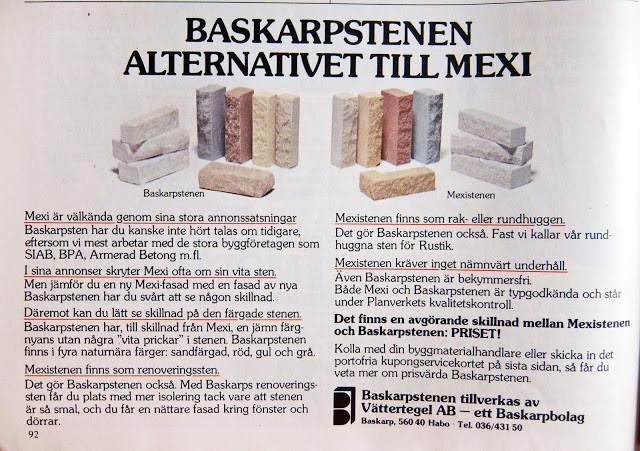
It could be that you also have Mexi, but it looks like Baskarp. Mexin does have some white specks in it, and Baskarp is more fine-grained. It's been a long time since I did any masonry on facades with this, but I remember that the rounded one was often Baskarp.
Now after about 8 months, we have noticed 2 cracks in the wall. The question is whether this is standard or if we made a mistake in the construction?
This is how one of the cracks looks:

https://i.imgur.com/C0xKl23.jpg
We know that the plinth consists of a cast part on which hollow blocks have been placed. I don't know how the foundation is cast, if there is any reinforcement in it, but if not, I suspect it could be a problem? It is very possible that the foundation was never intended to carry anything heavy.
Topstone is planned for the spring when we will also clean the stone.
This is how one of the cracks looks:
https://i.imgur.com/C0xKl23.jpg
We know that the plinth consists of a cast part on which hollow blocks have been placed. I don't know how the foundation is cast, if there is any reinforcement in it, but if not, I suspect it could be a problem? It is very possible that the foundation was never intended to carry anything heavy.
Topstone is planned for the spring when we will also clean the stone.
Click here to reply