Hello
I have a split-level house with a double garage. Now I plan to build a carport that will also function as a terrace.
The dimensions are about 6x6 m and the height about 2.60. How should I dimension it? Are the dimensions on the sketches overkill, or is something more heavy-duty needed? Am I on the right track with the construction, or are there better/cheaper ways to do it?
The posts will be attached to ground anchors (not Jula's, but real ground anchors).
The dimensions look "normal" but the ratio between the dimensions of the beams and girders feels a bit off.
In any case, use C24 for the girders even if you can justify it with C14.
Is all horizontal stabilization taken care of by the garage via the deck planks? Have you solved the attachment here?
Other attachments? There will be quite a few connectors if you go that route.
Ground anchors? Do you mean the type used for fence posts and similar?
It's mainly vertical load you get from the pillars, so you need surface contact with the ground, not strength against overturning.
I plan to attach the floor joists to a sill with joist hangers. The sill, in turn, I will fasten with an expander against the concrete wall. To further stiffen the construction, I'm thinking of placing braces diagonally on the underside to brace the construction laterally. I read about it earlier today. Other fastenings will be with angle irons and flat bars/nail plates.
Is C24 the same as K24?
By ground anchors, I mean the real stuff. I talked to a contractor who was draining the neighbor's foundation, and he recommended ground anchors. Apparently, they are considerably better than plinths. Read more here:
I'm working on almost exactly the same thing as you.
I am building a double carport measuring 7.5x6.5 m (outer dimensions) with a terrace above, but it's not attached to the main house.
So far, I have excavated the slope, built a new driveway, cast the base, and built the walls.
I am using 2 laminated wood beams with dimensions of 140x270, with pillars of 140x140.
I used Moelven's beam calculation program and went high with snow load, etc.
The supporting beams above are 45x220, C24.
The ground anchors discussed are good stuff; up here in Östersund, they cost about 2000 SEK each, the last time I checked.
If you have other construction questions or anything else, you can PM me, and I also have plenty of pictures of how we've solved everything so far.
Thanks for the input Bystrom, I don't mind PM but prefer to keep the discussion here in the threads so that others in the same situation can also benefit from the reasoning. Hope that's okay?
I assume you have three pillars per beam if you have those spans? Is it 7.5 m wide and 6.5 m deep? What span do you get for 45x220 C24? How have you constructed the roof to make it watertight? Please post pictures if you can. Excited to see how you've done it.
2000 kr per jordankare....then that's totally out for me. This will probably be expensive anyway. Then I'll cast plinths.
Of course, it's perfectly fine to keep it in the thread.
As I said, I haven't gotten very far yet, we laid gravel up to the finished level yesterday, so the photo here is from the premiere/test parking last night.
Just to make sure the size really sufficed.
You can see the shoe for the post in the middle, a 140x140 pillar will stand there.
Yes, 7.5m wide and 6.5m deep, outer dimensions - so the inner dimensions will be 6.9 x6.2, with paneling and everything.
220cm up to the beam, which will be the lowest point, and asphalt will be laid inside the carport too.
The roof beams will be spliced over the glue-laminated beam and the span will then be around 3.2m.
Considering that the roofing felt I intend to use - Trebolit Glaciär3 - was only available in 70cm width, the roof beams are spaced at 50cc, I had otherwise thought of 65cc, but... that's how it will be.
What span I could have had if I fully utilized the lumber, I don't know, but I am far on the safe side at least.
I'm having a bit of trouble explaining the roof construction, but the principle is based on laying raw tongue-and-groove boards across the roof beams, with slope.
I will build slopes backward and forward, with a gutter at the front and a gutter + good drainage at the back.
I should then achieve a slope of around 4-5 degrees in both directions, which is adequate since the roofing felt holds down to a 3-degree slope.
Inserting a quick Paint sketch...
If you imagine seeing a roof beam from the side, where the reddish-brown is a glued/screwed strip, and the green is raw tongue-and-groove board laid across.
The black then is the roofing felt.
The felt is laid in whole strips from "ridge" to foot, with a fold up of just over 5cm up on the roof beam.
Then you lay felt over the roof beam down into the angle of the tongue-and-groove/roof beam, completely overlapping the fold.
Drip edge at the end of the gutter, into a gutter.
Done.
Then I lay decking over the whole thing and get myself a wonderful terrace of 48 sqm.
I'm planning a terrace on top of an existing extension of 8x4m but am still looking for answers on how the fastening or connection between the roofing and the terrace should be done without damaging the waterproofing. It would be interesting to hear how you plan it in your projects.
I am planning a terrace on top of an existing extension of 8x4m but I'm still looking for answers on how the attachment or connection between the roof covering and the terrace should be made without damaging the waterproofing layer. It would be interesting to hear how you plan it in your projects.
Ahaa, you're wondering how to attach, as in my case - the decking so as not to puncture the roof's waterproofing layer?
I honestly haven't thought too hard about it, I see two, possibly three, alternatives.
Alternative 1 is to lay the floor floating, kind of like those ready-made deck tiles in 30x30 you can buy here and there - but on a slightly larger scale, say 200x200?
It also facilitates roof maintenance since you can remove the floor relatively easily.
As long as it's not stormy then...you might end up with a flying floor tile!?
Alternative 2 is to use a "sacrificial board", or whatever you should call it.
You'd screw a board into the roof - puncture the waterproofing layer there - and then cover that plank, which you then attach the floor to.
In this way, you "sacrifice" that plank first, which in the long run feels like a less smart idea.
Alternative 3 is to attach the decking right into the roof and hope that not much moisture seeps through.
In my case, I don't have any insulation underneath; the beams/boards are bare, possibly allowing enough moisture transfer downwards without rot damage.
But if you're going to insulate and so on...then it's probably a bit worse.
Then alternative 1 is probably preferable.
What I (completely amateurishly) wonder when I see the sketch in the first post is how you stabilize it sideways. If I understand the drawing correctly, you drive in from the front, that front can collapse if you don't stabilize it sideways in some way.
I think the whole thing should be attached to the house?
I assumed that was the case anyway.
That, combined with stable posts at the front, should provide sufficient stability even laterally?
Hello
Just as bystrom mentions, everything should be attached to the house with expanders (concrete). That, together with diagonal braces on the underside of the terrace floor, should hold it laterally.
You see such carport constructions everywhere, I think. Sometimes even double carports with a really strong glulam beam and only two pillars.
As for the tightness, I will probably put sheets and gutters on the underside. It's way too tricky to start with tongue and groove, tar paper, and then build a new construction on top.
Yes, okay, so you're making sure that the roof becomes quite torsionally stiff, and since it's attached to the house, it shouldn't be able to twist. Sounds sensible.
I thought of this because a neighbor of a relative rebuilt his garage with a storage section in the back. He made a large opening in the wall to essentially merge the garage and storage into one room. Due to the large opening in the back wall, he lost lateral stability, and the garage blew over in an autumn storm. It probably didn't help the situation that he was also working on the roof, so all the concrete tiles were temporarily stacked on one side of the garage roof.
Thank you _bystrom_ for your ideas. Since I'm building the terrace on top of an insulated living room (albeit in the countryside but still), I want to ensure that it remains watertight for a long time.
I like the idea of 2x2 "decking," but since I want it to be a "permanent" installation and I have a slope underneath, I'm not sure it meets my requirements.
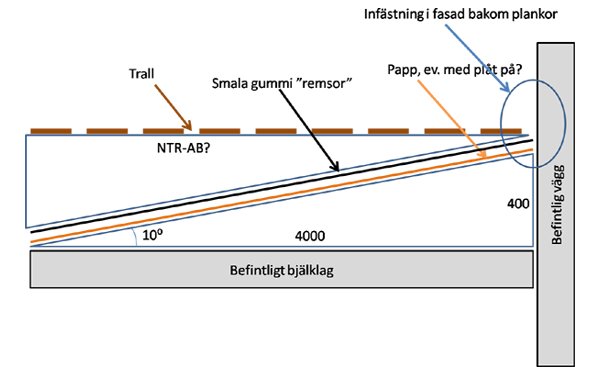
Right now, it seems a bit like "mission impossible," but it should be possible somehow. I read in various threads about smaller projects where treated joists rested directly on felt/metal with rubber strips in between. Tried to illustrate what I mean in an image that I hope is included here:
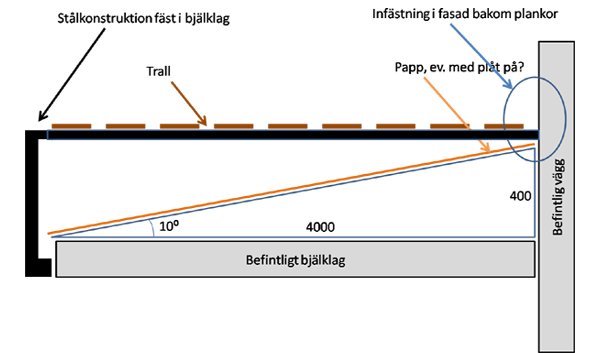
Another idea I have is to let the entire terrace "float" on a steel construction like in this picture, but then I don't know what to do with the drainage. It should be noted that this is about 5-6 meters up.
jeppeknaster - I hope you don't mind me "hijacking" your thread. If I should post this as a new thread, just let me know.
If I choose to use steel in the construction, how do I anchor the pillars to the ground? Is it possible to rust-proof and bury them and then cast over? The ground consists of sand and some small stones.
Vi vill skicka notiser för ämnen du bevakar och händelser som berör dig.


")