Trying to understand the construction with the eaves/overhang with the rafters.
Do you always place the sheathing over the visible panel under the eaves? How do you attach the zigzagging? Screws from above?
In the houses I've worked on (including my own), it is the "planking" you see... then you can also have wood shingles as an underlay instead... with only this panel where the overhang is visible.
In the houses I've worked on (including my own), it is the "råspont" you see.. then you can also have "stickespån" as an underroof instead.. with just this panel where the eaves are visible.
Interesting! Even if you get support in the rafters on the gable, with the help of the underlying truss, how do you get support in the corners? And how do you lay the rest of the "slätspont"? There's nothing to screw diagonally into if you do it with one layer?
Many questions! Please tell me how it's done I can't find any descriptions anywhere..
Stickspån, is it even allowed in new construction? Does the shingle facilitate this detail?
Thank you!
On the houses I've worked with (including my own), it's the "råspont" you see.. then you might also have shingles as an underroof instead.. with just this panel where the projection is visible.
I think I actually understand now
How large a notch did you make in the beam on the gable for the rafters? Or what dimension did the rafters have where the load lands? I think you understand what I mean.
Did you make the gable load-bearing or did you have a truss against it?
It might have been a story or I might have confused it with this post, here on the forum
[link]
Thanks again! I've looked at this one before, and here he lays raw spruce on top of the fine planks, and laths up on the trusses for raw spruce. I don't know how many ways there are to perform this, there are no descriptions anywhere on the big web.
The classic method is to let the beams (a longer type of claws) extend to the outermost roof truss, which is one truss distance from the gable. Five-inch nails are driven through the truss into the end grain of the beams. The beam lies on the gable wall, and because the inner end is nailed about a meter further in, it cannot tip outward.
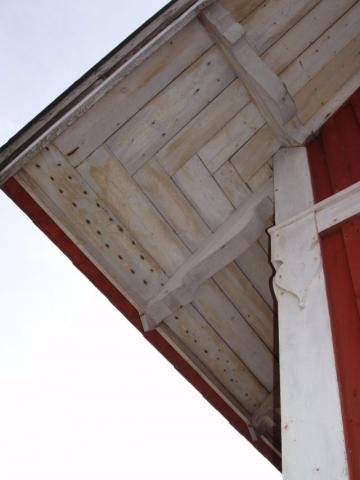
What looks like the outermost truss and is in line with the gable is also a beam. Usually, a beam is placed in the corner that slants out to the meeting between the gable and the long side's roof edge, but in your image, two beams have been notched half and half to cross each other, with one attached on top of the long side's wall plate with the end nailed to the outermost truss, and the other resting on the gable wall with the end nailed to the next-to-bottom claw on the gable.
Then the boards are nailed on top. From top to bottom on the gable and longitudinally on the long side. Board ends meet either in a zigzag pattern in the image without further attachments or mitered at 45 degrees and nailed on top of a single diagonal beam. Inside the walls, boards are normally laid horizontally nowadays, but in older houses, the boards may run from ridge pole to wall plate, with ends sitting in a rabbet cut into the wall plate.
If you want an underlayment, you can let it end flush with the outside of the outer wall. If you have a well-made sheet metal roof, no underlayment is needed if the boards are laid tightly enough to prevent the moist air from below from meeting any cold metal surface, and the little condensation that does occur is absorbed by the boards and evaporates on the next sunny day.
It is completely unnecessary to board with tongue and groove. It is only under paper roofs that the tongue and groove are needed. Otherwise, regular sawn 7/8" boards work well for rafter spacing up to 90cm center-to-center, and one-inch boards up to 120cm center-to-center.
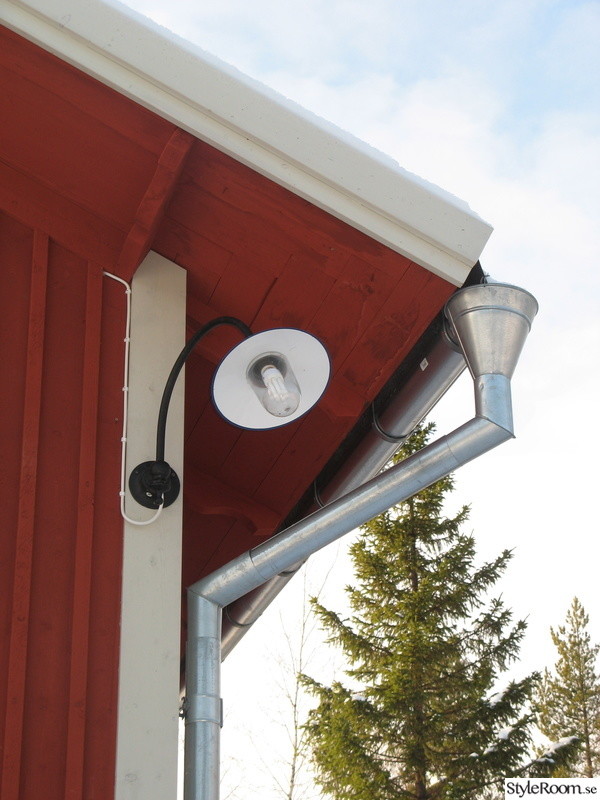
I notice that you are stuck in modern thinking, where one imagines that everything visible and neat must be cladding made afterward. It doesn't have to be so. Here we're talking about actual visible constructions. You can even see that the nails holding the metal to the boards have come through. The metal lies directly on the boards without complications.
Note that the fascia board (ridge board) on the long side traditionally should be vertical, which I claim is the only correct way. It is much easier to install the gutters and get a good slope on them when the fascia board is vertical.
There is no problem making those decorations directly on the rafter ends on the long sides. Just a little work with a hand saw and ax. It might even be done with a strong jigsaw.
Last edited:
Click here to reply
Vi vill skicka notiser för ämnen du bevakar och händelser som berör dig.


Mazen said:
") I can't find any descriptions anywhere..
I can't find any descriptions anywhere..
richardtenggren said: