In the floor structure of hjältevadshus, there are Masonite beams I beams.
Those of you who have rerouted plumbing and water on the upper floor, how have you reinforced the floor structure after drilling holes in the beams? I can't quite figure out what the industry standard is.
Waiting eagerly for some answers and especially hoping that Justusandersson has a good response.
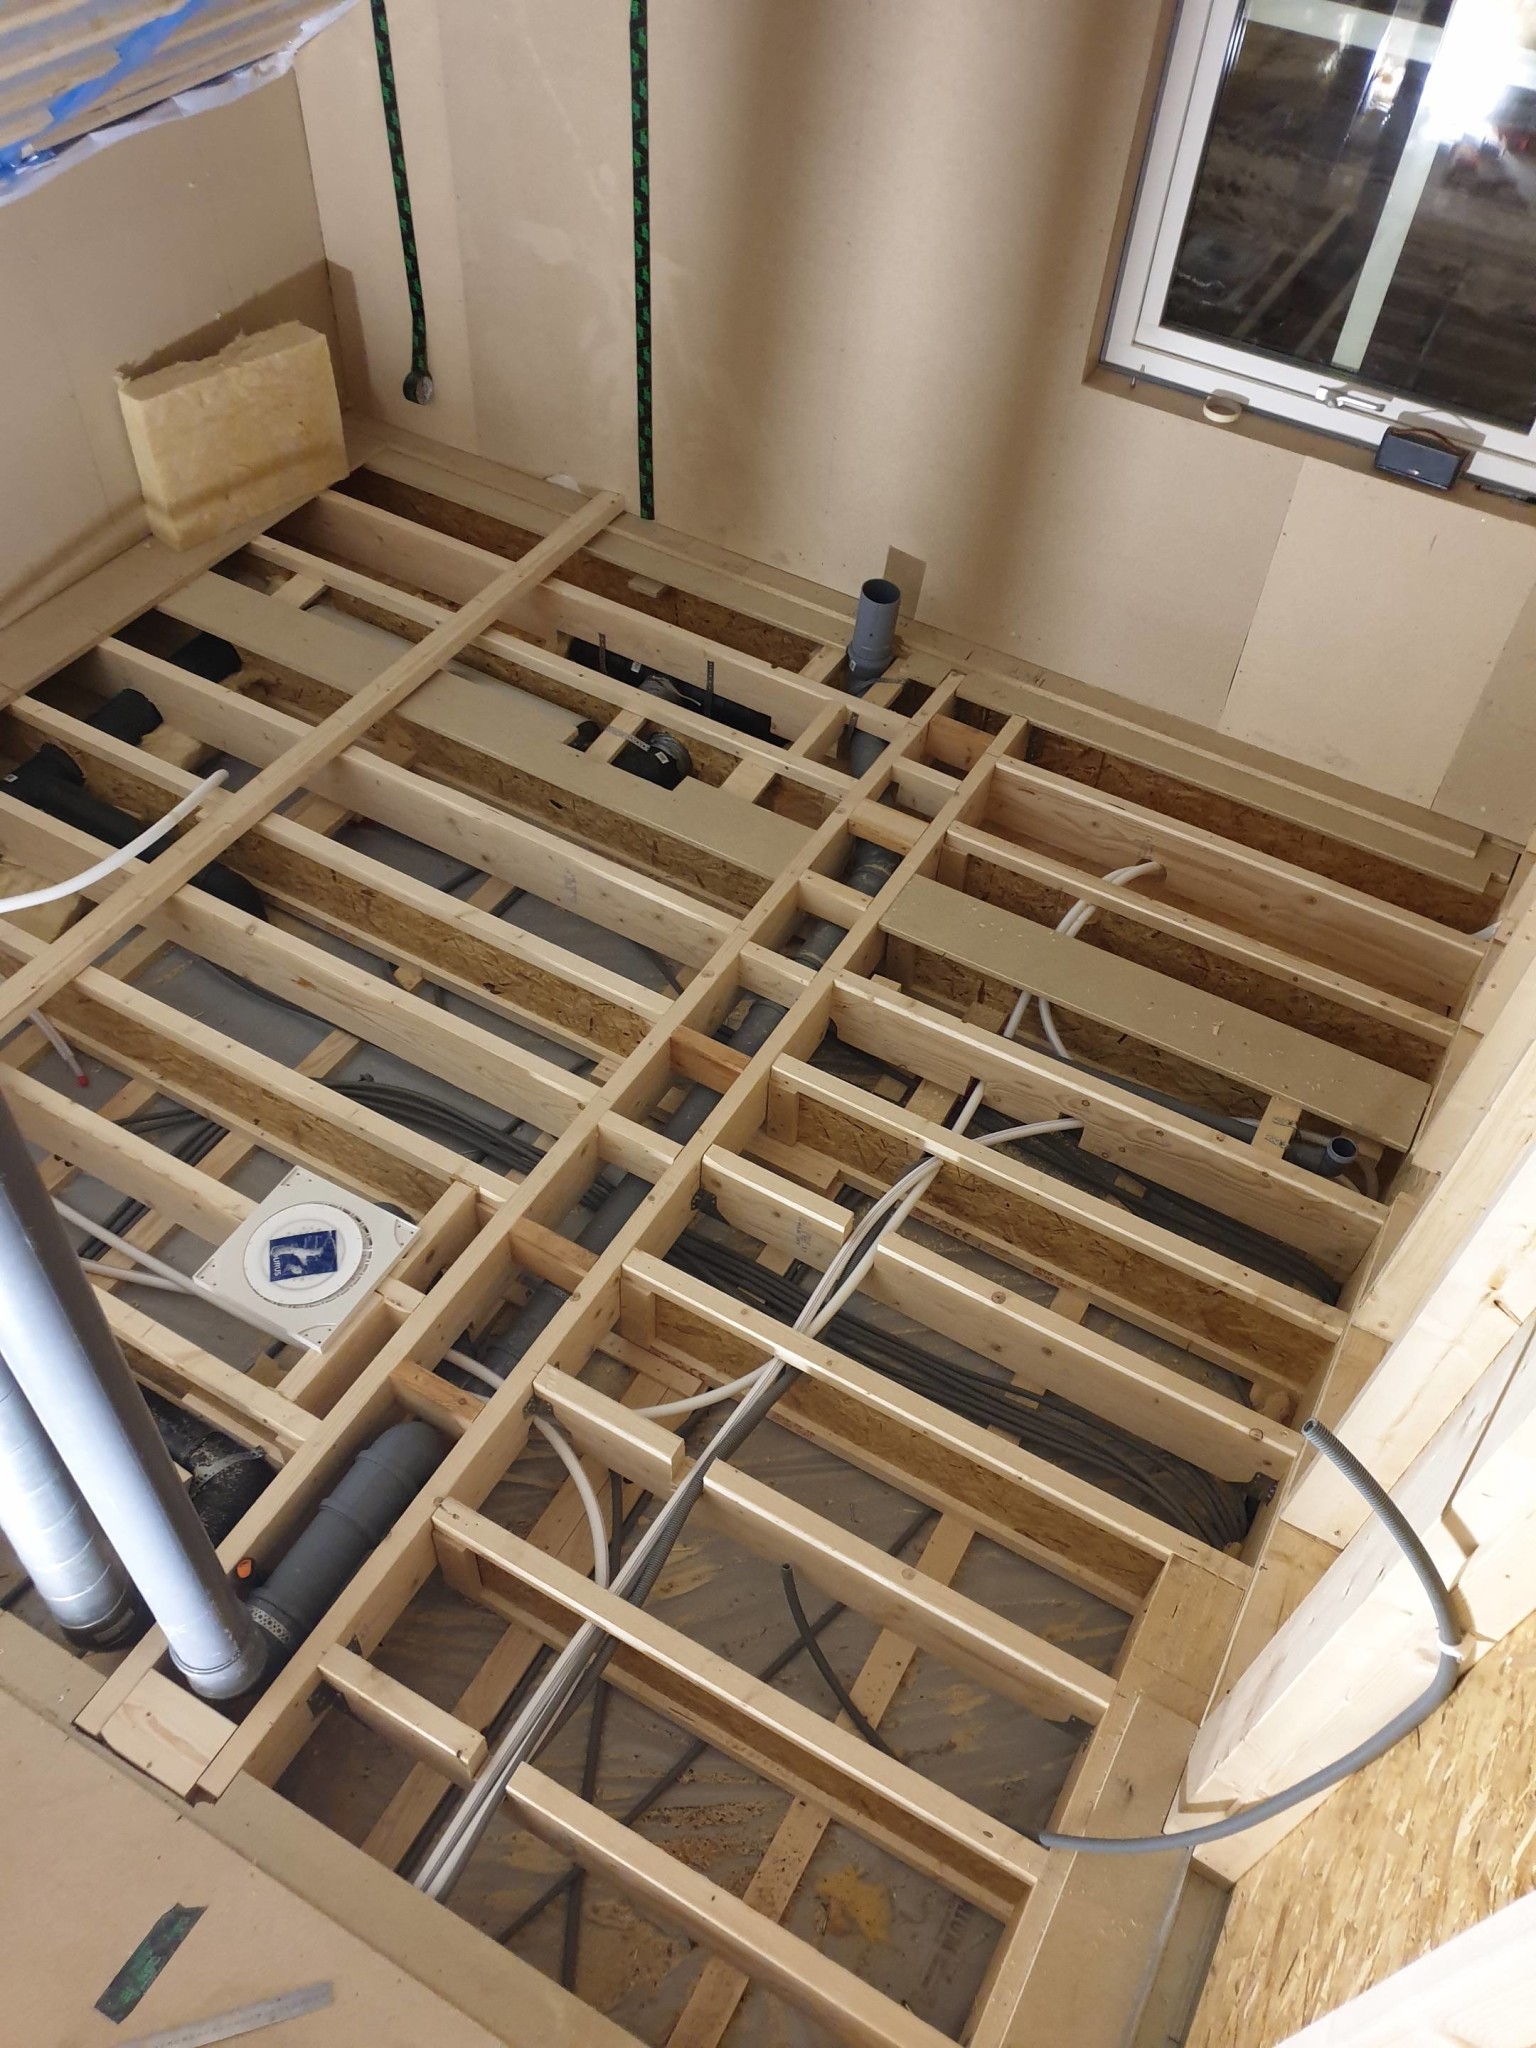
Better a late reply than never. We started building our upper floor in our Hjältevadshus Sol 170 last winter (similar to Spira 175, which is their most popular model). We reinforced the joists with 45x195 beams, placed them at 45 cm centers, and put blocks in between. It all depends on what kind of flooring you plan to have in the upcoming bathroom and also if you plan to have a larger bathtub, etc. I've read somewhere that the existing joists are not designed for anything other than a small bathtub of 200-300 L. With a larger triangle bathtub/corner bathtub, it adds a lot of weight, and with tiles, there are higher demands for rigidity in the floor. It's also possible to cast the floor with EPS cement, but that only improves the torsional stiffness and not the load-bearing capacity of the floor.
Attached is a picture of the joists in the bathroom.
Better a late reply than never. We started building our upper floor in our Hjältevadshus Sol 170 this winter (similar to Spira 175 which is their most popular model). We reinforced the joists with 45x195 beams, placed them 45 cm apart, and cross-braced between them. It entirely depends on what kind of flooring you plan for the future bathroom as well as if you plan to have a larger bathtub, etc. I read somewhere that the existing joists are not designed for anything other than a small bathtub of 200-300 L. With a larger triangle/corner bathtub, the weight is significant, and with tiles, there are higher requirements for the floor's stiffness. The floor can also be cast with EPS cement, but that only improves torsional stiffness and not the load-bearing capacity.
Attached is a picture of the bathroom joists.
I would dare to say that there will be quite good cooperation between EPS and beams when masonite beams are used (due to the wider flange compared to the web) and that it provides a significant addition to bending stiffness as well. Now you've managed to construct joists that look very good anyway!
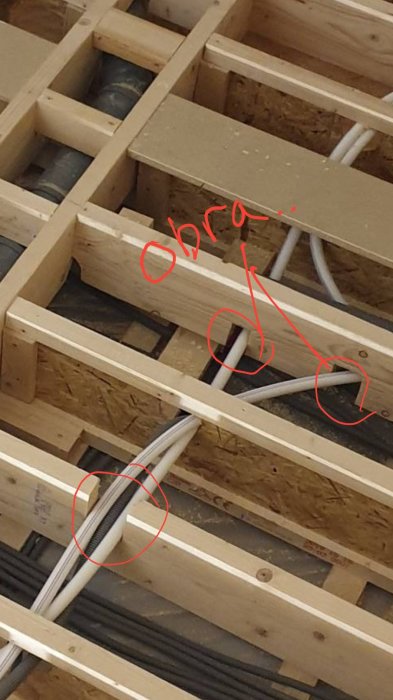
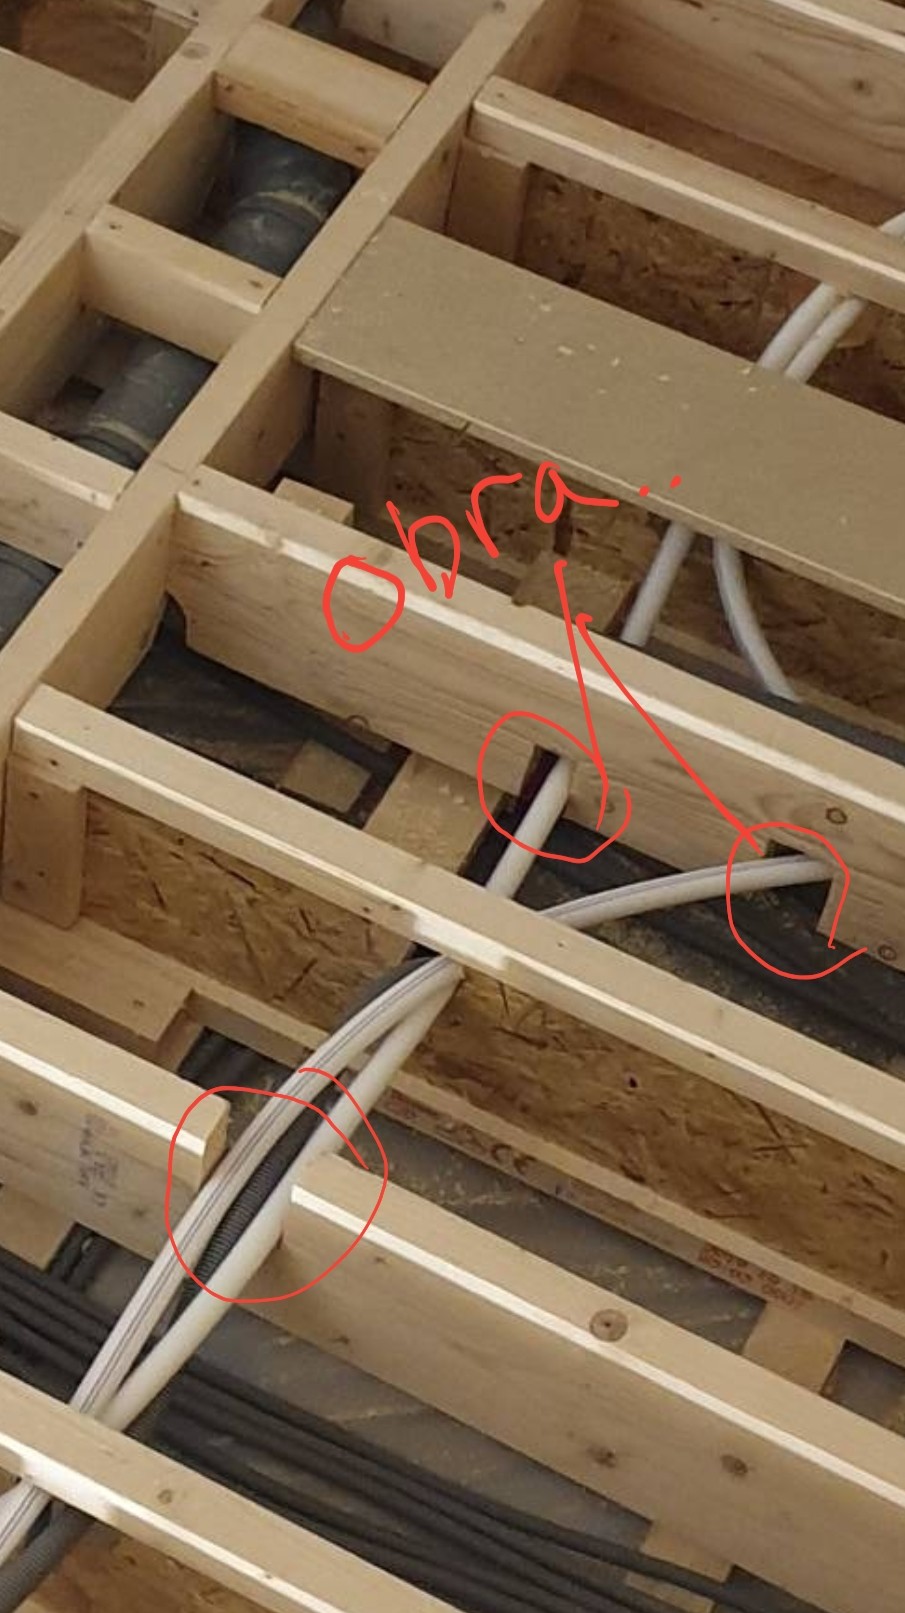
The notching of the studs there wasn't great in terms of strength. It's much better to cut the holes in the middle so that the top and bottom can remain intact
I apologize for not observing the original poster's request for my services. Generally, deflection problems in joists are solved by using stiffer (= usually higher) joists and load problems by reducing the c/c distance between the joists. Since masonite beams are often used to achieve higher stiffness than regular structural timber (and greater spans), I suspect you do not have a deflection problem. The c/c distance you need must be calculated as it depends on the type and dimension of the beam, span, and load.
Notching the studs like that wasn't the best in terms of strength. It's much better to cut the holes in the middle so you keep the top and underside intact
[image]
Unfortunately, it was the only solution we saw to avoid cutting the water pipes to the radiators and making joints in the floor. That's also why we used 195 studs. Anyway, the floor became much sturdier. My personal opinion is that these masonite beams are of poor quality. It was quite wobbly before.. If you want both belt and suspenders, you can both reinforce the joists and EPS-cast
Have been working with this for a few years, something that stiffens this up is to take a plyfa strip that you glue and nail (screw) on each side over the notched beam.
This stiffens the beam enormously while securing the pipes, drainage, or whatever you have placed there.
Strange that I missed all the replies in this thread until today. Those of you who disconnected from above and glued with screws, did you also add extra beams?
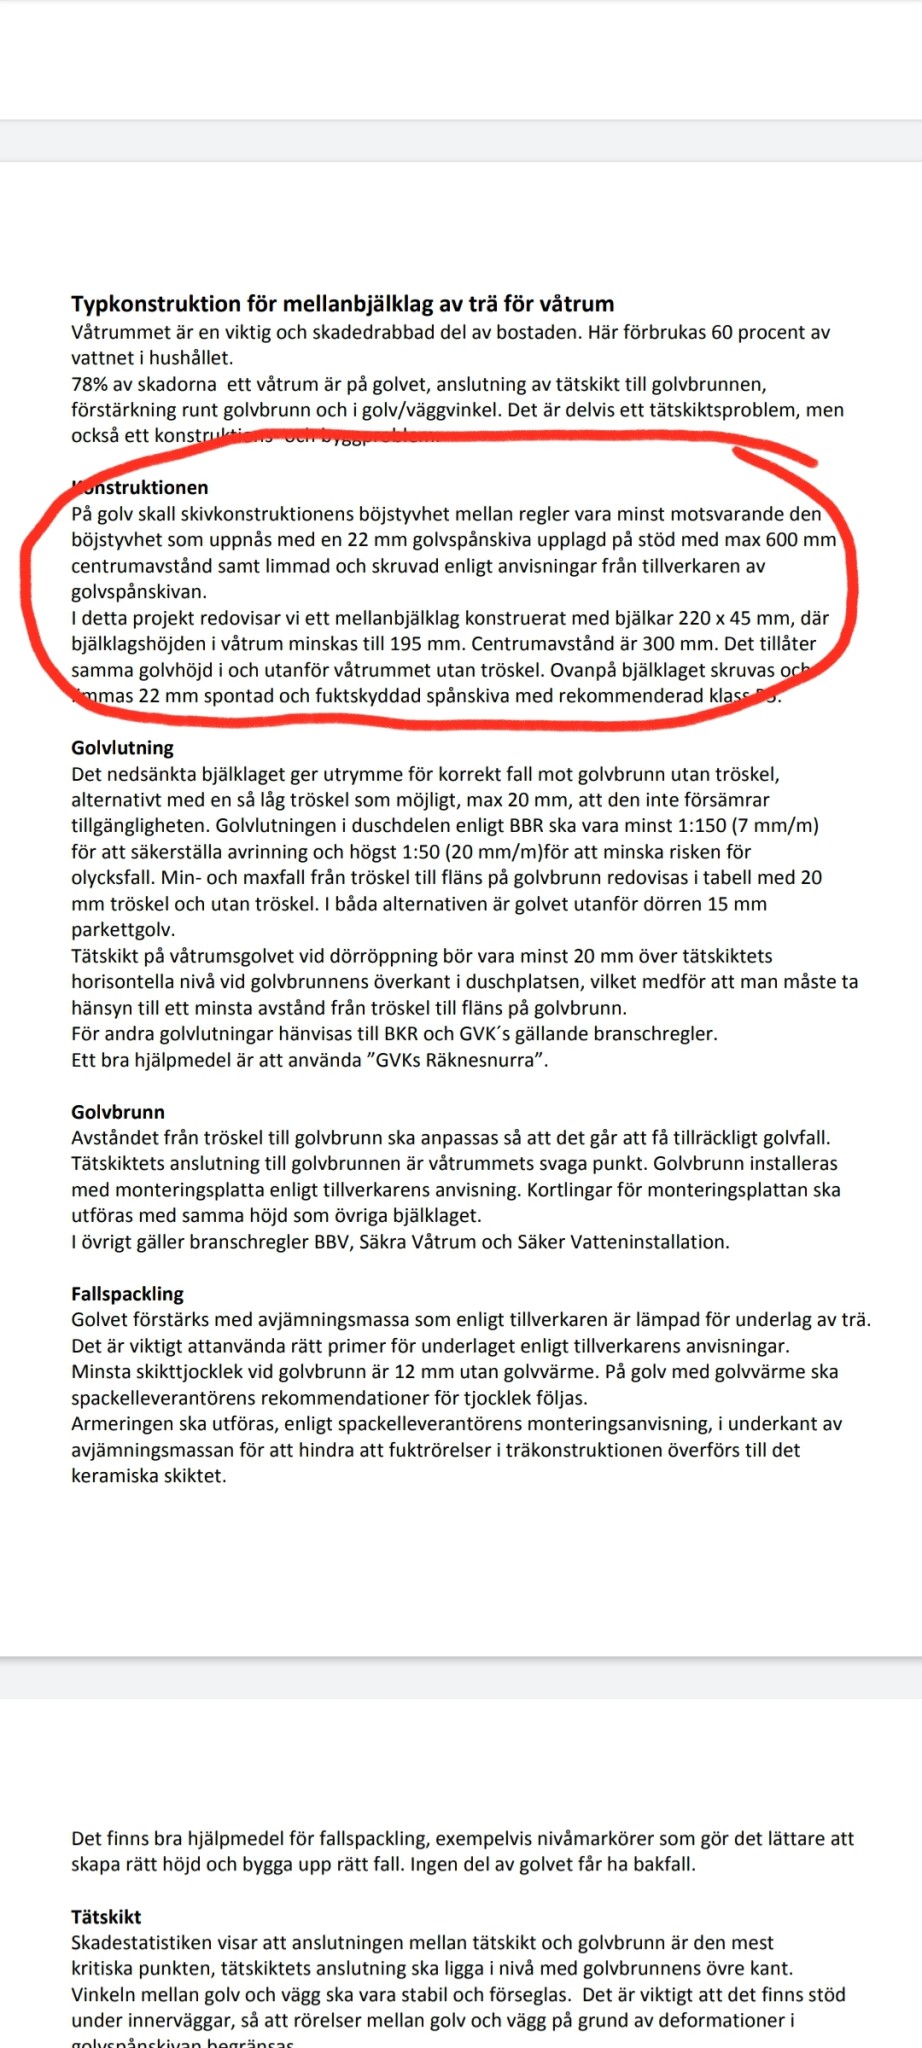
The manufacturer of these beams provides instructions on how to make penetrations. Hjältevadshus helped me get hold of information about this. I don't remember exactly, but you should definitely not notch it out in the manner shown in the picture above, but instead keep within certain measurements from the 45x45 rule.
Why didn't you put the pipes under the beams next to the glesen? That's the normal installation layer for the upper floor.
Otherwise, the instructions for Masonite beams are that you should drill in the middle of the height, and then you can take out quite a lot. I got 160 pipes through a 240 beam if I remember correctly.
All reinforcements in the floor were made with 45x195 beams that are now spaced 30cc in the floor. The notches are thus only made in the 45x195 beams that I installed afterward and not in the Masonite beams that are factory-mounted. The flooring chipboard is then glued and screwed from above. Notching the Masonite beams from above is therefore not recommended unless you reinforce them in another way.
The reason the heating pipes are not under beams is that the flex pipes (which are very stiff) are already laid in the floor and are thus locked in the construction. The pipes can barely bend, and there's no slack or room for movement in them to get them under a 45x195 beam without the need to notch. Trying to pull out the pipes and reroute them under all the beams wasn't an option either, as I would have had to bend them too much. The only way to do it differently is to replace the flex pipes for incoming heating connections to the upper floor and then run new pipes all the way down to the lower floor. (Because Safe Water does not allow hidden joints in pipes in floors or walls).
A reinforced 30cc floor with notched 45x195 beams that are glued and screwed with the flooring chipboard became much stronger than having none at all and having to live with the alternative of only having Masonite beams 60cc.
All the reinforcements in the floor were made with 45x195 beams that are now 30cc in the floor. The notches are thus only made in the 45x195 beams that I added afterwards and not in the masonite beams that are factory-installed. The floor chipboard is then screw-glued from above. Notching in the masonite beams from above is therefore not recommended unless you reinforce them in another way.
The reason the heating pipes are not under the beams is that the flex pipes (which are extremely stiff) are already laid in the floor and are thus locked in the construction. The pipes are barely bendable and there is no slack or room for movement on the pipes to get them under a 45x195 beam without the need to notch. Trying to pull out the pipes and reroute under all beams was also not an option as I would have had to bend them out of shape. The only way to do it differently is to remove the flex pipes for incoming heating lines to the upper floor and then run new pipes all the way down to the lower floor. (Due to Safe Water regulations, hidden joints in pipes in floors or walls are not allowed).
A reinforced 30cc floor with notched 45x195 beams that are screw-glued with the floor chipboard became much stronger than having none at all and then having to live with the alternative of only having masonite beams 60cc.
Best regards,
SM
Under a wet room, you should have at least CC30 on the floor joists if they are 195 beams. The floor must be as stiff as if it were 240 on CC60 with screw-glued chipboard if it is to comply with Safe Water.
The question about safe water concerned that you cannot have hidden joints on water pipes in walls and floors. It was not a question about the center distance between the studs. Therefore, check the picture again. There is 60cc between the masonite beams and then reinforced with 45x195, so it is now 30cc between the studs and masonite beams. Everything is then screw-glued with floor chipboard. I did not need to reinforce the floor to meet the requirements for safe water as it is already an approved base from the house supplier.
The reinforcement I did solely to safely have a larger whirlpool tub on the upper floor.
Best regards,
SM
Vi vill skicka notiser för ämnen du bevakar och händelser som berör dig.

Johannes Carlsson said:
")