4,827 views ·
21 replies
5k views
21 replies
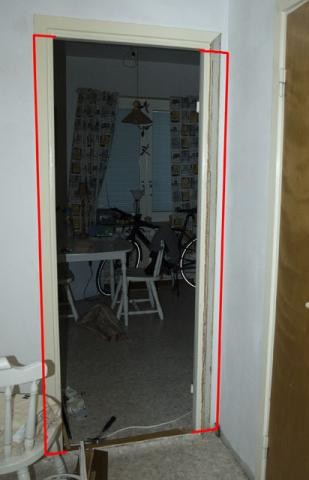
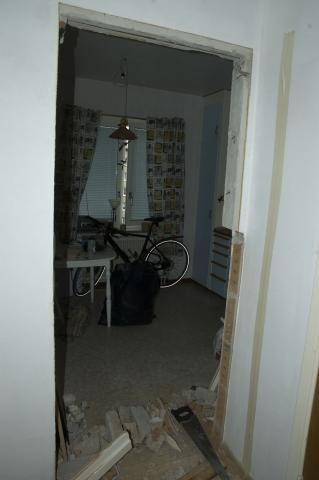
Enlarge the entrance to the kitchen
Hello,
I am doing a light renovation in my studio apartment and now want a slightly larger entrance from the hallway to the kitchen. I have marked the parts I want to remove in red in the first picture. The most important thing is to remove the right side.
How do I make it look nice and well-done?
Can I remove the frame and just use wallpaper all the way on the right side, or is it load-bearing in some way so I need to build a new one?
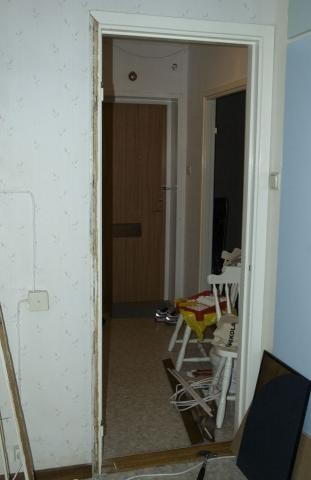
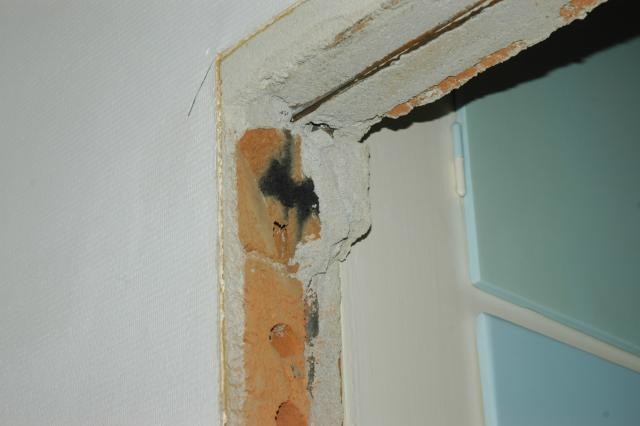
The material in the wall is quite easy to saw. I made a 5cm hole in the wall to the kitchen with a regular hole saw intended for wood very quickly and easily.
I am doing a light renovation in my studio apartment and now want a slightly larger entrance from the hallway to the kitchen. I have marked the parts I want to remove in red in the first picture. The most important thing is to remove the right side.
How do I make it look nice and well-done?
Can I remove the frame and just use wallpaper all the way on the right side, or is it load-bearing in some way so I need to build a new one?
The material in the wall is quite easy to saw. I made a 5cm hole in the wall to the kitchen with a regular hole saw intended for wood very quickly and easily.
Member
· Västerbottens län
· 18 048 posts
The door frame isn't load-bearing so you can remove it directly, and if it's aerated concrete, it can be easily sawed away. The load-bearing should not be an issue.
Do you have the association's permission?
Protte
Do you have the association's permission?
Protte
No, I don't have the association's permission. Does it really need to be required to remove a door frame and a decimeter of a wall?
But do I need to put something in the corners to prevent the aerated concrete from breaking? It's really fragile.
edit: I might just build a reveal or whatever the heck it's called with MDF or something similar around it, so I avoid the corners breaking and have something to wallpaper against?
But do I need to put something in the corners to prevent the aerated concrete from breaking? It's really fragile.
edit: I might just build a reveal or whatever the heck it's called with MDF or something similar around it, so I avoid the corners breaking and have something to wallpaper against?
Last edited:
When I have cut through walls of aerated concrete, I have noticed that the plaster tends to detach from the concrete. Therefore, I first place a board on each side of the wall, clamping the plaster, and then saw after that. This way, you have some control over the plaster when you remove the boards. If the plaster wants to bulge or detach, it is often possible to screw it back like a drywall if there is some layer of wallpaper, using wood screws with coarse threads and some feel")
If you remove the jambs you drew, the lintel will come down too; often, the row of lbstenar (lightweight concrete blocks) stands on rebar about 1 dm above the frame, and then they have stuffed chippings and mortar down to the frame, so expect some potential issues there.
Also, keep in mind that the frame is nailed with 4" cut nails into embedded wood pieces, just so you don't saw too close to the frame
Well, I drew something weird on the picture. Of course, I'll remove the top part as well.
Yeah, I sawed a bit half an hour ago to see how it was attached, but now it's a bit too late to do anything more tonight. As seen in the picture, it comes off very easily just by poking it a little. What is the material really where you can see a piece has come off? I have no idea about this kind of stuff.
Yeah, I sawed a bit half an hour ago to see how it was attached, but now it's a bit too late to do anything more tonight. As seen in the picture, it comes off very easily just by poking it a little. What is the material really where you can see a piece has come off? I have no idea about this kind of stuff.
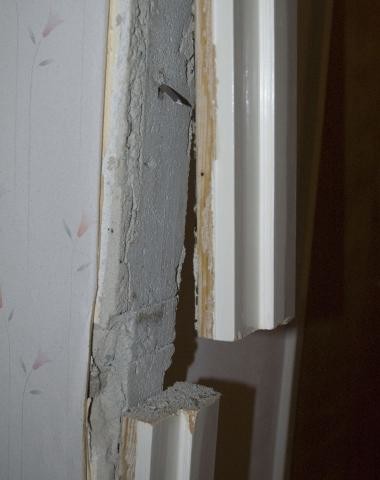
What has come loose is plaster, that is, mortar. It's brittle because it's old, but it's worst there at the edge. It will hold together better a bit further in, but as mentioned, feel free to use boards to keep it together while you saw. I was wrong about the wooden pieces, they did it in some other way, right?
they did it in some other way, right?
Last edited:
Oh, it looks like a brick wall. The nail seems to be embedded between the stones or something like that. When building, do you put up the frame before you lay the walls or the other way around? I guess they put up the frames first and then laid the bricks against them. Sounds most sensible anyway.
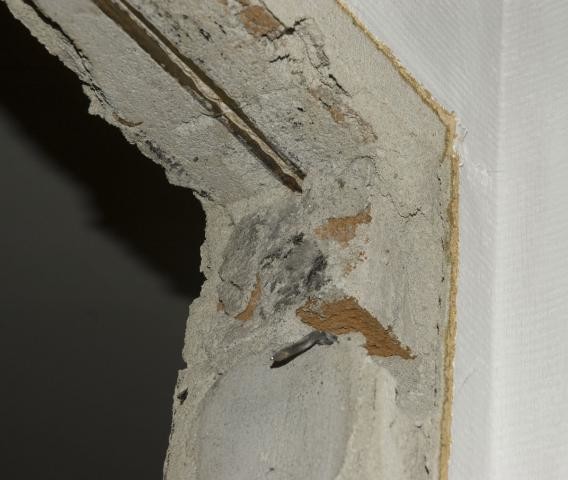
It didn't work to remove anything upwards because there was rebar right at the top part of the frame.
It didn't work to remove anything upwards because there was rebar right at the top part of the frame.
It's probably just a single brick?
Yes, they've mortared the frame in place, or nailed it to the frame to be exact.
If you want, you can remove the iron bars; they're most likely just a few centimeters into the wall. You can also cut above, add a smygbräda (you were thinking about doing that on the sides too) that you screw upwards into each lbsten, which will hold it in place.
A non-scientific/building-technically waterproof check, which always works anyway:
Want to know that it's not a load-bearing wall, so scrape off a little plaster at the top near the ceiling. If there's mortar on the last layer up towards the concrete ceiling (feels like it's a concrete ceiling, right?), then the wall was built after the ceiling and is therefore not load-bearing.
Yes, they've mortared the frame in place, or nailed it to the frame to be exact.
If you want, you can remove the iron bars; they're most likely just a few centimeters into the wall. You can also cut above, add a smygbräda (you were thinking about doing that on the sides too) that you screw upwards into each lbsten, which will hold it in place.
A non-scientific/building-technically waterproof check, which always works anyway
:Want to know that it's not a load-bearing wall, so scrape off a little plaster at the top near the ceiling. If there's mortar on the last layer up towards the concrete ceiling (feels like it's a concrete ceiling, right?), then the wall was built after the ceiling and is therefore not load-bearing.
There are few builders who would put "expensive" reinforcing bars in the wall if they didn't need to.
The iron is there to support the wall above the opening. Probably also why there's brick above the door. The whole thing constitutes something called a "brick lintel," which is quite an appropriate name.
If you cut the iron, you should replace the lintel with a new one of some kind.
The nails, by the way, were probably driven in after the masonry when the frame was mounted.
Well, tegelbalk is actually something else, it's made over windows in a cavity wall and the reinforcement is placed on top of the lowest course which cooperates with the upper course to form a tegelbalk. The rebar is there now to absorb the tensile forces under the last round. Some did it this way and some placed rebar under the last course that aligned over the door. They naturally did it to support the wall above. But if the wall is not load-bearing, now that everything has long since burned, you can replace the whole thing with a simple 22 mm "beam" that you screw into each lbsten from underneath. Then the tensile forces under the stones are absorbed by the 22. It holds, I've done this in many places in my house (where I have control over what has happened and what hasn't) and in others. When you tear down a little in houses built around the 50s, you often find inner door frames with clip nails driven in from the outside, with the head facing outwards. Seems difficult to achieve with a post-installed nailed frame...
One can make a brick beam in various ways. It can be delivered ready-made or built on-site. However, it is still a brick beam. Even if the wall is not load-bearing, it should still support itself. It could be that the beam was only needed during construction, but that's not something to guess about. The arch effect of flat-lying bricked stones is limited. It might be enough to hit it from the side for it to give way and collapse. What is the 22mm "beam" you are talking about? A board of raw timber? I would say it has very limited usefulness. It sounds great that it works for you, but it's not something I would recommend.
I will not remove the rebar, so you don't need to worry about that.
Yes, the nail is driven into the frame from the outside and at an upward angle, then bent so it becomes horizontal and probably embedded in the brick. It's a hell of a job to remove all the nails. I have to dig them out with a hammer and screwdriver.
But I think it looks great. However, I stumbled upon something that looks like an electrical wire at the top in a corner.
Can't help but keep on nagging:blushing::
Yep, for it to fall down, the valve effect must be counteracted, i.e., the bottom twist must be forced apart at the bottom, and a screwed råspont or råplan (or something else) is sufficient to counteract it for that low load. It's not the bending stiffness in the stack of lumber I'm after, but the tensile strength. The irons aren't particularly rigid either.
The electrical wire is probably notched from the side into the wall; if it's in the way, carefully chisel/scrape up the groove and try to make it reach in a new groove. The pipe is probably made of thin metal, so be careful not to create wrinkles/break it. If it doesn't work, you'll have to splice in a new hose/pipe and run new wires.
Last edited:
Thank you, I am well aware of how an arch and a beam work.RoughChuck said:Yes, for it to collapse, the valve effect must be negated, i.e., the bottom row is forced apart at the bottom, and a screwed raw plank or raw timber rather (or something else) is enough to counteract that for that low load. I'm not interested in the bending stiffness of the board stack, but the tensile strength. The iron is not particularly bending stiff either.
However, planks are not used as tensile reinforcement for mineral materials because their stiffness is far too low. By the time your plank begins to take up tensile loads, the brick/light concrete/mortar is already cracked.
Post-installed mechanical fasteners also allow a lot of movement before they become effective, making the plank reinforcement even less effective.
Well, we're talking about the own weight from a 30-40 cm brick wall, it's usually not even rebar lying there...ahh Haha, TS should keep the rebar, I'm going to continue with a "brädsmyg" if I'm going to hold any stones, and you Krawk will never do it so now I give up Take care!
, TS should keep the rebar, I'm going to continue with a "brädsmyg" if I'm going to hold any stones, and you Krawk will never do it so now I give up Take care!
Last edited: