91,393 views ·
32 replies
91k views
32 replies
Cutting cove molding, how do you do it?
I've got the idea that the angles 33.9° roughly and 22°.... (or whatever it is...), the ones preset on the miter saw, are specifically for being able to place a crown molding on the saw table and still get the right angle when you then put it up on the ceiling!? Or have I got it completely wrong?
It doesn't really help with how to think so that you get the angle facing the right direction. When I'm at the saw, I "think" the wall/corner and visualize it in front of me, and then it usually turns out right.
It doesn't really help with how to think so that you get the angle facing the right direction. When I'm at the saw, I "think" the wall/corner and visualize it in front of me, and then it usually turns out right.
I'm bumping the thread and adding a cheat sheet that I've laminated and attached to the wall behind the miter saw.krills said:I've got it into my head that the angles 33.9° approx and 22°.... (or whatever it is...), the ones preset on the miter saw are specifically for able to place a crown molding on the saw table and still get the right angle when you then put it up in the ceiling!? Or have I got it wrong?
It doesn't really help when it comes to how you should think to get the angle the right way. When I'm at the saw, I "think" of the wall/corner and visualize it in front of me, and then it usually turns out right.
Here is the table for angle settings in XL format. You can change the list angle.
If we consider a common electric miter saw:
Mitre = the miter angle, or the rotation of the miter table around an axis that is normal to (orthogonal to) the horizontal plane. The axis lies in the same plane as the miter fence.
Bevel = the bevel angle, or the rotation around an axis that is parallel to the miter table. The axis lies in the same plane as the miter table.
Not so easy to describe if you don't bother to find a picture
/Mattias
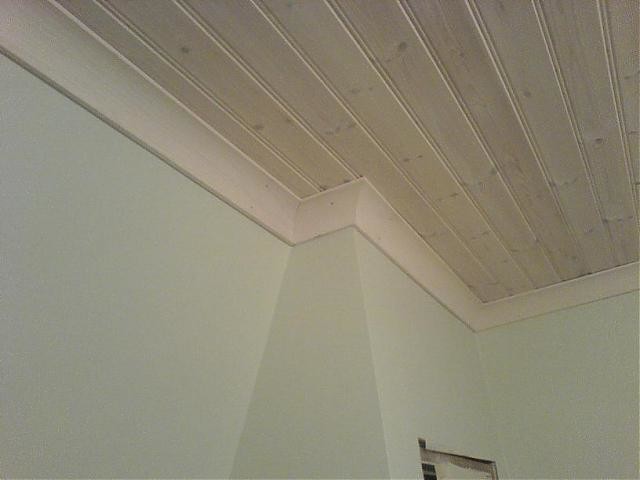
Here are some detailed images from my coving installation. I followed the approach advocated by mattiasp and others, and the result is really good if you are meticulous.
After cutting and sawing, the result of the end looks like what the first two images show. The moldings in place were also captured in a photo. For the profile cutting (after the 45-degree cut), I used the multitool with the circular blade. I managed to achieve really good precision with this.
After cutting and sawing, the result of the end looks like what the first two images show. The moldings in place were also captured in a photo. For the profile cutting (after the 45-degree cut), I used the multitool with the circular blade. I managed to achieve really good precision with this.


A rule that I follow with hollow moldings,,, is.... Left side,,,, upside down with the molding to the left on the table... Cut 45 degrees.... Then use the knife on the back side... until it becomes paper-thin on the back... hard to explain but practice on some scrap pieces....
Hello,
How the heeeeeck do you do it if you don't have right angles, i.e., if the angles are, for example, 100 degrees or 30 degrees? I'm measuring with the angle bevel but just can't get it right. How should one really think about it? This concerns molding but it's probably the same principle for all.
How the heeeeeck do you do it if you don't have right angles, i.e., if the angles are, for example, 100 degrees or 30 degrees? I'm measuring with the angle bevel but just can't get it right. How should one really think about it? This concerns molding but it's probably the same principle for all.
1. Buy a miter saw of good quality. Not some $10 one from Överskott or Claes Olsson. They sell a Swedish miter saw at Jula for just under $100. Then it starts to look like something. Been there, done it.......
2. Realize that as a hobby carpenter you have limitations regarding the experience to gauge whether one should whittle and carve the molding to get it perfect. EVEN if you practice on scrap pieces extensively. You need to watch someone who knows how to actually do it.
3. If you have a room that doesn't have a single right angle anywhere, you can, instead of fitting the entire molding in one piece with miter at both ends at once - cut off so you START with the corner itself and just take maybe a 50 cm piece on each side and get the angle correct. Then you do have an extra two 90-degree joints along the side, but it is MUCH easier to achieve. That's how I did it in the cottage (where it's crooked in every direction) after a tip from a carpenter who also showed me on site.
4. Accept that it won’t be 100% and buy silicone to fill in the last millimeter. You wouldn't believe how much silicone even real craftsmen use. Paint generously, as even paint fills gaps. Someone said that "silicone is the modern carpenter's best friend." It's no worse than putting up moldings in foam, (or however it’s spelled).
After having seen real so-called experienced fine carpenters with good references work when renovating our previous apartment in Sthlm, I will NEVER be ashamed of my mitering or use of silicone and filler. You can’t see it. The main thing is knowing it holds, so it's well-made even if you took a little shortcut.
Just a small clarification... do NOT buy silicon, it cannot be painted over, what you need is acrylic sealant or paintable caulk. But the bottles indicate which ones are paintable. Then it's just practice... good luck...
Do not use silicone! Not paintable. Use latex sealant instead.
If you're using the most common method - the one where you miter both moldings - you usually (or I think it looks best and is easiest) miter both sides equally. So, for example, if it's an inside corner of 100 degrees, you miter both moldings meeting there to 50 degrees.frede said:
How does that work on the miter saw?
Let's assume we lay the molding upside down on the miter saw, meaning the side that's going to be against the wall is facing the fence, and the side that's going to be against the ceiling is facing the table. The molding's concave side is then facing up/forward towards you when you're sawing. This way the molding lies steadily and is easy to hold in place.
Since the molding is upside down, the directions are reversed; for example, if you're going to cut a molding that will be to the left of the corner, then the piece you want to keep will be to the right when it's on the saw.
How do you set the miter angle then?
If it's an inside corner, the saw's handle should be swung in the direction TOWARDS the part that should remain, so that piece gets a sharp angle inward towards the blade and fence. If it's supposed to be cut to 45 degrees, everything is fine, just set that. If it's supposed to be something other than 45, you can think about it this way: Every degree you swing the blade is an additional degree you REMOVE from the piece you want to use. The number of degrees you swing should therefore be 90 minus the number of degrees you want to keep. So - if you have a 100-degree inside corner and want to saw the molding to the right of it -> the molding should be cut to 50 degrees -> swing 90 - 50 = 40 degrees to the left.
If it's an outside corner, the saw's handle should be swung AWAY FROM the piece to remain but the number of degrees is calculated the same way, as it's now the edge towards the ceiling/table that should be the outside point of the angle, so it's still true that every additional degree you swing makes the piece to remain one degree sharper. For example, to saw the molding to the right of an outside corner at 86 degrees -> the molding should be 43 degrees -> swing 90 - 43 = 47 degrees to the right.
(It's probably best that I remind you that the above applies provided you follow the advice to flip the molding upside down in the miter saw...if you don't, it becomes very backwards if you try to do as I say...)
Mattias P's method works just as well in corners that aren't 90 degrees. It's actually more forgiving when it comes to the angle than "the usual way." You set the saw in the same way you think for inside corners above (the method doesn't work on outside corners).
