80,631 views ·
12 replies
81k views
12 replies
Cove molding +corners +sloped ceiling = problem
I've encountered a problem I can't solve on my own.
I've wasted a lot of meters trying to figure it out but it's just not working.
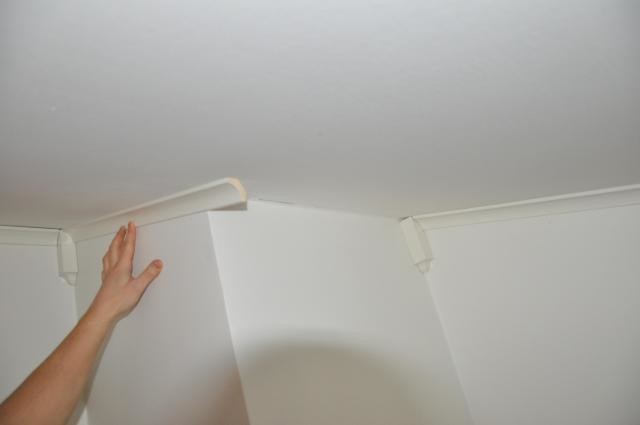
Situation: crown molding that runs along a sloped ceiling and needs to fit together with a crown molding that runs horizontally.
See image, and I appreciate all the help I can get.
I've wasted a lot of meters trying to figure it out but it's just not working.
Situation: crown molding that runs along a sloped ceiling and needs to fit together with a crown molding that runs horizontally.
See image, and I appreciate all the help I can get.
Oh dear... a delicate problem that someone here can surely solve ")
Two ideas... either you use a corner-edge-whatever-you-have in the inner corners that you notch and attach to the outer corner so you can make the connections without it looking odd...
Alternatively, you can buy a molding in foam with the same profile as your moldings... then you can twist/turn it slightly to fit the miters, and then you need to use caulk/spackle between the wall and the twisted molding.
It will look good enough that no one but yourself will notice ;-) I put up foam moldings in an old apartment from the 40s with anything but straight walls and ceilings... without the ability to twist and bend the foam moldings, it would never have looked nice.
I had that problem myself a while ago. I went out and tried different approaches, but it didn't turn out right. I put the trim in the saw in all sorts of strange ways and just made it more complicated:blushing:
I read a description somewhere here that I also managed to fail with:blushing:
For me, the solution was to measure the angles and adjust the saw accordingly, and then it worked out.
I assume one angle is 90, so that makes it 45 on one axis and the other looks to be around 20, so that makes it 10 on the tilt and then mirrored on the second piece.
I think that's how I did it and it worked.
The problem is if you have a saw that can only tilt one way, but the basic principle was still to measure the angles and follow them.
I'm absolutely no expert and could be wrong:S

If I see correctly in the picture, the problem is that the angle between the wall and ceiling is not 90 degrees, the angle is acute, i.e., less than 90 degrees.
Try inserting a triangular molding in the angle between the ceiling and wall, in this way you get 90 degrees between the ceiling and wall behind the molding.
The triangular molding should then be concealed by your coving.
You should be able to manufacture the triangular molding from a stud using a lateral support and an angled circular saw.
Attaching an additional image for clarification. Since it might not be obvious what I mean in the first picture.
How should these two molding strips meet nicely in a smooth and proper transition.
As already mentioned, one strip is SLOPING downward (the one on the left) and the other is horizontal.
How should these two molding strips meet nicely in a smooth and proper transition.
As already mentioned, one strip is SLOPING downward (the one on the left) and the other is horizontal.

Last edited:
Now comes a long text... It's not easy to try to describe and it's not entirely straightforward to get the miter joint right, but it's possible with some effort. To begin with, the moldings won't meet each other edge-to-edge in the miter joint, but it matters less as long as you can paint the edge. You can get the miter joint completely tight (molding to molding), but the edge of one molding will not completely follow the edge of the other molding. You fix that by sanding away what "sticks out," and the joint will be completely tight. If you imagine that there are two square moldings to be joined together, it's easier to see that it's not possible without readjusting the flat surfaces. Since I don't have any pictures, it's hard to describe, but the point is that the edges of the moldings should fit completely tight, even if the profiles don't match 100%. When the moldings are in place, you sand away what "sticks out."
Here's how you do it: Miter the horizontal molding (right in the picture) at 45 degrees. Then set up the saw, either with a double angle or by propping up the molding, so it saws 45 degrees on one side and the roof's pitch on the other side. Start with short test pieces until you get the angle just right.
The downside is that if you don't have an electric saw, you only have one shot. The easiest way is to shorten a roughly cut molding 1/2 mm at a time until it fits 100%. If you're sawing by hand (Noex is probably a handsaw), you only get one chance since it's not possible to cut so little; if it's wrong, you have to take a new piece.
The goal is to have the edges of the moldings 100% against each other. Then you sand, cut, or file away anything that doesn't meet the other molding and you'll have a perfect miter joint. A bit of paint and everything is done.
The skilled craftsmen (not me) with plenty of time (not me) can miter the moldings with a small plane.
I use an electric miter saw that can be adjusted at two angles. Then I start with some scrap pieces of the moldings that I cut to nominal measurements. The first piece can be nailed up loosely. After that, you adjust the saw one miter angle at a time, one degree at a time. I test the small scrap piece between each saw cut. Since this is a bit off, you may need to iterate between the two molding pieces a few times. Don't forget to write down the saw setting every time you switch the piece.
I have found that it's perfectly sufficient to only vary the saw by 1 degree at a time between each cut.
Don't you have to miter both trims, as sblixten wrote? It feels like otherwise, the cuts in both trims would be different lengths, and in that case, it wouldn't just be the profile that needs to be sanded, but the upper and/or lower edges won't match either. But if you miter both, it should instead be that the horizontal trim needs to be a bit "tilted" to fit against the other one, a bit more upright so to speak, and needs to be planed on the backside to sit well against the wall. As usual, it's hard to explain what you mean when it comes to trims... hope someone understands...Larsa said:
Try to place a piece of molding against the ceiling as it will sit. Extend the molding a little more than its width. Draw a faint line with a pencil along the edge facing the ceiling. Do the same on the opposite molding. As you can see, you now have an intersection on the ceiling where the two lines meet. At the intersection, the top ends of the moldings should meet. Now you can place the molding against the ceiling again and draw a line on the molding at the intersection on the ceiling and also at the outer corner on the wall. Test with a sample piece until you get it exactly right.
Click here to reply