We are looking for more storage space and are thinking of building into our staircase. The staircase is a real '70s piece in a '30s house, so the aim is also to achieve a more traditional look. The plan is to:
1. Remove balusters
2. Install risers
3. Construct the enclosure
4. Build a new railing
And, of course, remove old paint and repaint.
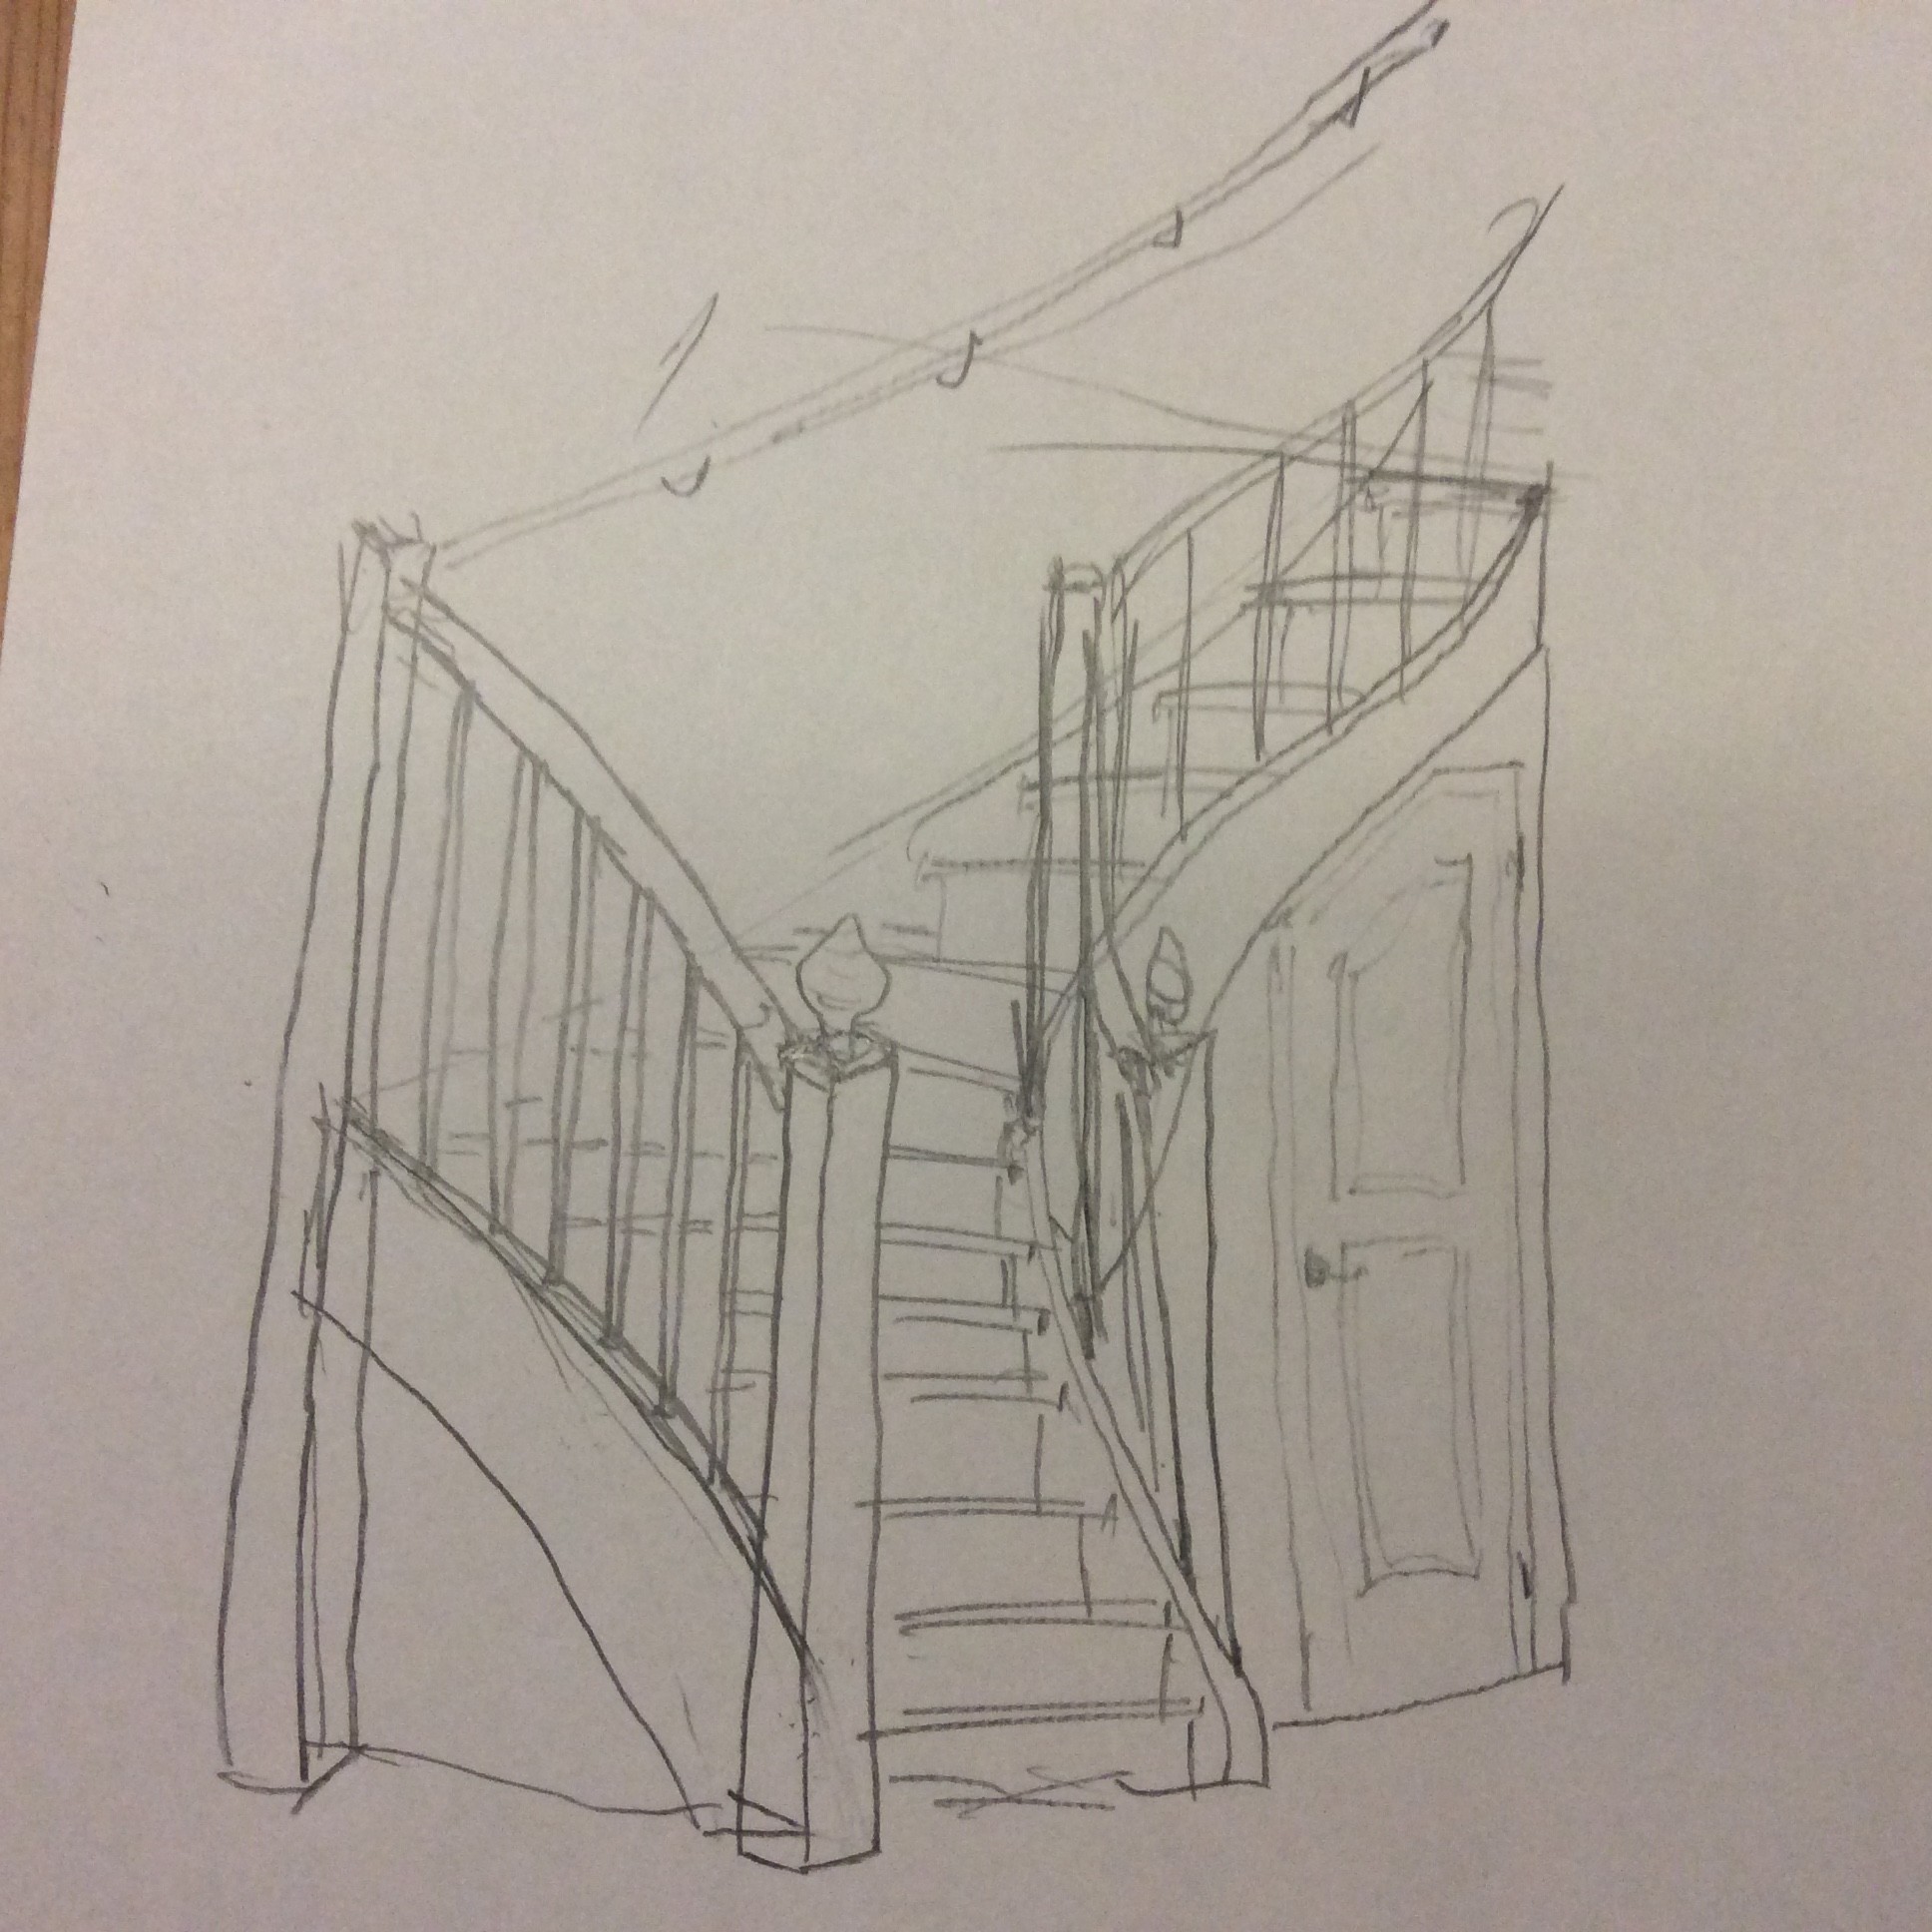
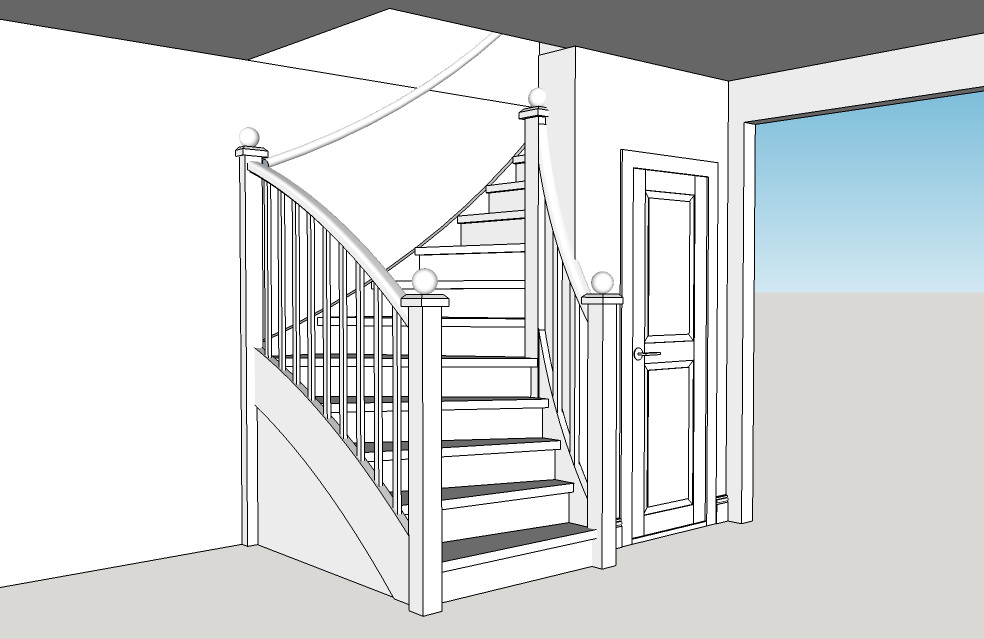
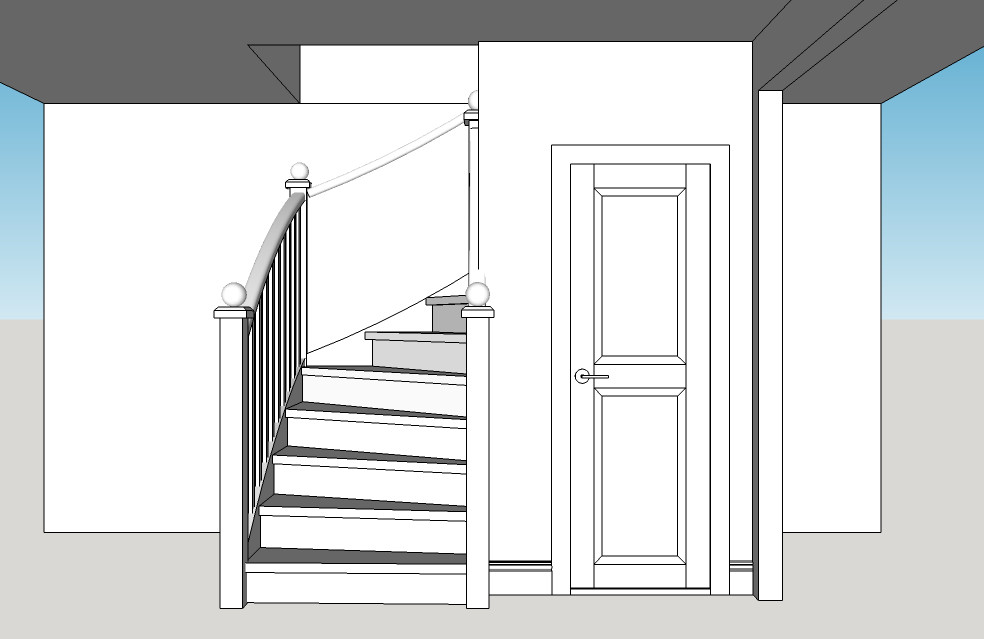
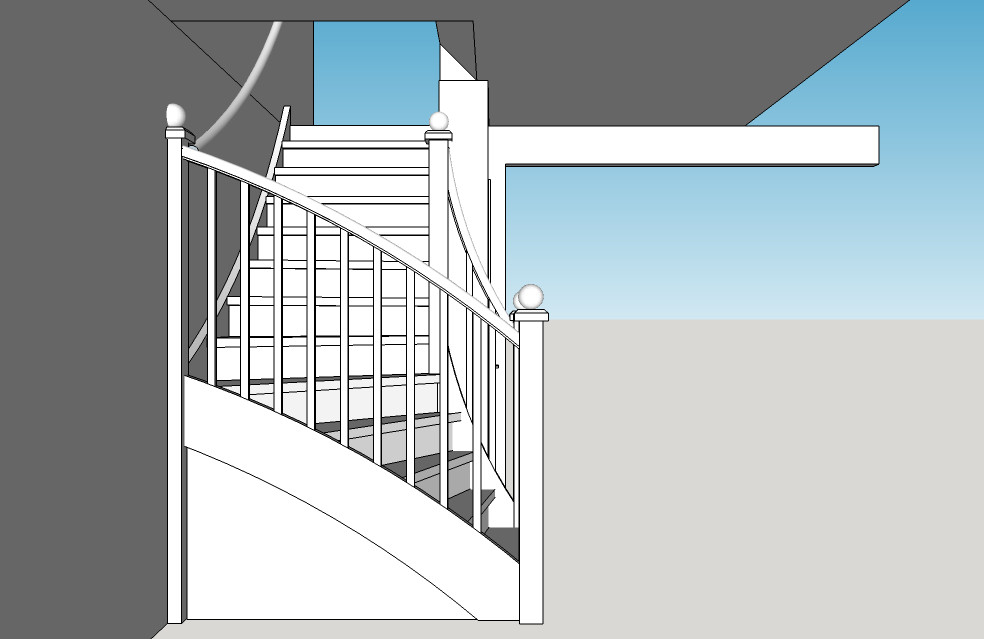
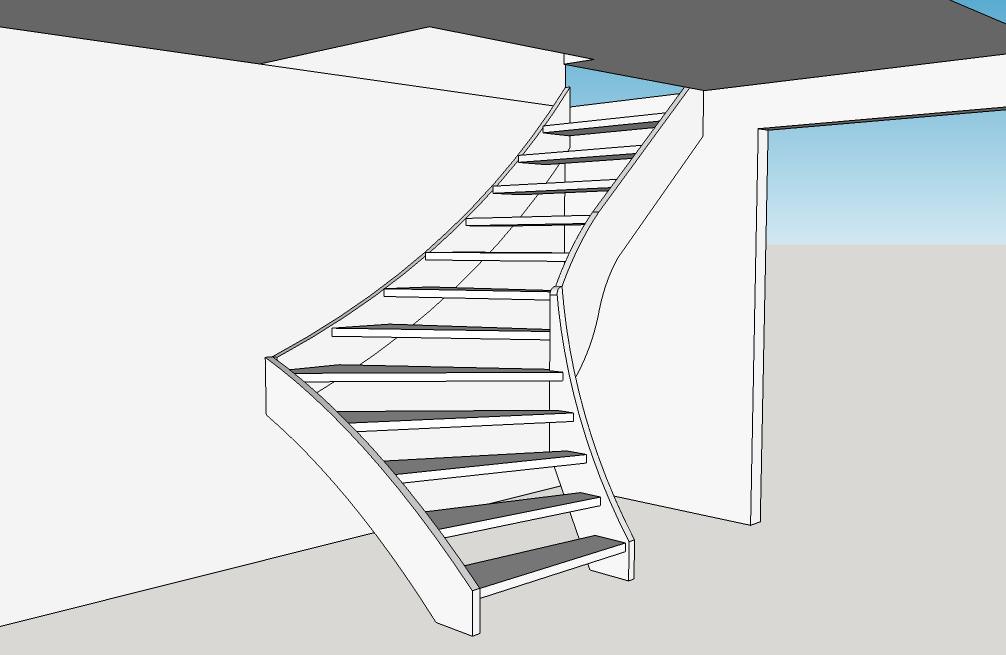
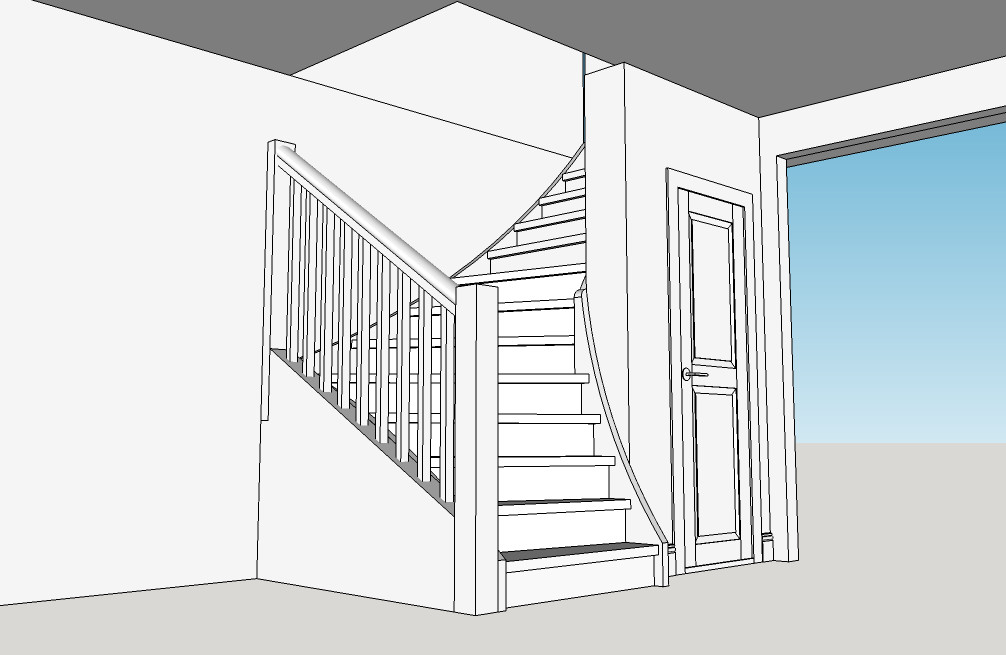
In this thread, I am interested in point 4. The picture Trappa_03 shows a sketch of the staircase as it is without balusters. I want to place a railing against the left stringer when viewed straight on. What I'm wondering is how to best attach the posts and how the balusters should connect at the bottom. The pictures Trappa_01 and 02 show a simple model of how I envision it. Here I have drawn the entire railing as a separate box on the outside. Note that I haven't drawn any special detailing yet. What's not so nice is that the stringer is exposed on the inside – it looks a bit unfinished? How else can this be done? Create mortises in the stringer?
I also want stable posts. The upper one can probably be properly screwed into the wall, but the lower one has to attach to the stringer, which may also affect the placement of the post?
Installing risers is wise. Children, the elderly, and dogs do not like stairs without risers. I have a staircase with similar placement and shape that descends into the kitchen. The space underneath and beside it is used for storage. Pull-out drawers hidden by doors and a pantry-like space with a door. As handrails, I have two railings made of polished stainless steel pipes (diameter about 26 mm) with welded-on brackets. The section on the lower stair landing is U-shaped (a square U) and is screwed directly into the stringer.
Thanks for the response! Yes, the material and installation of risers is also a question. I have understood the part about pre-tensioning. Google provides many variations. For example, should one mill mortise holes in the upper landing step for the riser to fit into, or is it unnecessary? Should there be a margin to the stringers?
But is there no one who can give input on the railing? Should I have posted in a different forum section?
If the backside of the risers is normally hidden, I think it should be made as simple as possible. Screw the lower edge of the riser into the back edge of the underlying tread and attach the top with angle brackets to the underside of the next tread.
You haven't explained why you want spindles in the stair railing. The solution you've drawn, I think, is a bit bulky and not particularly elegant. I think a Victorian staircase with turned details and elegant railings requires a different and above all larger setting. You can make posts for handrails from laminated wood which can be very rigid if they are attached at two points in the stringer. If you want to utilize the entire space under the stairs for storage, wouldn't it make sense to try to access it from the now open side?
I think your sketch of the intended staircase looks nice, I like that direction!
The upper post you can draw into the wall, it's not a problem to get stable as long as there's something sensible behind it. The lower post I would screw from the inside of the stringer. If you want even more stability, there are mounts where you screw a plate into the ground, then a threaded rod runs from the mount through the entire post so it can be tightened down from above. Ends with a post cap of some kind. You'll find examples at altanbygge.nu if you want to check it out.
I definitely think the bottom of the railing should follow the shape of the stringer even if it involves some extra hassle. A spontaneous idea that comes to mind is to cut two (depending on the width of the railing) planks to shape, which are screwed to the outside of the stringer. They should be mounted so they come about 5-10 mm below the upper edge of the stringer. Then a slightly thinner planed board on top of the planks, thin enough to follow the shape. Diagonally screw the balusters through the board down into the planks. Fill the screw heads or work with moldings to cover them and at the same time give the railing a bit more character (I think balusters just standing on a flat board are a bit dull). The board at the bottom can advantageously be made wide enough to extend slightly outside the surface layer of the staircase, so that the surface layer is pushed up against the underside of the board, and feel free to route a nice profile on the edges. I hope you understand my attempt to explain what I envision
@justusandersson Thanks for the info about risers. What I'm wondering about is if the amount of creaking is affected by how you fasten the riser at the top? Thanks for the tip about the glulam post. I'd like to talk about style! But please explain what you think is clumsy. I have drawn the amount of balusters based on some standard I found - I assume it's to prevent children from squeezing between, etc. I was thinking of some sort of top-knob for the posts, maybe some design on both the post and balusters. I'm not going for a Victorian look but something simple yet old-fashioned. I don't quite understand the comment about being able to reach the space through the now open side; do you mean a small hatch at the floor where I've drawn a build-up? Please give more tips and more detailed feedback!
@Bernieberg There's wood paneling at the upper post, so it should screw in well there! I also believe in screwing the bottom post into the stringer. But should one make a notch in the post so that it's "over" the stringer, perhaps less "clumsy" as Justus wrote? However, it might become less stable, and then the question again is what the balusters attach to since they would then be directly over the stringer. I will try to redraw it so the bottom follows the shape of the stringer! Your suggestion is very interesting but somewhat difficult to understand. I'll sketch out my interpretation, and we can see if I've got it?
By clumsy, I mean that the details have too coarse dimensions in relation to the staircase's function and significance. Everything should be a little more slender. To avoid squeaking in the staircase, the risers must be mounted tightly against the underside of the treads and be securely fastened. You can use the space under the staircase for storage. Build, or buy ready-made, cabinet frames that you equip with pull-out drawers. Place these under the staircase and build doors that seal against the stringers.
Attaching the risers as Justus describes is perfectly fine. To avoid creaking, make the top of the riser "bombered." This means it is highest in the middle and slopes down a few millimeters towards the stringer on each side. There will be a small visible gap, but it will hardly be noticeable. The only person who might see it (and be bothered by it) is you, and possibly an occasional carpenter (who won't be bothered but will nod slightly).
The idea is that the riser stiffens the step it's screwed onto at the back and supports the step above in the middle so that the steps stop flexing. As a result, they don't move in the dowels, and the creaking is expected to stop.
Plywood is a good material for risers in retrofitting. Just not the worst kind .
In a newly manufactured staircase, the risers are grooved into tracks on the underside of the steps. During installation, you slide the riser into the track and screw it to the back of the lower step. The tracks should not be tight. The riser should only be held in place but still be able to move.
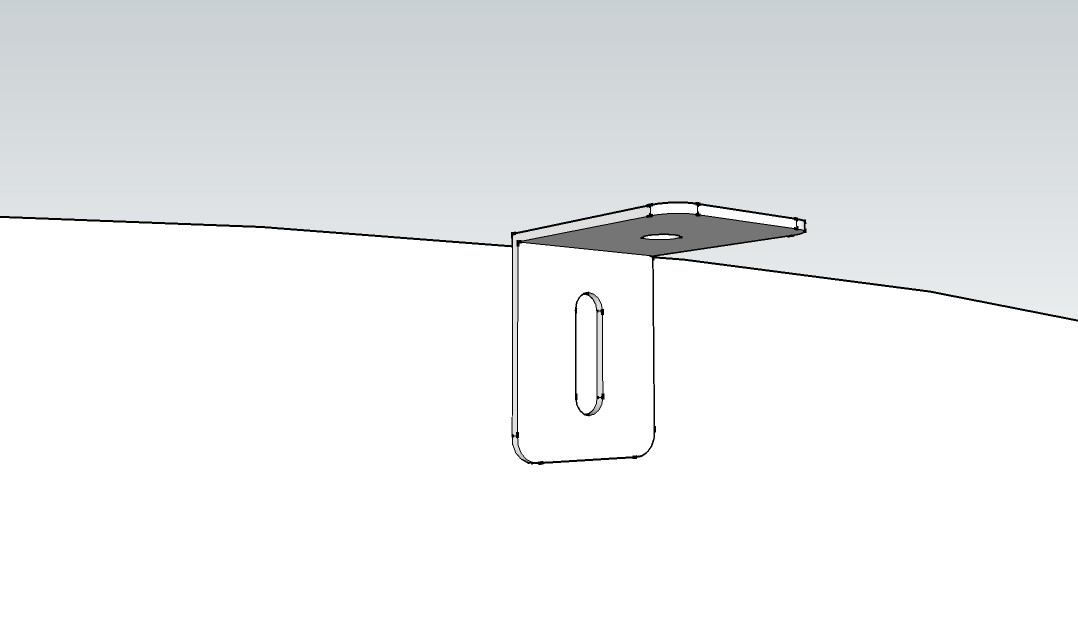
In your case, with retrofitting and the riser underneath, you should use so-called furniture angles that have an elongated hole that allows the riser to move.
I have some thoughts about the railing that I will write about after dinner.
Your sketched idea can be good with some modifications.
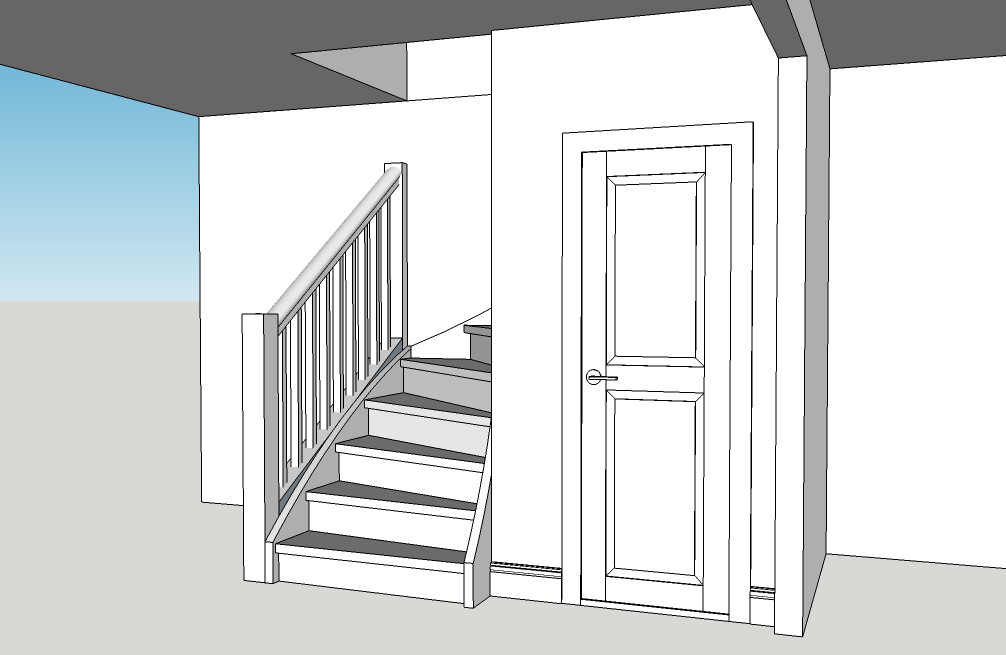
The wall with the door is a bit too massive. If you sneak it under the stairs and let the top edge follow the stringer, it will be more refined and elegant. If you adjust the door slightly. Right-hinged, outward-opening, and trim the left corner. Then it becomes visually subordinate to the stairs and blends in without taking over.
The handrail will look unbalanced if you only do things on the outside of the stairs.
What you do on the outside needs a "comment" on the spindle side of the stairs. Not necessarily complete, but enough not to leave the inside neglected.
If you recess slightly heavier posts so they protrude about half a cm over the stringer on the inside. Then you can place pipes or dowels between the handrail and the stringer. The handrail should definitely follow the stringer. It's worth every extra minute it takes.
Drew a simple freehand sketch that will hopefully make the ramblings more understandable
Thank you for all the answers, there's a lot to keep track of now!
@justusandersson
I agree that the details are too bulky, so far I haven't thought much about dimensions and such for the railing. I drew the post 110x110. Not sure what might be a suitable dimension?
The idea was to use the space underneath for storage just as you said. Good tip to use pre-made frames, it might otherwise become quite tricky spaces. At the same time, we have a lack of storage, so every extra cubic centimeter is worth something, even if I have to crawl under the stairs to fetch the Christmas box and so on.
@findus42
Thank you very much for all the information and the nice sketch. It would have saved me many hours of Sketchup-tinkering if I could draw like that!
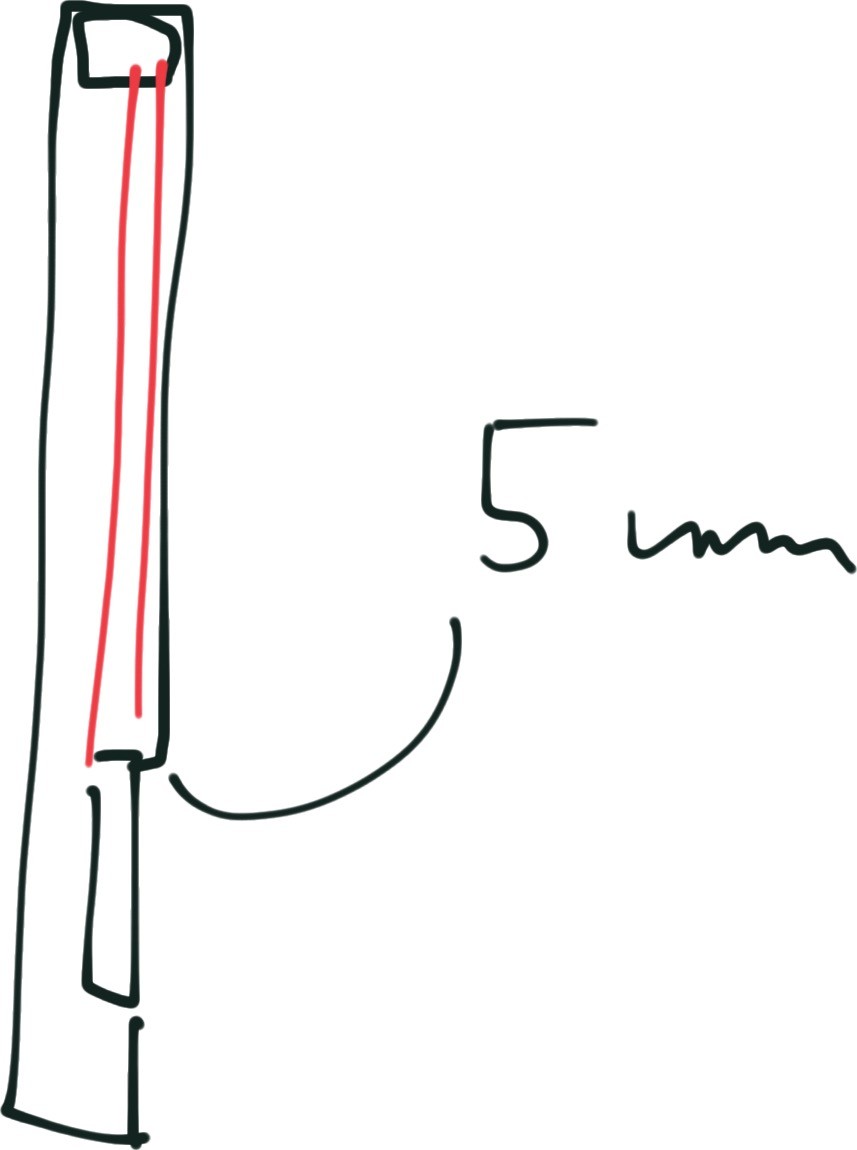
Bombing - I have read about this but am not completely on it. Do you do as I drew in the picture below, but with only a few millimeters difference between the center and the edge?
Plywood as risers, interesting! Is there some advantage that it doesn't have moisture movements like regular wood? Can you find such fine plywood in the building store? I read on American forums that at least 3/4 inch thick was recommended.
Furniture angles - I drew again, is it like that you install them? Three to four per step?
The door/wall: I was thinking of placing the door as in your sketch initially but thought the hole was too small. Your idea was radical! At the same time, I'm a bit reluctant. I have three or four doors lying around that are almost the only things left of the old in the house. Cutting into one of them feels iffy. I agree that the "box" I drew looks dominating, but I've also seen such solutions that I've liked. I'm wavering!
It looks nice to have a railing on the upper part, too, as you drew. But that gap is actually quite small, about 1 meter at the highest point. I think it might be a bit of an awkward railing? It's quite low-ceilinged.
Nice to have a right post at the bottom. I was thinking that, too, but forgot to draw it. It also makes it, for example, easier to put in a child gate.
The part about the posts "leading over the vangen about half a cm on the inside," I don't completely understand. Do you mean that the posts are centered over the vangen and stick out 5 mm on each side? No? The vangen is 40mm thick.
Handrails that follow the vang piece, elegant but so difficult?
The upper "post" attached to the wall, is it nicest to let it then go to the floor as you drew perhaps? Then, of course, a lot of thought is required behind the details, moldings, etc. That is the next step.
Just as you've drawn, I thought that's how one could do with posts and balusters! Do you suggest round dowels for the balusters to make mounting simple? I think I can handle tenon/tenon hole, the trickiest part will probably be getting the shape of the shoulder to be good as it then has to follow the curved vangen.
And just as you drew, I imagine a round wooden handrail for the upper part against the wall.
And now a more practical question. In the end, it should be linseed oil paint I believe. Should I plane the staircase clean from paint before I install the risers? I'd prefer not to because of usage. It's an advantage for me if I can divide the job into phases like risers, installation, railing instead of being forced to tear everything down at once. Or maybe I need that push....
If you use other types of wood than pine, such as birch, you can easily reduce the dimensions. Especially if you also use lamination technique (i.e. gluing pieces together). A post should at most have a cross-section of 75x75 mm.
@SCGB
Your interpretation of the concept of cambering is completely correct.
The mounting of furniture angles too. 3 is enough. Maybe even 2.
It is a great advantage that the step risers have locked moisture movement. If you lay solid wood along the step, it won't support the step in the middle during winter/spring because it shrinks. If you set it upright, it will be like a picket fence when the wood shrinks and cracks. Equally useless then. Pine plywood with knife-cut veneer is usually available at larger lumberyards at fantasy prices. Look for a local joinery, they can probably help you.
With the posts, I meant you can have slightly thicker wood, like 90x90, and set it asymmetrically. Embed the stringer, so to speak. Why it should overlap inwardly by 5mm is because it's a difficult point to get really good. If you leave a gap of a few mm with a beveled edge in that joint, it looks much nicer if it overlaps. If you join before painting, there is nothing that draws attention to it.
You attach the handrail after the asymmetrically placed posts. The spindles/tubes you place between the stringer and the handrail. The result will look straight and well thought out.
Thank you! I have redrawn following your feedback. The "cabinet" remains, I just haven't had the energy to think further about it. But that built-in feature will be step 2, so I need to decide soon.
A few follow-up questions:
Should the small handrail on the right side also follow the stringer's shape as I have drawn?
What do you think about the profile for the handrails? I don't want it to feel too flimsy + it should preferably have some nice detailing. Currently, they have approximately the mushroom profile
Some challenges I anticipate:
Manufacturing the handrails with a curved shape. I would have preferred to do the entire work myself, but making such a complex shape might not be possible for me. Outsource? That bothers me! 3D printer?..
The right stringer on the lower part of the stairs extends further into the room than the left one. Therefore, the left post must be offset outward and thus has a smaller contact area with the stringer. This might not be so good for stability. I don't want to make holes in the floor due to fine old parquet.
The cutouts on all posts become quite complex when they need to encase stringer, treads, etc. Are there shortcuts?
This was much sleeker and lighter! The handrail should follow the stair noses. The top edge should be 80 cm higher up. There, you may need to compromise with regard to child safety. It should feel comfortable when you walk. The diameter of the handrail should be 3-5 cm.
Thank you for the feedback! What does it mean that the handrail should follow the stair noses? Do you mean in shape?
I have probably set the handrail at 90 now but will read up on ergonomics, we are quite tall in the family.
I am summarizing my old questions too if anyone wants to give a bit more information before I start in earnest!
Mounting the posts - The recesses for the stringers become quite tricky. Is the mounting weakened by this? For example, for the left post, there will be 45 mm left on the left side which is screwed to the stringer, if the post is to go over the stringer 5 mm on the right side.
Stair nose - This is really a question in itself. Today the stair treads are completely smooth at the front. Can you, for example, glue on a strip to make them a bit more interesting? I'm thinking of painting the entire step so no contrasting stair nose or anything like that.
Spindles - What can be a style model regarding dimension/profile for the 1920-30s?
Handrail following the shape of the stringer - IF one tries this oneself, is the method to laminate the handrail in a curved shape and mill the profile with a router? What do you think about the profile for the handrails? Suitable type of wood?
Vi vill skicka notiser för ämnen du bevakar och händelser som berör dig.

")