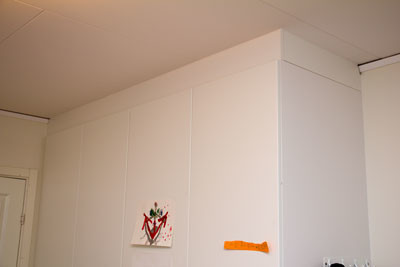
We have two IKEA Pax wardrobes that I want to build in by placing a trim between the wardrobes and the ceiling.
However, I'm all thumbs, so I have to ask how to do it. From the built-in wardrobes I have seen, you can't see how the trims are attached around the wardrobes.
What material is used? How do you attach the trims to the ceiling and the wardrobe? And above all, how do you do it without visible screws? Do you glue them??
Sorry for such a beginner question, but any tips on where to start are appreciated.
However, I'm all thumbs, so I have to ask how to do it. From the built-in wardrobes I have seen, you can't see how the trims are attached around the wardrobes.
What material is used? How do you attach the trims to the ceiling and the wardrobe? And above all, how do you do it without visible screws? Do you glue them??
Sorry for such a beginner question, but any tips on where to start are appreciated.
Can't you buy a passbit or a floor molding at Ikea and saw it to height (if you have plenty of space to the ceiling) and then screw it in from inside and up into the wardrobe. Then you can put a new ceiling molding outside up in the ceiling if you have moldings on the other walls.
/ Micro
/ Micro
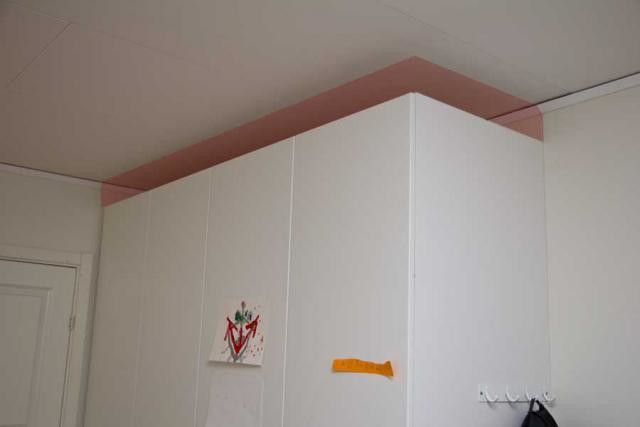
I have added an image and drawn where I want the molding. There will be an outer corner there which complicates it even more.
I have also thought about the option of screwing from inside the wardrobe, but I don't know what is most suitable. Some small plastic or rubber molding is probably needed closest to the ceiling too, to hide the "gap" above the large molding?
I have also thought about the option of screwing from inside the wardrobe, but I don't know what is most suitable. Some small plastic or rubber molding is probably needed closest to the ceiling too, to hide the "gap" above the large molding?
What you call a list most of us call a passbit  might be good to know. I would have cut a passbit out of MDF, mitered the corner, screwed a square list into the ceiling that the passbit can rest against (the list should sit inside the passbit), then I would have glued the passbit to the list, to the closet, and in the miter. Finished with the same ceiling list as in the rest of the room.
might be good to know. I would have cut a passbit out of MDF, mitered the corner, screwed a square list into the ceiling that the passbit can rest against (the list should sit inside the passbit), then I would have glued the passbit to the list, to the closet, and in the miter. Finished with the same ceiling list as in the rest of the room.
Jan-Å
I would have done as you described - simple and good solution. But since TS sees this as a construction problem at all, I think it will be difficult to miter the fitting piece neatly - therefore I would recommend TS to check the dimensions, if a base for kitchen counters would fit. Then there is no mitering, just straight cuts that are hidden in the finished plastic angles. After that, it's just a matter of applying some PL400 during installation, which should be done following your concept.
I would have done as you described - simple and good solution. But since TS sees this as a construction problem at all, I think it will be difficult to miter the fitting piece neatly - therefore I would recommend TS to check the dimensions, if a base for kitchen counters would fit. Then there is no mitering, just straight cuts that are hidden in the finished plastic angles. After that, it's just a matter of applying some PL400 during installation, which should be done following your concept.
I thank you for the answers. I didn't know what gering was and had to look it up. I can't do gera and I don't know how to find the cornice so it doesn't feel feasible.
I'm aiming to find a baseboard for the kitchen counters and screw it in from inside the closet, and then I hope the hardware store can help me with how to cover the joints.
I'm aiming to find a baseboard for the kitchen counters and screw it in from inside the closet, and then I hope the hardware store can help me with how to cover the joints.
Buy a 45 * 70 and cut into two pieces and wedge it above the gadrobe about 20mm in; they can preferably be a little too short. Screw straight through the gadrobe. Buy a shelf plan and have it pre-cut at the hardware store; it should be 3 mm lower than what you need, and the front piece should extend past the side piece plus 1 mm. Buy latex, place large blobs of latex on the joists and press firmly; it holds well. Latex along the top towards the ceiling.
I understand that I need to put up a trim against the ceiling behind the spacer and glue it on, as well as screw through the wardrobe from below.
But I was at a hardware store today and looked at ready-made plinths. They were fine in themselves, but the plastic corner piece that you put on the outer corner was quite dull. I'll check another hardware store tomorrow.
The alternative is to buy MDF and miter them? I'm considering trying that after all. A miter saw only costs 399 at Clas Ohlson. I understand the quality is questionable, but I only need to use it twice.
But I was at a hardware store today and looked at ready-made plinths. They were fine in themselves, but the plastic corner piece that you put on the outer corner was quite dull. I'll check another hardware store tomorrow.
The alternative is to buy MDF and miter them? I'm considering trying that after all. A miter saw only costs 399 at Clas Ohlson. I understand the quality is questionable, but I only need to use it twice.
The fascia on the pedestal is indeed white, let this be visible. Otherwise, you can buy a shelf and have it cut at the store. It will be better and easier than mitering.

For example, Beijer charges almost nothing to cut MDF into exact pieces, which you then get to paint white yourself. They probably miter as well if you ask them. Paint with lacquer, it looks the best. It should be a foam roller, but you can get help with that at K-Rauta, for example. Then you should buy a pack of caulk. With that, you can cover all screw holes, blemishes, etc. The carpenter's best friend!
Now I'm done. I chose to buy shelves and cut them out, then screwed them from inside the wardrobes and applied latex along all the edges. It turned out relatively simple and good enough (my ambition level is probably not on par with many others here on the forum).
I thank you all for the help. Without you, nothing would probably have been done at all.
I thank you all for the help. Without you, nothing would probably have been done at all.