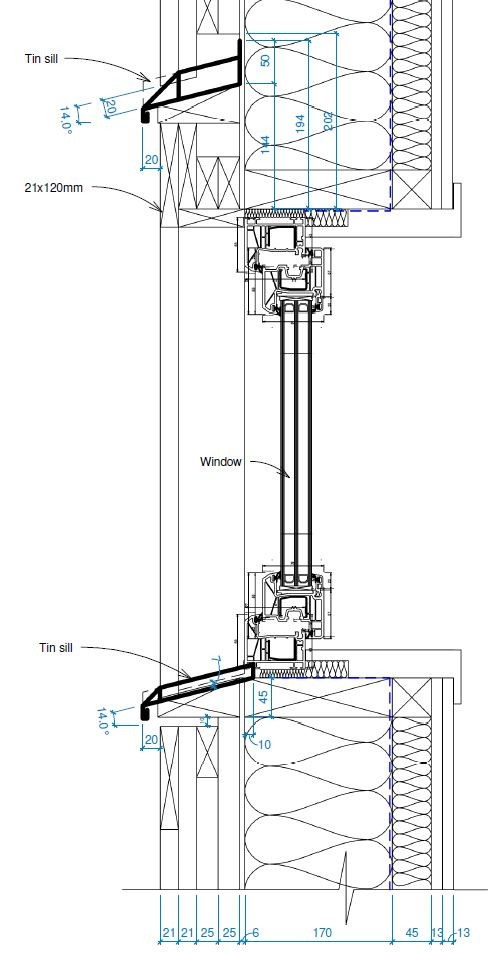
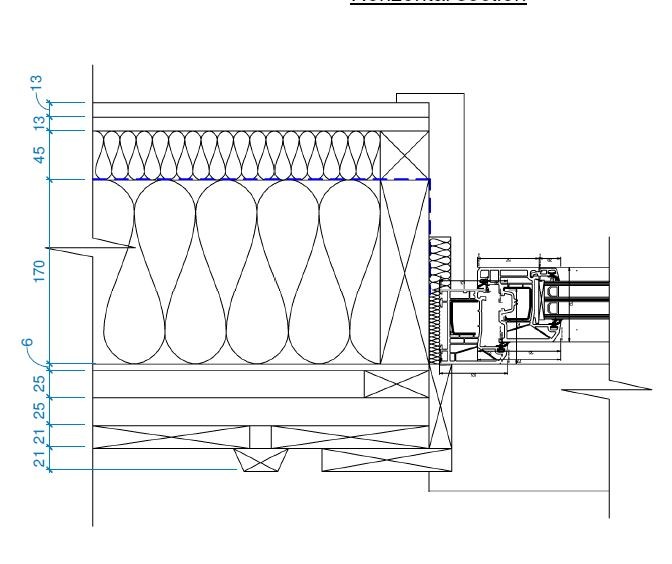
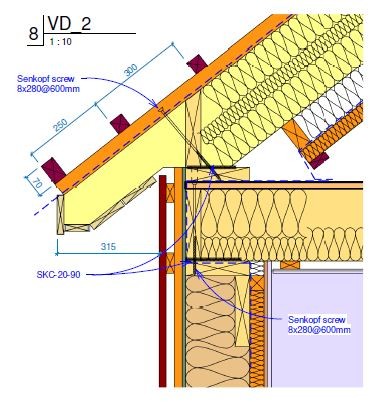
I am currently learning Revit and AutoCAD, and I've made significant progress, which is great fun. However, I am stuck when it comes to drawing an exterior wall detail with a roof connection. I tried following the wood guide, but it looks wrong when I do it.
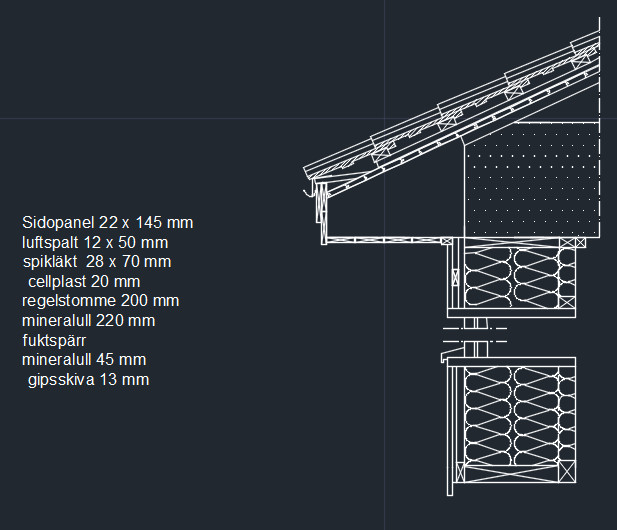
Image of my own attempt.
How does it look, have I drawn everything correctly? Then I wonder if I want a wall that is 300-450mm, what should I change to get that measurement and make it look good?
When dealing with wall thicknesses as large as those required by today's insulation standards, the wall construction must be divided into several parts. The primary and load-bearing part consists of vertical studs in dimensions ranging from 45x120 to 45x170 with a center-to-center distance of 600 mm. These studs are topped with a header, which is a horizontal beam of the same dimension. On both sides of this middle section, horizontal studs are attached to provide cross insulation. The dimensions of the horizontal studs are adjusted to achieve the desired total amount of insulation. Larger studs than 45x95 can become cumbersome. Today, it is popular to place the moisture barrier inside the inner insulation layer, allowing it to be used for electrical installation without breaking the moisture barrier.
On the outside, some form of windproofing is attached to the outer insulation. (Sometimes this is done without studs using boards attached with spacer sleeves). Outside the windproofing, nail battens are nailed, which also shape the air gap, vertical for horizontal external cladding and horizontal for vertical cladding. The size of the air gap is usually about 25 mm.
When you get to such large wall thicknesses as with today's insulation standards, you need to divide the wall construction into several parts. The primary and load-bearing part consists of vertical studs in the dimension 45x120 to 45x170 at c/c distance 600 mm. These studs are topped with a wall plate, which is a horizontal stud of the same dimension. On both sides of this middle section, horizontal studs are attached to create crossing insulation. The dimension of the horizontal studs is adjusted to achieve the desired total amount of insulation. Larger studs than 45x95 can become cumbersome. Today, it is popular to place the moisture barrier inside the inner insulation layer, allowing this to be used for electrical ducting without breaching the moisture barrier.
On the outside, some form of windproofing is attached over the outer insulation. (Sometimes the latter is done without studs using boards attached with spacing sleeves). Outside the windproofing, furring strips are nailed, which also give shape to the air gap, standing for horizontal external paneling and horizontal for standing ditto. The size of the air gap is usually about 25 mm.
Hi,
Thanks for the great explanation. I'm trying to learn as much as I can, but I must say it's difficult. I've tried to come up with a wall that is 300-450mm (as close to 300 as possible) for a villa, but I can't manage it. How much insulation, how large a moisture barrier? That's what I'm struggling with.
Is there a site where you can see how a wall is constructed with the measurements you want?
You can start from Träguiden's images. Try to think in principle. I don't think there is such a detailed guide as you are looking for. Then there's the option of five years at Chalmers or Teknis...
The primary and supporting part consists of standing studs in the dimension 45x120 to 45x170
You can definitely have larger dimensions for the standing stud framework.
We have 220x45 in our house built in 2010.
OOllehoff said:
I've tried to create a wall that's 300-450mm (as close to 300 as possible) for a villa but I can't manage
Our wall has 310 mm insulation. It's 45 mm on the outside + 220 mm in the standing framework + 45 mm on the inside.
Plastic film/vapor barrier 45mm into the insulation from the inside, so we have an "insulation layer," and 9mm exterior gypsum board outside of the outer 45. Outside of that 28x70 mm battens and horizontal Z-panel. On the inside, we have 18 mm wood paneling, no OSB or gypsum board.
If you want slightly thicker insulation, you can replace the 45x45 studs with 70x45, and get 360 mm insulation.
You can have any dimension you want for the supporting joists, but it is easier to build if they are not max size. It is also good to have three layers of insulation.
Paroc, I believe, is the one advocating for double stud walls? An outer load-bearing 45x120 and an inner 45x70? Then any choice of insulation thickness in between.
Otherwise, a thin wall is:
Insulation 45+145+45:
Panel 22
Batten 28
Insulation 45
Stud wall 145
Plastic
Insulation 45+horizontal stud
Plasterboard 13
This totals 298mm and is probably the absolute minimum one can build today. I think it's better to add a bit of insulation when you're building new, 450mm sounds reasonable
You can also build with lightweight studs and fill the wall with loose wool. Then you can choose exactly how thick you want the wall to be
You can absolutely have larger dimensions on the vertical framing timber.
We have 220x45 in our house built in 2010.
Our wall has 310 mm insulation. That's 45 mm outermost + 220 mm in the standing framework + 45 mm innermost.
Plastic foil/vapor barrier 45 mm into the insulation from the inside, so we have an "insulation layer", and 9 mm external plasterboard outside the outer 45. Outside that, 28x70 mm sparse paneling and horizontal Z-panel. On the inside, we have 18 mm wood panel, no OSB or plasterboard.
If you want a bit thicker insulation, you can replace the 45x45 battens with 70x45, and get 360 mm insulation.
KnockOnWood said:
You can absolutely have larger dimensions on the vertical framing timber.
We have 220x45 in our house built in 2010.
Our wall has 310 mm insulation. That's 45 mm outermost + 220 mm in the standing framework + 45 mm innermost.
Plastic foil/vapor barrier 45 mm into the insulation from the inside, so we have an "insulation layer", and 9 mm external plasterboard outside the outer 45. Outside that, 28x70 mm sparse paneling and horizontal Z-panel. On the inside, we have 18 mm wood panel, no OSB or plasterboard.
If you want a bit thicker insulation, you can replace the 45x45 battens with 70x45, and get 360 mm insulation.
Good morning and thanks for the help.
I am trying to understand as much as possible of what you wrote. But if it wouldn't be a problem, it would be super kind if you could write the materials as a list (first material from the outer wall to the last inner one which is plasterboard)
Then, I wonder if your wall would be approved for a villa built in 2018?
What is approved for walls in 2018 depends on the house's total energy consumption. If you have large, poor-quality windows, the other parts must have better insulation to compensate.
240-260mm thick insulation in walls is commonly standard in villas today.
But if there would be no problems, it would be super nice if you could write the materials as a list
No problem at all:
Outer wall Z-panel 22x120
Air gap 28mm (28x70 standing spaced panel)
Exterior gypsum 9 mm
Horizontal beams 45x45 + 45 mm Gullfiber insulation
Vertical beams 220x45 + 220 mm Gullfiber insulation
Vapor-tight plastic foil 0.2 mm
Vertical beams 45x45 + 45 mm Gullfiber insulation
Horizontal wood panel 18 x190 mm, (alternatively 1 or 2 x 13 mm gypsum in kitchen and wet rooms).
I have no idea how "approved" this is. No proper energy calculations have been made, either before or after the construction.
But the house "consumes" about 4,800 kWh/year including heating, hot water, ventilation and household electricity, and some heating and hot water in the stable. And heating sometimes in the guest room in the attic.
One should ideally start by considering the U-value one wants the wall as a whole to have. KOW's wall above likely has a U-value around 0.13, which is very good but not sufficient for a passive house or if one wishes to compensate for large window areas. To achieve a U-value of 0.10, an insulation thickness of about 405 mm is required (e.g., 45+145+145+70). Insulation manufacturers' websites are good sources of information. For example, http://www.paroc.se/losningar/byggisolering/vaggar/ventilerade-fasader-traregelvaggar
KOW's wall above probably has a U-value around 0.13, which is very good but not sufficient for a passive house or if you want to compensate for large window areas.
I don't have large windows, rather normal-sized according to the old 70s standard.
An 11x13 in each bedroom and two by the dining area, two 11x15 plus a patio door in the living room. Also some small windows in the kitchen and wet rooms.
I haven't understood why people want windows down to the floor or across entire walls. It just means you have to run the heat pump for cooling as soon as the sun comes out.
No, moderation in all things, balance is best, too much and too little spoils everything
I don't have large windows, rather standard-sized according to the old 70s norm.
An 11x13 in each bedroom and two by the dining area, two 11x15 plus a patio door in the living room. And some small windows in the kitchen and wet rooms.
I never understood why people want floor-to-ceiling windows or windows covering entire walls. It just leads to having to run the heat pump on cooling as soon as the sun comes out.
No, moderation in everything, moderation is best; too much and too little ruin everything
That was exactly what I thought when I built new. But with triple-glazed windows with some form of metal layer in them (mobile signal is terrible), the U-value of the glass is down to 0.5. It gets bright but not warm. We haven't even hung any of the curtains we've accumulated.

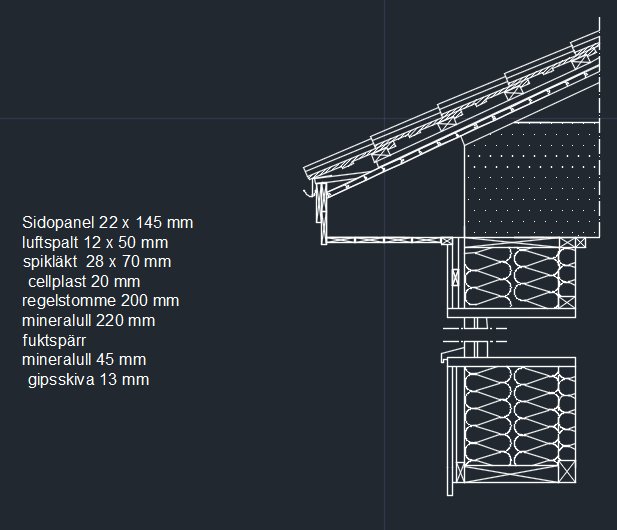



KnockOnWood said:
You can absolutely have larger dimensions on the vertical framing timber.