45,235 views ·
16 replies
45k views
16 replies
Nail z-panel - where should the nails be placed?
I am in the process of setting up 22x145 double-sided tongue and groove paneling a.k.a. z-panel (and some other names).
The panel will be mounted vertically, and I have battens horizontally with 28x70 at 60 cm centers.
Now to the question, I have read in the forum about other types of paneling, e.g., board and batten or batten paneling, that people have opinions on the number of nails per board and how they are placed. In the case of the z-panel, I am now unsure.
I saw at Beijer in Kungsbacka that they placed two nails in each batten, a bit inside the groove. In my case with 5 battens, that would mean 10 nails per board.
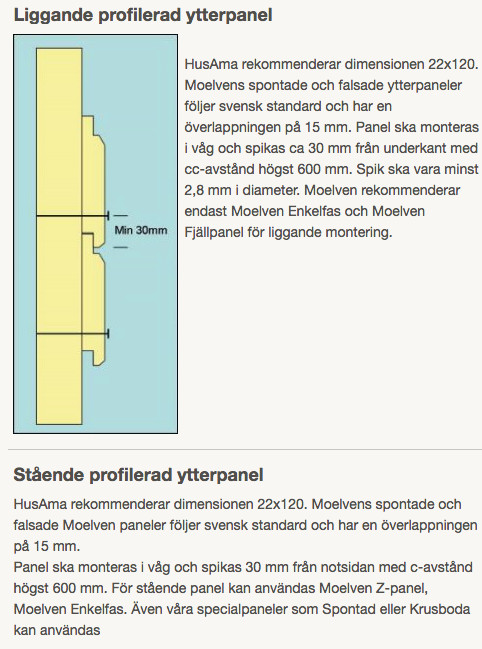
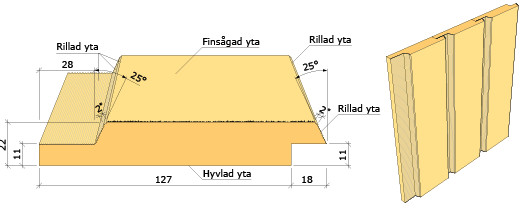
When I look at Moelven's description for paneling (http://www.moelven.com/se/Produkter...el/Ytterpanel-Gran/Montering-Ytterpanel-Gran/), it seems like they suggest placing one nail in each batten (in my case 5 nails per board). It is not exactly the same panel as mine; my boards are beveled all the way to the edge (as in the attached image from Träguiden). I attach an image from Moelven below, note that the picture refers to horizontal paneling but I interpret the text below as suggesting the same with vertical.
With just one nail, I imagine there is a high risk that the boards will warp.
Is there any disadvantage to using two nails per batten, other than requiring many nails?
Right now, the plan is to place the nails on one side as Moelven suggests and then symmetrically on the other side - that's how I saw it at Beijer.
Do you have any opinions or suggestions?
The panel will be mounted vertically, and I have battens horizontally with 28x70 at 60 cm centers.
Now to the question, I have read in the forum about other types of paneling, e.g., board and batten or batten paneling, that people have opinions on the number of nails per board and how they are placed. In the case of the z-panel, I am now unsure.
I saw at Beijer in Kungsbacka that they placed two nails in each batten, a bit inside the groove. In my case with 5 battens, that would mean 10 nails per board.
When I look at Moelven's description for paneling (http://www.moelven.com/se/Produkter...el/Ytterpanel-Gran/Montering-Ytterpanel-Gran/), it seems like they suggest placing one nail in each batten (in my case 5 nails per board). It is not exactly the same panel as mine; my boards are beveled all the way to the edge (as in the attached image from Träguiden). I attach an image from Moelven below, note that the picture refers to horizontal paneling but I interpret the text below as suggesting the same with vertical.
With just one nail, I imagine there is a high risk that the boards will warp.
Is there any disadvantage to using two nails per batten, other than requiring many nails?
Right now, the plan is to place the nails on one side as Moelven suggests and then symmetrically on the other side - that's how I saw it at Beijer.
Do you have any opinions or suggestions?
Know-It-All
· Västra götaland
· 10 922 posts
OK, that's how I imagine it too.Dan_Johansson said:
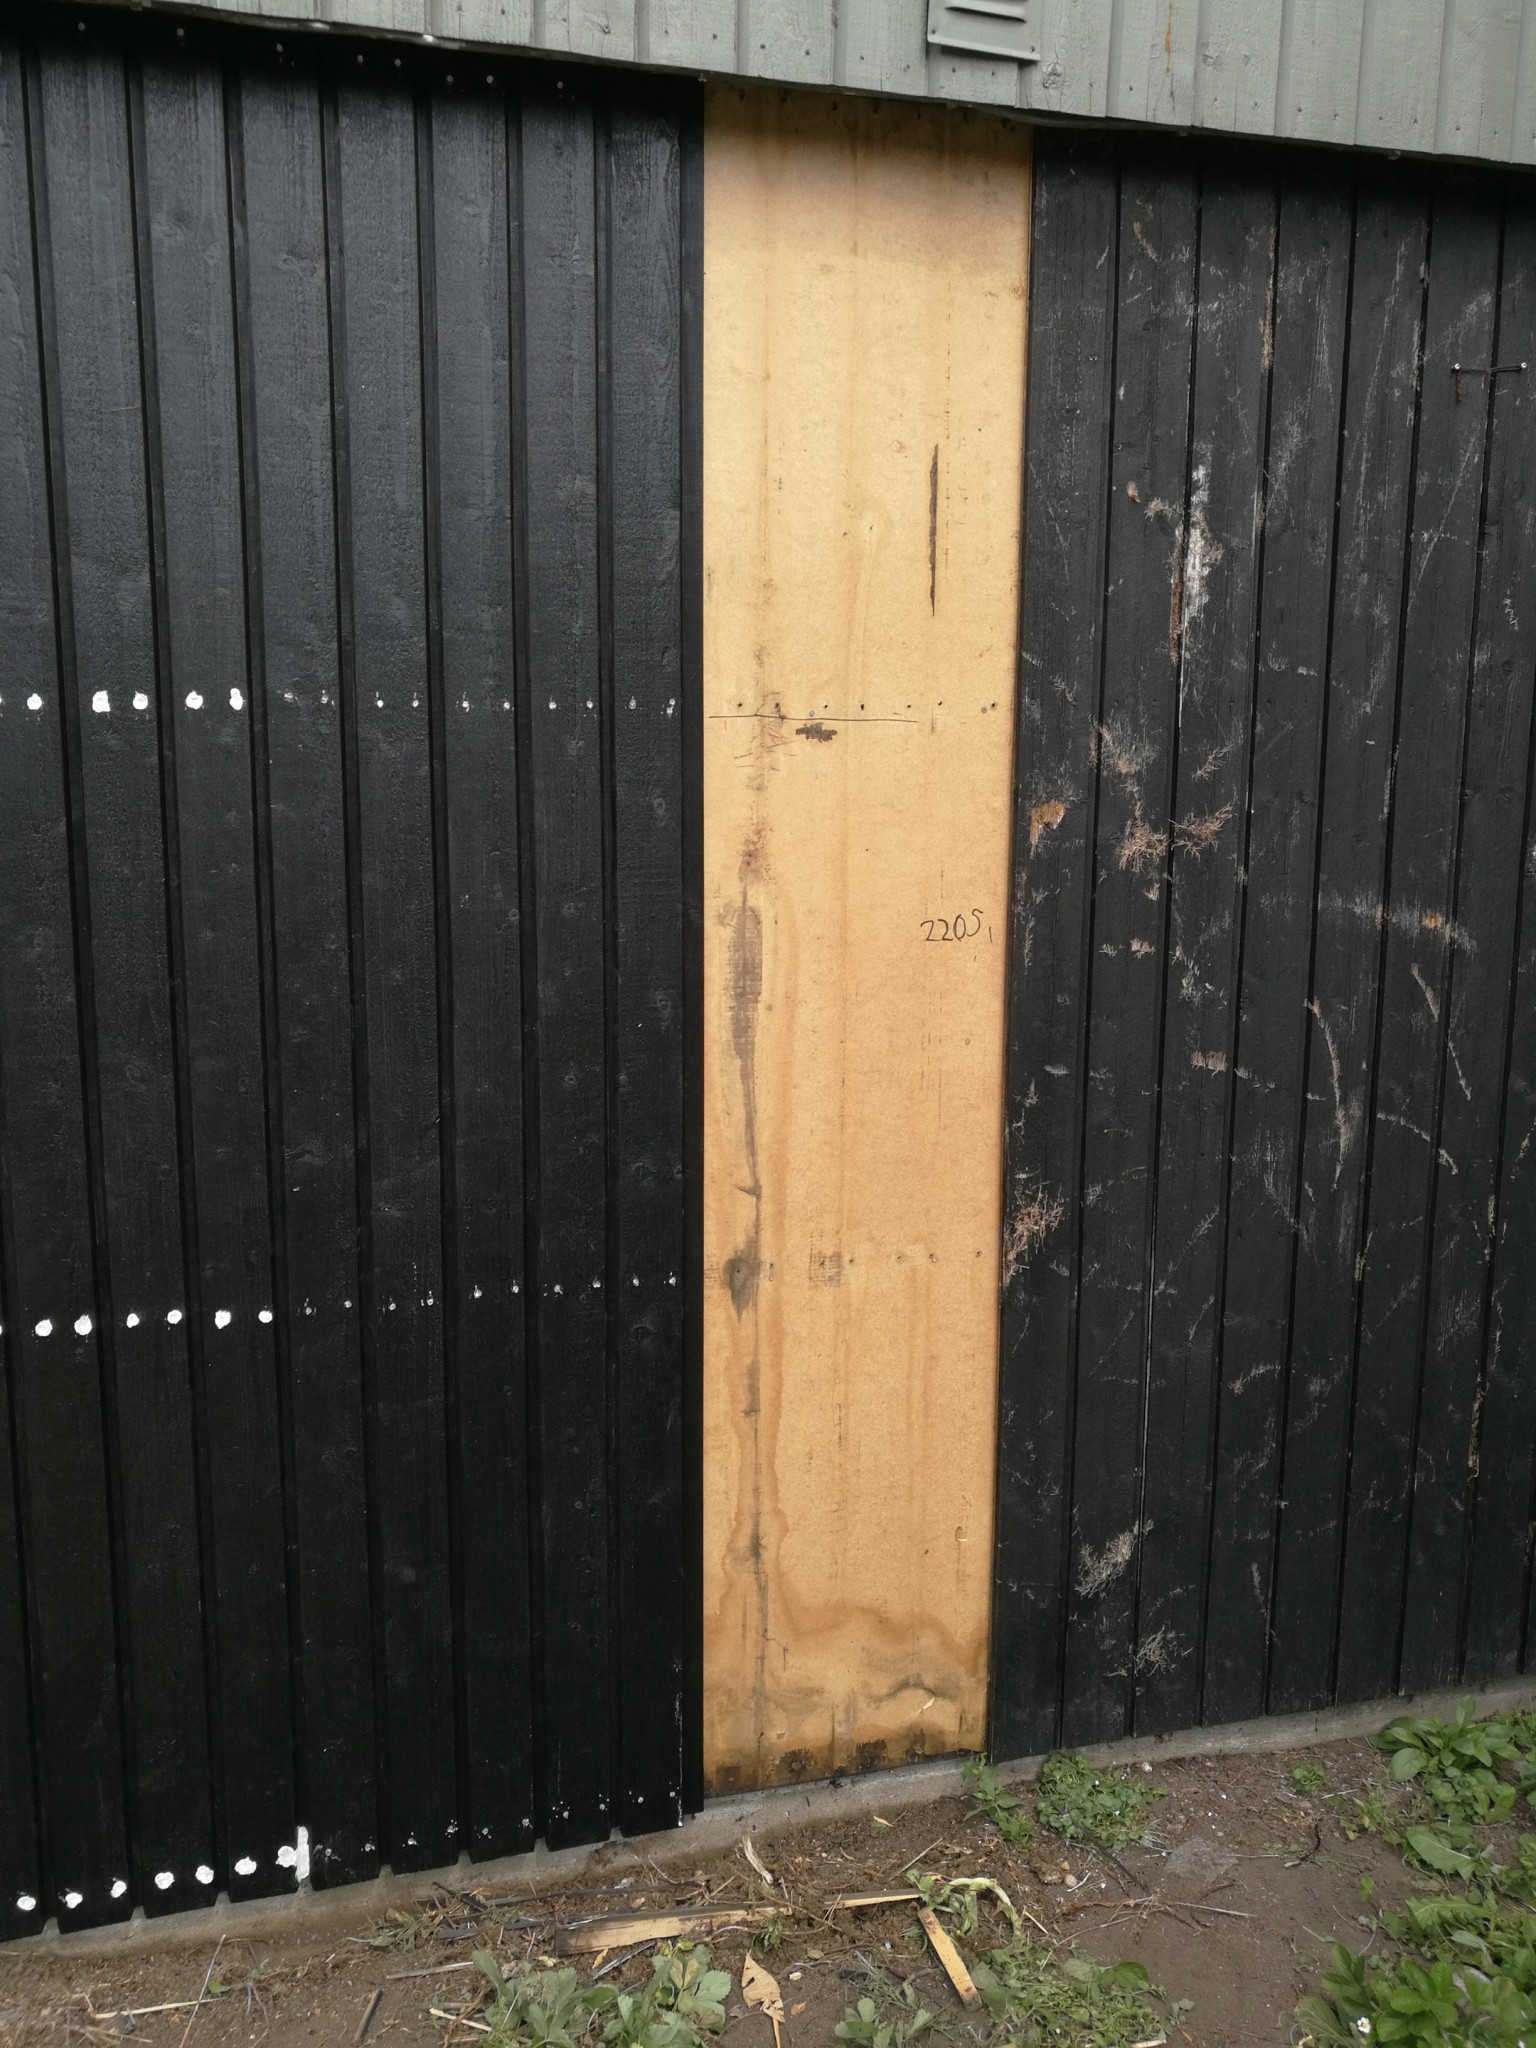
What is the white around your nails? Outdoor sealant because the nails went in too far?
What is the coolest thing in the toolbox? Chainsaw? ;-)
Know-It-All
· Västra götaland
· 10 922 posts
The white is primer...P Prosit said:
") I don’t care much if the nail holes show, but there will be a small crater that you don’t want water standing in... If you’re a bit more particular, you could surely use something more filling... It’s not easy to get an even result with an air nail gun.. (yes, there are two nails in the same spot... )
I don’t care much if the nail holes show, but there will be a small crater that you don’t want water standing in... If you’re a bit more particular, you could surely use something more filling... It’s not easy to get an even result with an air nail gun.. (yes, there are two nails in the same spot... )Spot on about the chainsaw..

I'm torn between hand nailing and using a nail gun myself - I'm not too keen on driving in 2000+ nails by hand, but I haven't checked if I can adjust the pressure to a suitable level on the Biltemapickan so I can drive in the last centimeter by hand.The white is the base color...
Absolutely right about the chainsaw ..
By the way, what nails did you use? 2.8x75 or something like that?
Know-It-All
· Västra götaland
· 10 922 posts
It usually works fine to lower the pressure... I used what I had, I think they were 60 mm, but that might be a bit on the short side...

One or two nails per rule?
If you look at your picture

you normally only nail on the right side. What benefit would a nail on the left side provide?
The nail on the right side compresses the joint between the boards, but if there’s also a nail at the edge of the lower board (the one with the notch), how does that help?
We do, in fact, only have horizontal Z-paneling on our three houses, two built by professionals, one by me, an amateur.
And I would actually advise against using Z-paneling vertically. Due to the geometry, it's easy for gaps and leaks to form where rainwater can blow in if it is vertical.
I have experience with this from our previous house, where we had to replace an entire gable that had rotted all the way to the gypsum inside. That house, however, didn’t have an air gap behind the panel.
If there is a risk of driving rain and strong winds, I think Z-paneling should be installed horizontally to avoid leakage. I have read this recommendation somewhere, and if you look at the small towns in Norwegian Sørlandet, you can see that horizontal paneling is extremely common. And it’s not a fashion trend, like horizontal paneling is here in Sweden, but has been very common for a long time.
But maybe you don't have the option to choose between horizontal and vertical? Where is the house located?
And set the panel so the wind doesn't blow into the gap, considering the prevailing wind direction.
I hope this doesn't sound too negative now
And by the way, we've used regular 75x2.8 mm galvanized wire nail.
Except on the large house, which is nailed by machine. And there we had to fill with outdoor sealant in the "nail holes" before we painted. The nails were driven about 5 mm in. But it looks great now after painting
If you look at your picture
you normally only nail on the right side. What benefit would a nail on the left side provide?
The nail on the right side compresses the joint between the boards, but if there’s also a nail at the edge of the lower board (the one with the notch), how does that help?
We do, in fact, only have horizontal Z-paneling on our three houses, two built by professionals, one by me, an amateur.
And I would actually advise against using Z-paneling vertically. Due to the geometry, it's easy for gaps and leaks to form where rainwater can blow in if it is vertical.
I have experience with this from our previous house, where we had to replace an entire gable that had rotted all the way to the gypsum inside. That house, however, didn’t have an air gap behind the panel.
If there is a risk of driving rain and strong winds, I think Z-paneling should be installed horizontally to avoid leakage. I have read this recommendation somewhere, and if you look at the small towns in Norwegian Sørlandet, you can see that horizontal paneling is extremely common. And it’s not a fashion trend, like horizontal paneling is here in Sweden, but has been very common for a long time.
But maybe you don't have the option to choose between horizontal and vertical? Where is the house located?
And set the panel so the wind doesn't blow into the gap, considering the prevailing wind direction.
I hope this doesn't sound too negative now
And by the way, we've used regular 75x2.8 mm galvanized wire nail.
Except on the large house, which is nailed by machine. And there we had to fill with outdoor sealant in the "nail holes" before we painted. The nails were driven about 5 mm in. But it looks great now after painting
Know-It-All
· Västra götaland
· 10 922 posts
Now, I am a happy amateur as well, but most of the old paneling I've seen usually has edges that curve out from the backside, and I've reasoned that it's better to have two nails that hold against the "cupping" than one....
I am old-fashioned and believe that paneling should be nailed with regular galvanized three-inch nails that you drive in with a hammer. Two nails per nail rule ...... and the nail line must not be straight. If you don't let the nail line become uneven and zigzag a little, the nail rule usually cracks over time and then the boards will come loose.
Now I have tested the nail gun on some loose pieces, it didn't go well - if I set it to low pressure it doesn't feed any nails but makes a mark in the panel when the firing pin hits. If I set it just right to get nails, they often go too deep (I would prefer to have about 1 cm left to hammer in by hand but I can't achieve that). So I'll have to nail by hand.
In my case, outside the wind barrier I have: 50 mm Isover facade board, 28 mm vertical battens for air gap, 28 mm horizontal nail battens, i.e. from the outer side of the panel I have 128 mm so there is no risk of perforating it. 75 mm nails barely reach the facade board, missing a few mm, so that length should not be a problem - but it will mean more hammering for sure. I prefer to stick to 2.8 mm diameter but can of course arrange shorter nails like 50-60 mm, but I happen to have a lot of 2.8 x 75 lying around.
I will put 2 nails per batten to minimize the risk of the boards warping.
Member
· Etelä Pohjanmaa
· 2 467 posts
Two nails per rule. Since you have half-lapped paneling where the back lap is missing, there will be gaps when the wood dries and warps if you don't place nails on both sides of the board. The panel should be cut so that you have a smiley face at the end, i.e., the heartwood facing outwards, but the sawyers don't have time to stand and turn the boards. The working pressure on the nail gun is usually 6 to 8 bar. You adjust how deep the nail goes by pressing the gun harder or softer against the surface. After twenty nails, you'll have learned. If you hold the gun too loosely, it will bounce a bit off the board and double-nail.
You should actually get a system in Sweden for naming paneling so you don't have a lot of different names for the same panel
In Finland, that panel was called UYV (where U stands for ute or rough-sawn surface, Y for half-lapped, and V for beveled).
You should actually get a system in Sweden for naming paneling so you don't have a lot of different names for the same panel
In Finland, that panel was called UYV (where U stands for ute or rough-sawn surface, Y for half-lapped, and V for beveled).
Regarding nail length, the result naturally depends on what you are nailing into.
If you're nailing 22 mm panels into 28 mm battens, using three-inch nails is overkill, 22+28=50.
But there are also 2.3x60 mm wire nails, which I would probably choose.
At my place, with horizontal panels, the 28 mm nailing battens are attached to the vertical studs with 9 mm exterior plasterboard in between.
So 22+28+9=59 mm means the 75 mm nail also goes a bit into the stud, making it stable and good
Now the first side is fixed, it was 2.8 x 75, 2 per rule. A total of just under 1000 hand-nailed nails on that side, feeling it a bit in the wrist.
Noted that it went very smoothly when I made a mail/jig where the boards were pre-nailed by the wife and I then just placed them against the wall, aligned the nails with the cross laser to the previous nails and drove them in (spirit level too, of course, so it didn't get crooked over time). Straight nice rows of nails, hopefully, the nail rule behind won't crack.
Now the gable is the next subproject.
Raising this a bit as you seem knowledgeableKnockOnWood said:
Regarding nail length, the result naturally depends on what you are nailing into.
If you're nailing a 22 mm panel into 28 mm battens, three-inch nails are overkill, 22+28=50.
But there's also 2.3x60 mm wire nails, which is probably what I would choose.
For me, with horizontal siding, 28 mm battens are placed on the vertical studs with 9 mm exterior gypsum in between.
So 22+28+9=59 mm means the 75 mm nail also goes into the stud a bit, making it stable and secure
I'm in the process of installing 30mm west coast board on old wooden facade. Then 28mm battens and horizontal 22x120 z-board.
I've been thinking about nail length for the battens and the panel. Do you have any good thoughts/suggestions?