To lower a ceiling in a small toilet measuring 110 x 160cm doesn't require much material, just studs, drywall, and drywall screws. But which studs should one use?
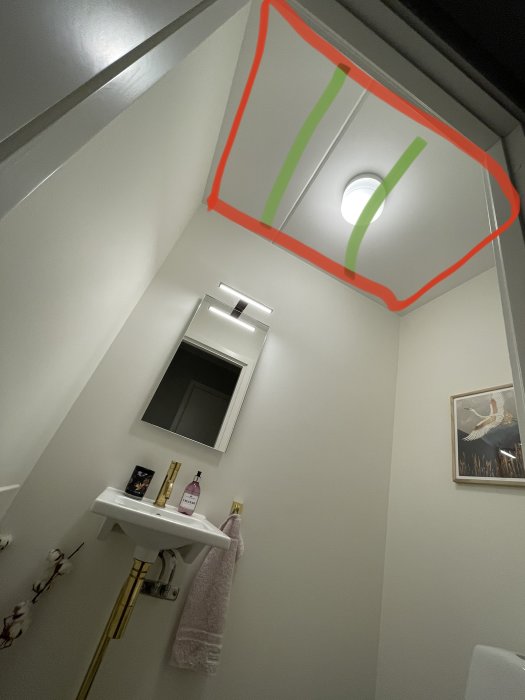
I understand the principle: you fix studs along the walls (Red in the picture) so the underside of the stud matches the height you want the new ceiling at. Then cross studs (Green in the picture) for stabilizing the board. 2 should suffice in my case. Do you use regular metal studs? 70mm or what is normal? For both studs?
The spotlight extends about 40mm.
Drywall? Regular drywall that you cut to size and screw in place?
Then, of course, filler, etc., and paint.
I feel the task itself is quite simple, but I don't want to mess up by buying the wrong type of stud and such. I know nothing about this kind of thing, what materials should be used, etc.
So please contribute anything I might have missed.
The standard is 45 mm for the spotlights. Check what distance they require from the surroundings first. Then gypsum, carefully spackle, possibly some ceiling fabric as well. It's good to have help to get the gypsum boards up.
Standard is 45 mm for the spotlights. Check what distance they require to the surroundings first.
Then gypsum, plaster carefully, maybe some ceiling cover too. It's good to have help to get the gypsum boards up.
Thanks!
Ceiling cover? What is that?
Was thinking of trying to get a whole gypsum board up without joints, but maybe that's a bit too difficult?
Sounds like it would work well with a 45mm metal stud.
"Low-profile, efficient, and tiltable downlight, adapted for mounting in slatted panels 28mm and approved for installation directly against insulation.
DIMENSIONS AND INSTALLATION
Operating environment Indoor / bathroom (ceiling area 1), Outdoor
IP class 44
Protection class II
Installation Recessed
Fastening Mounting spring
Ceiling thickness Range (mm) 3-26
Fire safety marking Approved for installation in insulation
Protection cover 7466700, 7466701, 7466702
Approval marking CE, SELV
Glow-wire test IEC 695-2-1 (°C) 650
Height (mm) 41
Diameter (mm) 95
Weight (kg) 0.262
Min. installation dimension (mm) 170x120x38
Recessed part height (mm) 38
External part height (mm) 3
Cutting Ø (mm) 83-85”
You might need a bit more to attach the drywall to. It's common to have as "worst" cc40 on sparse paneling (often 28x70mm) which is screwed into the studs. If you instead choose cc30, you don't need sparse paneling "crosswise" on the short ends. If you attach the board with sparser studs/paneling, it will sag.
The sparse paneling needs to be attached to studs, with a cc distance that I can't remember, but maybe cc60, if you choose 28x70 gelspanel.
You can find the construction details in the documentation from the drywall manufacturers. The last time I looked, I checked Norgips, then Gyproc had put their instructions on pages requiring a login. But that was several years ago.
The lamp you describe, is it a halogen lamp, or LED?
I would choose a 45x45 wooden frame and a white-painted ceiling in Masonite, so you save a lot of time instead of fussing with plasterboard
Not a bad idea if you can fit in a whole sheet. Need to figure out how I meet the condition that the ceiling is exactly straight and not a rhombus or similar.
You might need a bit more to attach the plasterboard to. Typically, the minimum is cc40 on sparse paneling (often 28x70mm) which is screwed into the studs. If you instead choose cc30, you don't need to have sparse paneling "across" at the short ends. If you attach the board with sparser studs/panel, it will sag.
The sparse panel needs to be attached to studs, with a cc distance that I don't remember, but perhaps cc60 if you choose 28x70 spare panel.
You can find the constructions in documentation from the plaster manufacturers. I looked at Norgips last time I reviewed, back then Gyproc had put their instructions on pages you had to log into. But that was a few years ago.
The lamp you're describing, is it a halogen lamp or LED?
So metal studs around then sparse panel with about 40cm cc? Can I manage to build as I've drawn then? Or do I need to build in the box directions? Would be three if I count correctly?
CC BUILDING MEASUREMENTS
0cm metal stud
40cm sparse panel
80cm sparse panel
120cm sparse panel
160cm metal stud
What kind of roof is it now? Is there any roof tiles/spars above the existing roof? If so, you can just install 45*45 as you planned and then any board of your choice as the ceiling.
What kind of ceiling is it now? Is there any roof tile/spacing above the ceiling that's in place? In that case, it's just a matter of adding 45*45 as you planned and then any board of your choice as the ceiling.
It's a concrete ceiling, so I have quite a bit of freedom. Except for avoiding hitting the electrical conduits if I drill upwards into the concrete.
Not entirely wrong if you can fit in a whole panel. I have to figure out how to ensure the ceiling is exactly straight and not a rhombus or similar.
I was referring to the thin pre-painted panels available at the building store. Convenient but expensive. If it's a small area, they are exceptionally easy to use.
Vi vill skicka notiser för ämnen du bevakar och händelser som berör dig.
")


Tekniker said:
Thank you!