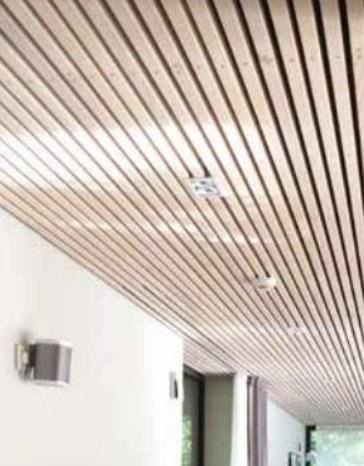
Building a new house and have long been eyeing so-called slatted ceilings (see attached image). Does anyone know how to build one yourself? How do you handle the mounting? I would prefer a concealed mounting. Anyone who has built their own slatted ceiling who can give me tips?
Perhaps place the ribs at the correct C/C and then screw-glue battens on top. So screw through the batten and into the rib. Then lift up the whole package and fasten everything to the ceiling through the batten, between the ribs
The main challenge is getting the slats completely parallel. The slightest deviation is clearly visible, especially at 8 meters in length. This requires the right methodology and high material quality. You can either use nice screws that withstand exposure, like chrome-plated countersunk brass, list screws that can be filled over afterwards, or screw holes that are plugged. A nail gun can probably also be used. The edges of the slats can ideally be slightly beveled. There are also metal slats in suspended ceiling systems, but that tends to be both expensive and dull.
Ribbed ceilings are incredibly beautiful.
The swimming pool here in Falun has that on the ceiling. I've sat and been fascinated by the quality of it several times.
What struck me is how perfect the installation and form are.
There aren't any knots. So I've gotten the idea that it's quarter-sawn pine that's been aged.
The mounting is like in your picture, visible and of quality. Even spacing on the ribs and nails.
The question is whether a nice mounting enhances the appearance as @justusandersson suggests.
I think if you're going to install such a ceiling, it has to be perfect; otherwise, it just looks wrong.
So with good materials that have been properly dried and careful work, it will look amazing in the right space.
I really hope you do it and share your progress along the way.
Have often thought about this.
My theoretically best solution so far is to place a black cloth behind and then shoot with 18G brad nails. Just haven't had the chance to test it yet
Many times I've thought about this. My best theoretical solution so far is to put a black fabric behind and then shoot with 18G brad nails. Just haven't had the chance to test it yet
Black fabric is a good solution, but 18g brad nails won't hold. Maybe 16g.
I think that you fire more frequently/more shots with 18G, I feel that 16G creates too large heads
But probably it is like you say, minimum 16G
I did a test with some slats and nails but I think the heads are too visible, even though there is some distance to the ceiling. Possibly you get a good result if you apply white pigmented oil afterward.
Black fabric underneath, I don't believe in considering fire, etc. However, there is black diffusion plastic that one might be able to use...
I did a test with some strips and nail gun tacks but I think the heads are too visible, despite the fact that there is a certain distance to the ceiling. Possibly you get a good result if you subsequently apply white-pigmented oil.
I don't trust black fabric underneath considering fire etc. However, there is black diffusion plastic that one might use...
In that case, screws are probably the best, alternatively putting a million furniture angles on the ceiling
Try burning plastic, then I think you'd rather have acoustic fabric
I did a test with some battens and brads but I think the heads are too visible, despite there being a certain distance to the ceiling. Possibly, you get a good result if you subsequently apply white-pigmented oil.
I don't believe in a black fabric underneath due to fire concerns, etc. However, there is black diffusion plastic that you might be able to use...
Black fabric is a good solution but 18g brad nails won't hold. Maybe 16g.
18g works fine for planks on the ceiling if it's a reasonably normal-sized plank and the fastenings are at an appropriate level.
I've installed a plank ceiling (21/43 I believe (Byggmax planed)) with 18g. Used 50mm brad nails, straight shots, cc1000, then added an extra support beam "in the middle of the room" for where I installed ceiling lights, there I used angled shots (about 30*). If you need to fasten something in the ceiling (a heavier light, for example), you can simply use a long screw that goes through the plank into the support frame for extra fastening if desired. Now I should mention that I obviously didn't hang from the ceiling or anything like that. It's in the family room in the basement of our cabin, and with very varying humidity, every plank has twisted/bent a little, but I think it adds a bit of charm. We bought cheap wood from Byggmax because it was for the cabin, and it was better than a bunch of visible electrical, water, drainage pipes, etc. I'll see if I can find a picture! Unfortunately, I won't be going there for a while. We used 45/45 as the support beam, with those long screw-plugs (?) that you hammer in and screw the last bit. Ran white/light VPR pipes along the support beam and then stapled to the ceiling; they are not visible because it becomes a bit like in the picture, where it's "dark" above. We have a white concrete ceiling, and it is barely noticeable between the gaps.
The edges of the planks in our ceiling are straight, and if I had the choice, I would prefer rounded edges, which it appears to be in the picture. But straight doesn't look bad at all; it just creates much "sharper" edges on the planks.
We oiled them quickly once with some cheap white-pigmented "oak oil." They were cut, oiled, and installed in the same run, maybe allowed to dry for half an hour.
It's all for aesthetics, and the brad nail holds well. You typically use 18g on door casings, and I think they are subjected to much more impact than ceiling planks. 18g is practically invisible, and if you finish with a coat of oil/stain after installation, it disappears entirely.


FreQa said: